Celeste

Conditions of use of the material provided
It is forbidden to modifiy, change the name, take off the watermarks or alter the tubes.
It is forbidden to share them in groups or offer them on your site, blog or forum.
If you want to use them to create a tutorial, you must ask the permission of the authors.

Sybel has the permission of the creators to use their tubes, masks and decorations
Thank you to all of them.
Without their beautiful creations, no tutorials could be written.
Sybel uses PSPX6 to create her tags
I use PSPX8 to create my tags
but you can realize these tutorials with any other version of PSP
Matérial

open all tubes
window/duplicate. Close the originals and work with the copies
open the mask and minimize it to tray
Plugins
impressionist - Fine Brush Hairs + Old Brusch Stamp
FM Tile Tools - Blend Emboss
Graphics Plus - Quick Tile II
Colors palette
1 --> brown : #602515
2 --> dark brown: #181615
3 --> black : #000000
4 --> yellow : #c4bd8b
use the pencil to follow the steps
left click to grab it

Realization
Step 1
open a new transparent raster layer 900 * 550 pixels
in the materials palette, prepare a linear gradient, using the brown colors
or your own colors according to your tubes

flood fill the layer ith the gradient
Step 2
copy/paste as new layer the misted landscape (or your own misted tube)

layers > merge > merge down
effects > plugins < Impressionist > Paint – Fine Brush Hairs

once more, copy/paste as new layer the misted landscape
blend mode : Screen – opacity : 68%
Step 3
selections > select all
layers > new raster layer
copy/paste into selction the fractal image « fractal RndFX 5 bd 8 »
selections > select none
effects > edge effects > enhance more
effects > plugins > FM Tile Tools > Blend Emboss > default settings
opacity of the layer : 74%
Step 4
selections > select all
layers > new raster layer
copy/paste into selection the image « fractal synth 2 bd 28-11-14 »
selections > select none
opacity : 74%
Step 5
copy/paste as new layer the character tube (don’t forget to erase the watermark)
don’t move it
effects > image effects > seamless tiling > default settings

effects > plugins > Impressionist > Paint –Old Brusch Stamp

blend mode : Dissolve
effects > plugins > FM Tile Tools > Blend Emboss > default settings
Step 6
once more, copy/paste as new layer the character tube
don’t move it
Step 7
image > add borders > check « symmetric » > 2 pixels black
effects > 3D effects > buttonize

image > add borders > 2 pixels color 4 (yellow)
image > add borders > check « symmetric » > 2 pixels black
image > add borders > check « symmetric » > 50 pixels color 4
select this large border with the magic wand tool
effects > reflection effects > kaleidoscope

keep the selection active
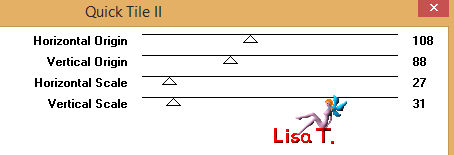
effects > plugisn > Graphic Plus > Quick Tile II
selections > select none
image > add borders > 5 pixels black
Step 8
copy/paste as new layer the decoration tube don’t move it
layers > merge > merge visible
Step 9
apply your watermark
image > resize > 1000 pixels width (or other)
Animation (optional)
I use UGA to create my animations
the one I used for this tag is provided with the material (type .pdf)
apply this animation as many times as you like
according to the software you use to animate you work, you can choose another animation (of course)
you will find many free animations if you pay a visit to Simone’s site
thank you to her for her beautiful work

if you want some help to create your animation with UGA, you can use the tutorial I wrote
click on "Mister Rabbit" to see to this tutorial

your tag is finished
Thank you to have realized it
Don’t hesitate to write to me

if you have any problem
or to send her your creations
It will be a real pleasure to see them and present them at the end of this tutorial
Your Creations
coming soon......
Back to the board of Sybel’s tutorials
board 1  board 2 board 2

|