

You will find the original tutorial here
:

This tutorial is a personal creation.
Any resemblance with another one would be only pure coincidence.
It is stricly forbidden to modify tubes, to change their
name or take off the matermarks,
To present them on your sites or blog,
To share them in groups,
to make a bank of images, or to use them on lucrative purposes.

Thank you to respect Animabelle’s work and the tubers
work.
Don’t hesitate to warn me if you have any trouble
with this translation,
and I’ll try to fix the problem as quickly as I can

Animabelle works with PSPX9 and I work with PSP 2019
you can follow this tutorial with another version of PSP,
but the result might be slightly different

Supplies
tubes - masks - selections - gradient

TIP 1 -> if
you don’t
want to install a font -->
open it in a software as « Nexus Font » (or
other font viewer software of you choice)
as long as both windows are opened (software and font),
your font will be available in your PSP
TIP 2 -> from PSPX4,
in the later versions of PSP the functions « Mirror » and « Flip » have
been replaced by -->
« Mirror »has become --> image => mirror => mirror
horizontal
« Flip » has become --> image => mirror => mirror
vertical

Plugins needed
AP [Lines]
FM Tile Tools
Simple
Alien Skin Eye Candy 5: Impact
Toadies
MuRa's Seamless
Filter Factory Gallery J
Nik Software
Thank you Renée Salon for sharing your plugins page

 
Use the pencil to mark your place
along the way
hold down left click to grab and move it
 |
 
1
duplicate all the tubes and work with the copies to preserve
originals
save your work often in case of problems with your psp
2
use the Dropper tool to pick up your colors into your tubes
and misted images
Animabelle chose these :
color 1 => #ecdfe5
color 2 => #882a45
color 3 => #c9ddea
color 4 => #130d0f
color 5 => #6f4164
don’t hesitate to change blend modes and opacities
of the layers to match your personal colors and tubes
3
place the gradient into the folder « gradient » or
PSP general folder
place the selection into the folder « selection » or
PSP general folder
open the masks and minimize to tray
open a new transparent image 800 * 500 px
flood fill with the gradient provided with the following
settings
you can follow a tutorial to learn how to change colors
into an existing gradient HERE
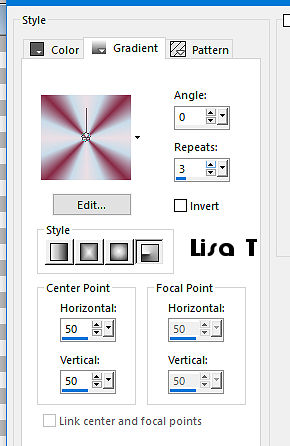
effects => image effects => seamless tiling => default
settings
adjust => blur => radial blur
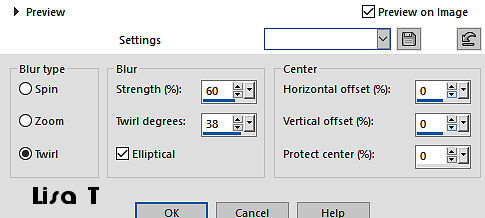
4
layers => duplicate
image => mirror => mirror vertical
blend mode of the layer : Multiply
layers => merge => merge down
effects => edge effects => enhance more
5
layers => duplicate
image => rotate => free rotate
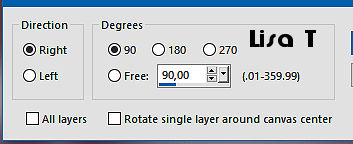
effects => texture effects => mosaic
/ Glass
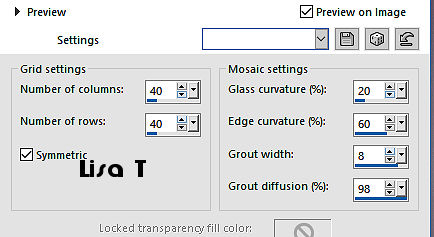
image => mirror => mirror horizontal
effects => reflection effects => rotating Mirror
/ 0 / 180 / tick « reflect »
6
layers => new mask layer => from image / « Narah_mask_0179 » /
untick « invert mask data »
layers => merge => merge group
effects => image effects => seamless tiling => default
settings / tick « corner » « bidirectional » « linear »
0 / 0 / 100
effects => 3D effects => drop shadow => 0 / 0
/ 30 / 10 / color 4 or 5
7
layers => new raster layer
effects => plugins => AP Lines => Lines Satin
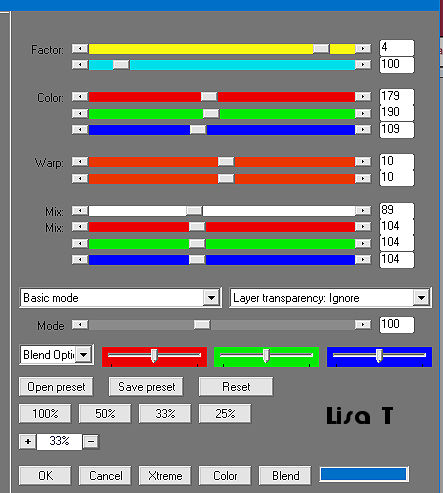
blend mode of the layer : soft light /
opacity : 30%
effects => reflection effects => rotating Mirror
(same settings as before)
layers => merge => merge visible
effects => plugins => FM Tile Tools / Blend Emboss
/ default settings
8
layers => duplicate
layers => new mask layer => from image / « Narah_mask_1164 » /
untick « invert mask data »
layers => merge => merge group
blend mode of the layer : screen
9
layers => duplicate
image => mirror => mirror vertical
layers => merge => merge down
image => mirror => mirror horizontal
effects => reflection effects => rotating Mirror
(same settings as before)
10
highlight bottom layer
selections => load-save selection => from disk => selection
# 1
adjust => blur => gaussian blur / 30
selections => select none
11
copy / paste the misted tube as new layer
blend mode of the layer : soft light
effects => edge effects => enhance
12
highlight top layer
layers => new raster layer
enable the Selection tool / custom selection

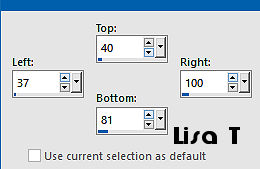
flood fill selection with color 1
selections => modify => contract => 2 px
edit => Cut
13
highlight bottom layer
selections => promote selection to layer
layers => arrange => move up TWICE
adjust => blur => gaussian blur / 30
effects => plugins => Alien Skin Eye Candy 5 Impact
/ Glass
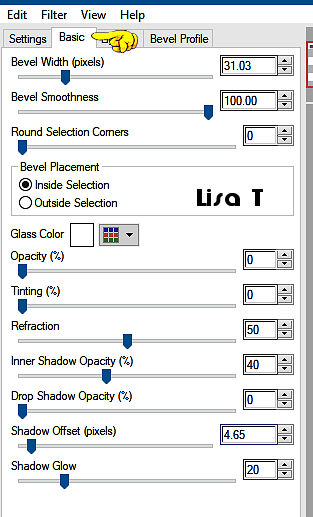
selections => select none
14
highlight top layer
layers => merge => merge down
effects => 3D effects => drop shadow => color
1
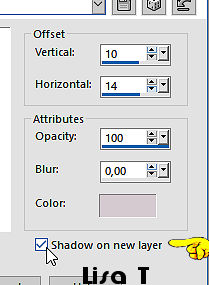
the shadow layer is highlighted
selections => select all / selections => float / selections
=> defloat
selections => modify => contract => 2 px
edit => Cut
selections => select none
15
highlight layer above « promoted selection »
layers => merge => merge down
effects => 3D effects => drop shadow => 13 / 13
/ 100 / 0 / color 4 or 5 / UNTICK the box « shadow
on new layer »
effects = > plugins => Simple => Top Left Mirror
layers => merge => merge visible
16
selections => load-save selection => from disk => selection
# 1
selections => promote selection to layer
effects => plugins => Alien Skin Eye Candy 5 Impact
/ Glass (same settings as before)
keep selection active
17
layers => new raster layer
flood fill selection with color 1
selections => modify => contract => 2 px
edit => Cut
selections => modify => contract => 12 px
flood fill selection with color 1
selections => modify => contract => 3 px
edit => Cut
selections => select none
blend mode of the layer : screen
18
layers => duplicate
effects => plugins => Toadies => What Are You
?... / 20 / 20
19
selections => load-save selection => from disk => selection
# 1
edit => Cut
selections => select none
layers => merge => merge down
effects => plugins => Mura’s Seamless => Emboss
at Alpha => default settings
20
layers => new raster layer
selections => select all
effects => 3D effects => cutout / color 5 or 4
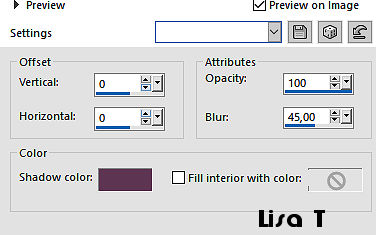
selections => select none
blend mode of the layer : Multiply - lower opacity if necessary
21
image => add borders => tick « symmetric » => 1
px color 1
edit => copy
selections => select all
image => add borders => tick « symmetric » => 30
px color 1
selections => invert
edit => paste into selection
22
selections => select all
image => add borders => tick « symmetric » => 50
px color 4 or 5
selections => invert
effects => plugins => Tramages / Pool Shadow
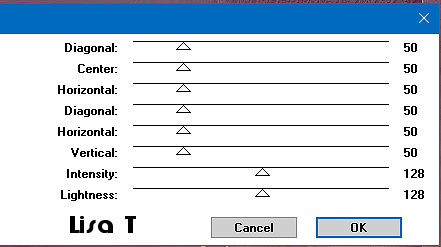
adjust => blur => gaussian blur / 20
effects => plugins => Filter Factory Gallery J /
Drink to Me... / 15
effects => edge effects => enhance
selections => select none
23
layers => duplicate
effects => plugins => Nik Software => Color Efex
Pro 3.0 / Bi-Colors Filters
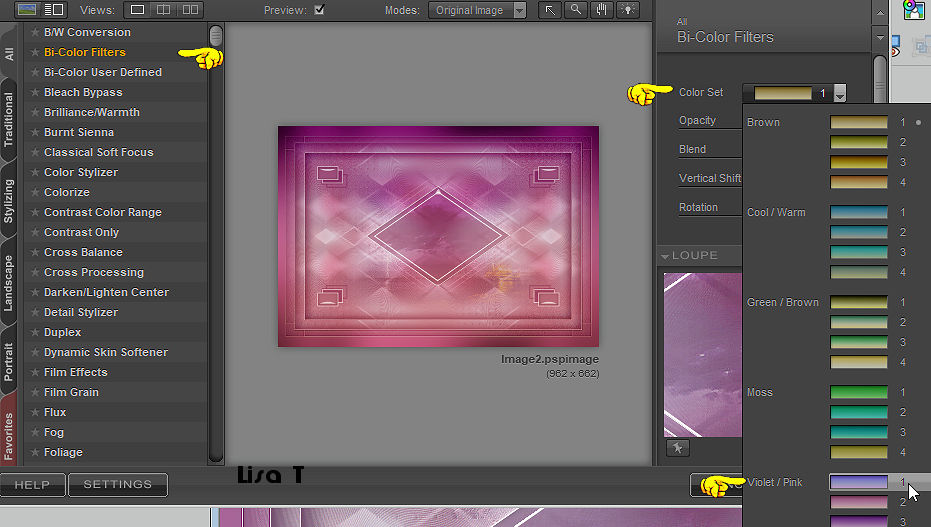
change the settings according to your
colors
opacity of the layer : 50% (or other)
24
copy / paste the woman tube as new layer
image => resize => untick « resize all layers » => 90%
place as presented on the final result
drop a shadow of yor choice
25
image => add borders => tick « symmetric » => 1
px color 4
layers => new raster layer => apply your watermark
or signature
edit => save your work as... type .jpeg optimized
 
My tag with my tube and misted image
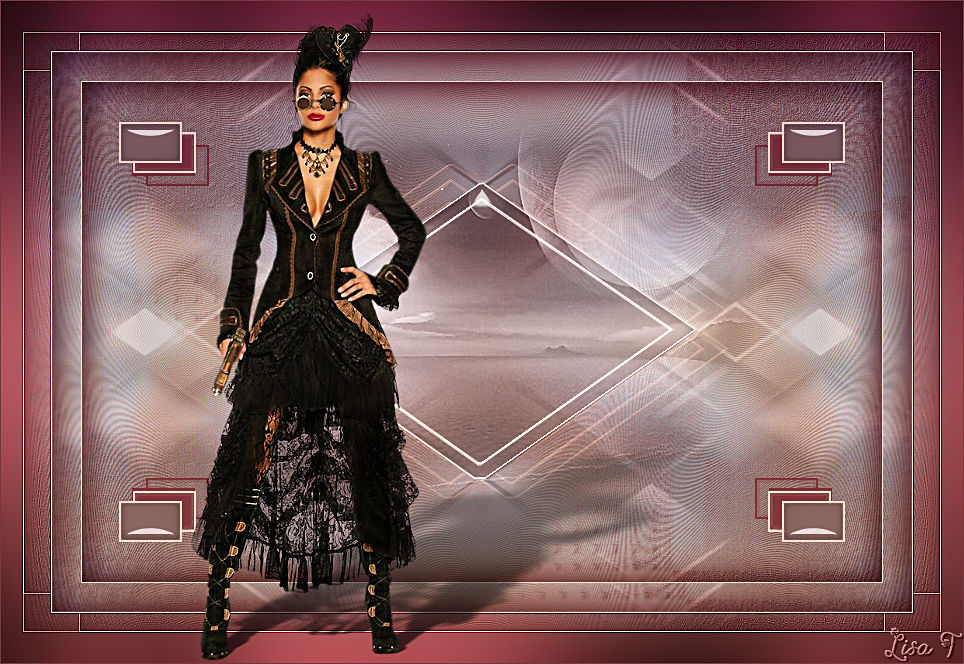
Don't hesitate to write to Animabelle
if you have any trouble with her tutorial
If you create a tag (using other tubes than those provided)
with this tutorial
and wish it to be shown, send it to Animabelle !
It will be a real pleasure for her to add it to the gallery
at the end of the tutorial


back to the boards of Animabelle’s tutorials
board 1 board 2 board 2 board
3 board
3 board 4 board 4  board
5 board
5 

|