Steampunk World

I am member of TWInc
This tutorial is protected


Conditions of use of the material provided
It is forbidden to modifiy, change the name, take off the watermarks or alter the tubes.
It is forbidden to share them in groups or offer them on your site, blog or forum.
If you want to use them to create a tutorial, you must ask the permission of the authors.

Sybel has the permission of the creators to use their tubes, masks and decorations
Thank you to all af them.
Without their beautiful creations, no tutorials could be written.

Matérial
1 mask by Nikita
1 mask by Maëlle Dreams
1 tube by Malvi
elements : clock, cog, gloves and border by Kizzdbykelz
elements : hot-air balloon, flowers by Tootypup

open all tubes
window/duplicate. Close the originals and work with the copies
open the masks, minimize them

Plugins
FM Tile Tools/Blend Emboss
Mura’s Meister/Copies
AAA Frames/Foto Frames
Graphic Plus/Cross Shadow
&<Bkg Designers sf10II>/Daggers Done
Xero/Improver

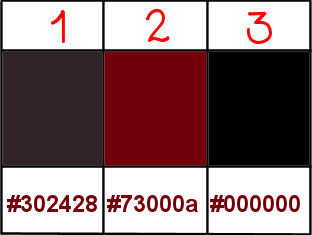
Colors palette

foreground color -> color 1 -> #302428
background color -> color 2 -> #73000a

Use the paint brush to follow the steps
left click to grab it
 |

Realization
Step 1
open a new transparent raster layer 900 * 600 pixels
selections/select all
activate “paper 8”
edit/copy - back to your work - edit/paste into selection
selections/select none
Step 2
layers/new raster layer
paint with color 1
layers/new mask layer/from image
choose the mask “1250181968_nikita_masque” / check “invert mask data”

effects/edge effects/enhance more
layers/merge/merge group
layers/merge/merge visible
effects/plugins/FM Tile Tools/Blend Emboss

Step 3
layers/new raster layer/paint with color 2
layers/new mask layer/from image/choose “MASK_MD_070”/uncheck “invert mask data”

layers/merge/merge group
effects/edge effects/enhance more
effects/edge effects/enhance
Step 4
activate the tube “TP balloon 01”
edit/copy - back to your work - edit/paste as new layer
image/resize/uncheck “resize all layers”/50%
don’t move it
effects/plugins/Mura’s Meister/Copies

in the layers palette, set the blend mode on “hard light” and the opacity on 36%
adjust/sharpness/sharpen
Step 5
acitvate the tube “KBK steamyElegance 103”
edit/copy - back to your work - edit/paste as new layer
image/resize/uncheck “resize all layers”/70%
don’t move it
adjust/sharpness/sharpen
effects/3D effects/drop shadow/ 5 / 5 / 80 / 10 / black

Step 7
activate the tube “KBK steamyElegance 108”
edit/copy - back to your work - edit/paste as new layer
image/resize/uncheck “resize all layers”/50%
adjust/sharpness/sharpen
effects/3D effects/drop shadow/ 5 / 5 / 80 / 10 / black

move the cog as shown on the final result, at the top right of the central cog
layers/arrange/move down
Step 8
in the layers palette, activate the top layer
activate the tube “KBK steamyElegance 109”
edit/copy - back to your work - edit/paste as new layer
adjust/sharpness/sharpen
effects/3D effects/drop shadow

position the gear as shown in the example, on the left side of the central cog
layers/arrange/move down
Step 9
in the layers palette, activate the top layer
activate the tube “KBK steamyElegance 25”
edit/copy - back to your work - edit/paste as new layer
adjust/sharpness/sharpen
effects/3D effects/drop shadow

don’t move it
Step 10
your tag looks like this
 x x
your layers palette looks like this

layers/merge/merge visible
effects/plugins/AAA Frames/Foto Frame

Step 11
image/add borders/check « symmetric »/3 pixels/black
Step 12
image/add borders/check « symmetric »/55 pixels/contrasting color
select this border with the magic wand tool (default settings)
in the materials palette, prepare a linear gradient with colors 1 and 2

fill the selection with the gradient
effects/plugins/Graphic Plus/Cross Shadow/default settings
effects/plugins/&<Bkg Designers sf10II>/Daggers/Done

adjust/sharpness/sharpen
selections/invert
effects/3D effects/drop shadow/ 7 / 7 / 80 / 15 / black

drop shadow again, replacing (7) by (-7)
selections/select none
Step 13
activate the tube “TP-BrassFlower 01”
edit/copy - back to your work - edit/paste as new layer
image/resize/uncheck “resize all layers”/50%
move the tube in the lower right corner
layers/duplicate
image/mirror
layers/merge/merge down
in the layers palette, set the blend mode on “overlay”
efects/plugins/FM Tile Tools/Blend Emboss

Step 14
activate the tube “KBK steamyElegance 66”
edit/copy - back to your work - edit/paste as new layer
image/resize/uncheck “resize all layers”/70%
adjuxt/sharpness/sharpen
move in the upper left corner
effects/3D effects/drop shadow/ 3 / 3 / 100 / 15 / black

layers/duplicate - image/mirror
layers/merge/merge down
Step 15
activate the tube “steampunkmalvi”
edit/copy - back to your work - edit/paste as new layer
image/resize/uncheck “resize all layers”/90%
image/mirror
move it as shown on the final result
effects/plugins/Xero Improver/ 10 / 10 / 10 / landscape
effects/3D effects/drop shadow/ 0 / 30 / 50 / 10 / black

Step 16
image/add vorders/check “symmetric”/2 pixels/black
Step 17
apply your signature
Step 18
image/resize/width 1000 pixels
file/save as... type jpeg

your tag is now finished
Thank you to have realized it

Don’t hesitate to write to Sybel

or to me

if you have any problem

you can send us your creations
It will be a real pleasure to see them, and to present them at the end of this tutorial

Your Creations
Creation Anne-Marie Anne-Marie

Creation  Lana Lana

Creation  Hennie Hennie

Back to the board of Sybel’s tutorials


|