Queen of Ice

Conditions of use of the material provided
It is forbidden to modifiy, change the name, take off the watermarks or alter the tubes.
It is forbidden to share them in groups or offer them on your site, blog or forum.
If you want to use them to create a tutorial, you must ask the permission of the authors.

Sybel has the permission of the creators to use their tubes, masks and decorations
Thank you to all of them.
Without their beautiful creations, no tutorials could be written.
Sybel uses PSPX6 to create her tags
I use PSPX7 to create my tags
but you can realized these tutorials with any other version of PSP
Matérial
tubes & misted images - masks -fractal image

open all tubes
window/duplicate. Close the originals and work with the copies
open the masks and minimize them
Plugins
User Defined Filter - Alien Skin Xenofex 2 - Graphic Plus
Colors palette
foreground color -> color 1 -> #58819a (blue)
background color -> color 2 -> #b782ab (purple)
color 3 -> # 1f2b37 (dark blue)
color 4 -> #ffffff (white)
color 5 -> #000000 (black)
Use the pencil to follow the steps
left click to grab it
 |
Realization
Step 1
open a new transparent raster layer 900 * 650 pixels and fill with color 1
layers/new raster layer
fill white
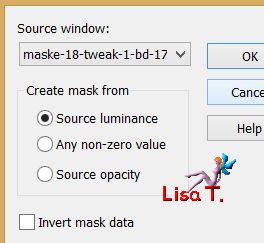
layers/new mask layer/from image

layers/merge/merge group
effects/user defiend filter/Emboss 6
Step 2
copy/paste the tube « sVb Winters 26 » as new layer (don’t forget to erase the watermark)
Step 3
copy/paste the tube « pays-1367-Azalee » as new layer
place it in the lower right corner
adjust/sharpness/sharpen
layers/duplicate
image/mirror/horizontal mirror
Step 4
layers/new raster layer and fill white
layers/new mask layer/from image
layers/merge/merge group
adjust/sharpness/sharpen
Step 5
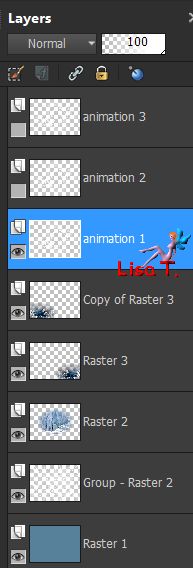
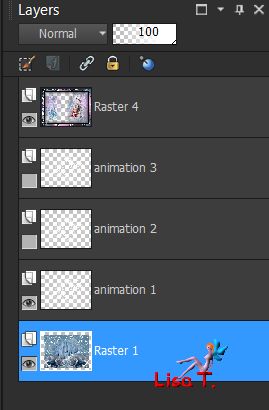
duplicate « Raster 4 » twice (you obtain 3 identicals layers)
rename Raster 4 -> « animation 1 »
rename Copy of Raster 4 -> « animation 2 »
rename copy 2 of Raster 4 -> « animation 3 »
close the eyes of « animation 2 » and «animation 3 »
activate « animation 1 »
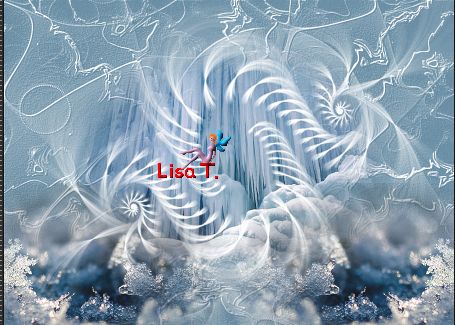
your work and you layers palette look like this
Step 6
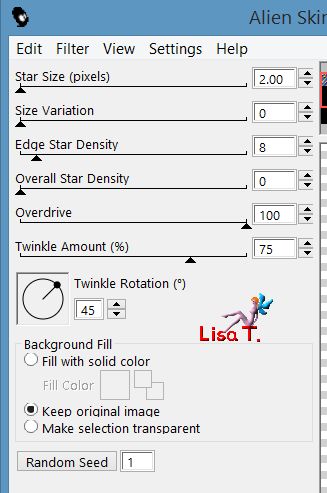
effects/plugins/Alien Skin Xenofex 2/Constellation
close the eye of « animation 1 »
open the eye of « animation 2 » and activate this layer
effects/Alien Skin Xenofex 2/Constellation/click on « random seed »
close the eye of « animation 2 »
open the eye of « animation 3 » and activate this layer
effects/Alien Skin Xenofex 2/Constellation/click on « random seed »
Step 7
copy/paste the tube « sudam » as new layer
move it to the left (see example)
Step 8
copy/paste the tube « misted fractal sybel » as new layer
move it to the right
adjust/sharpness/sharpen
Step 9
copy/paste the tube « misted personnage sybel » as new layer
move it to the right
Step 10
layers/new raster layer, and paint black
selections/select all
selections/modify/contract/2 pixels and hit the delete key of your keyboard
selections/select none
effects/3D effects/buttonize
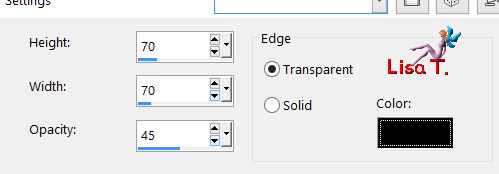
apply this effect once more with the same settings
Step 11
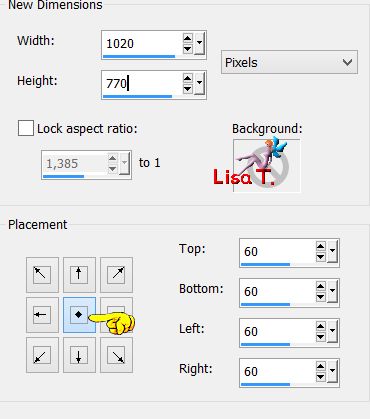
selecitons/select all
image/crop to selection
image/canvas size
with the magic wand

select the empty frame
selections/promote selection to layer
selections/select all

fill with color 3 (dark blue)
selections/modify/contract/2 pixels/hit the delete key of your keyboard
fill with color 4 (white)
selections/modify/contract/2 pixels/hit the delete key of your keyboard
fill with color 3 (dark blue)
selections/modify/contract/2 pixels/hit the delete key of your keyboard
fill with a contrasting color
selections/modify/contract/50 pixels/hit the delete key of your keyboard
fill with color 3 (dark blue)
selections/modify/contract/2 pixels/hit the delete key of your keyboard
fill with color 4 (white)
selections/modify/contract/2 pixels/hit the delete key of your keyboard
selections/select none
Step 12
select the large border (50 pixels) with the magic wand tool
in the materials palette, set color 1 and 2 as foreground and background colors
prepare a radial gradient
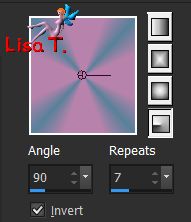
fill the selection with the gradient
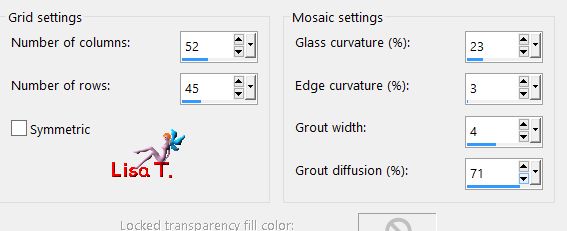
effects/texture effects/mosaic-glass
effects/plugisn/Graphic Plus/Cross Shadow/default settings
selections/select none
apply your signature on a new layer
ANIMATION with Animation Shop
close the eye of « animation 3 » and « animation 2 »
activate the layer « animation 1 » and open the eye
edit/copy special/copy merged
open Animation Shop
edit/paste as new animation
back into PSP
close the eye of « animation 1 »
activate « animation 2 » and open the eye
edit/copy special/copy merged
in AS
edit/paste after current frame
in PSP
close the eye of « animation 2 »
activte « animation 3 » and open the eye
edit/copy special/copy merged
in AS
edit/paste after current frame
edit/select all
animation/frame properties, and set on 10
view the animation
if you are satisfied with the result, save as ... type gif
ANIMATION with Ulead Gif Animator
in PSP
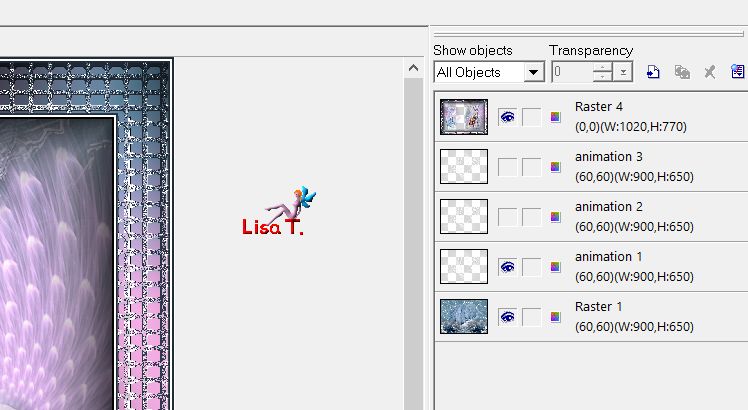
merge together the 6 layers at the top of the stack and leave the eye opened
leave the 3 animations layer
close the eyes of « animation 3 » and « animation 2 » and open the eye of « animation 1 »
merge together the 5 layers at the bottom of the stack and leav the eye opened
your layers palette looks like this
save as.... type PSP Animation Shop in a folder of your choice
open UGA
open PSP files -> choose your tag
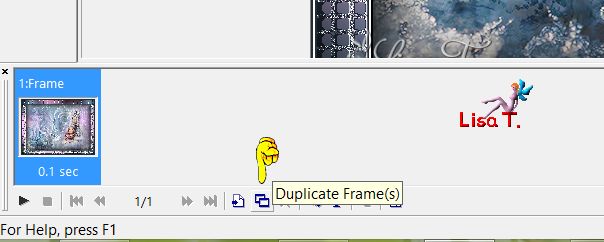
at the bottom left, left click once on « duplicate frame »
in the layers (top right), close the eye of « animation 1 » and open the eye of « animation 2 »
at the bottom left, click on « duplicate frame once
in the layers (top right), close the eye of « animation 2 » and open the eye of « animation 3 »
frame/frame properties/ choose 10
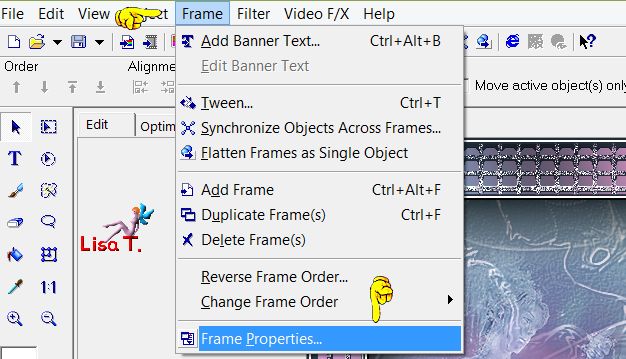
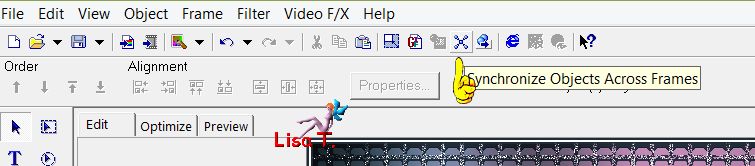
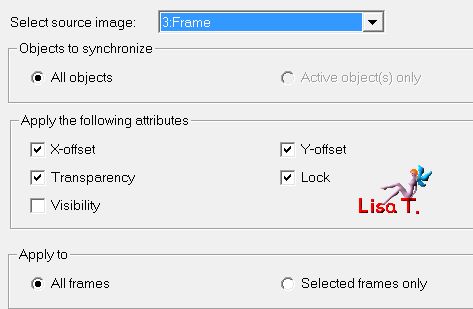
click on « synchronize objects »
with the following settings
view your animation by clicking on the « view » tab
if you are satisfied, save as... type gif
your tag is finished
Thank you to have realized it
Don’t hesitate to write to Sybel

or to me
if you have any problem
or to send us your creations
It will be a real pleasure to present them at the end of this tutorial
Your Creations
Back to the board of Sybel’s tutorials


|