Marpessa


Conditions of use of the material provided
It is forbidden to modifiy, change the name, take off the watermarks or alter the tubes.
It is forbidden to share them in groups or offer them on your site, blog or forum.
If you want to use them to create a tutorial, you must ask the permission of the authors.

Sybel has the permission of the creators to use their tubes, masks and decorations
Thank you to all of them.
Without their beautiful creations, no tutorials could be written.
Sybel uses PSPX6 to create her tags
I use PSPX8 to create my tags
but you can realized these tutorials with any other version of PSP
Matérial
tubes by Sybel – 1 animation by Simone - fractal

open all tubes
window/duplicate. Close the originals and work with the copies
here is the link to Simone's Site

Plugins
Mehdi - Wavy Lab 1.1
Filtre - VM Instant Art – Tripolis
Filtre - Graphics Plus – Emboss
Filtre - Graphics Plus - Cross Shadow
Filtre - AFS IMPORT - Squorber2
Filtre - Italian Editors Effect - Effets Fantasma
Filtre Flaming Pear - Flexify 2
Filtre FM Tile Tools - Blend Emboss
Filtre - Xero - Improver : Landscape
Colors palette
foreground color -> color 1 -> #271f44
background color -> color 2 -> #ff67b0
color 3 -> # b90951
color 4 -> #000000
color 5 -> #ffffff
utilisez le pinceau pour suivre les étapes
clic gauche maintenu pour le déplacer

Realization
Step 1
open a new transparent image 900 * 550 pixels
effects > plugins > Mehdi > Wavy Lab 1.1

adjust > blur > gaussian blur > 20
layers > duplicate
effects > Plugins > VM Instant Art > Tripolis

blen mode : Hard Light – opacity : 50%
effects > plugins > Graphic Plus > Emboss

effects > plugins > AFS IMPORT > sqborder 2

don’t change the blend mode and the opacity
layers > duplicate
effects > plugins > It@lian Editors effects > effetto Fantasma

adjust > sharpness > sharpen
Step 2
to obtain the same effects as mine, copy/paste as new layer « image 4 »
effects > plugins > Flaming Pear > Flexify 2
translator’s note : I obtained a slightly different effect,
probably because I use a different version of this plugin than Sybel

if you want to change the colors --> adjust > hue and saturation > colorize with your own colors
effects > plugins > FM Tile Tools > Blend Emboss

effects > 3D effects > drop shadow
drop shadow again changing (5) by (-5)
Step 3
layers > new raster layer
selections > select all
copy/paste into selection the fractal image « nr°39 »
edit > repeat « paste into selection »
selections > select none
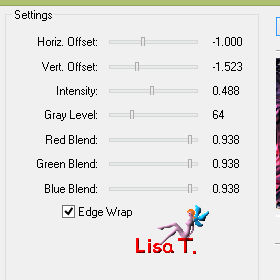
adjust > hue and saturation > colorize
Sybel used these settings

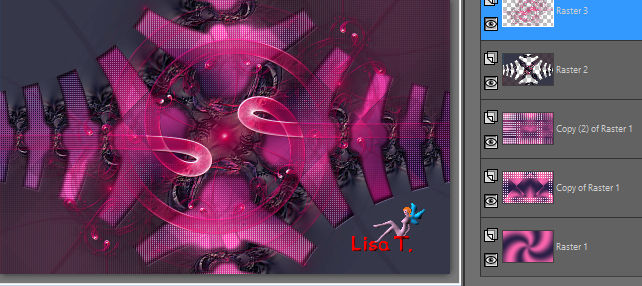
effects > plugins > FM Tile Tools > Blend Emboss
your tag and your layers palette look like this
Step 4
copy / paste as new layer the misted image « image 4 »
move it to the left (see final result)
effects > pllugins > Xero > Improver > Landscape

layers > duplicate
image > mirror > mirror horizontal
Step 5
image > add borders > check « symmetric -->
2 pixels white
2 pixels color 2
2 pixels white
50 pixels color 1
select this large border with the magic wand tool
effects > plugins > Graphic Plus > Cross Shadow

effects > reflection effects > kaleidoscope

selections > invert
effects > 3D effects > drop shadow

edit > repeat « drop shadow »
selections > select none
image > add borders > 10 pixels color 3 and 1 pixel black
Step 6
apply your watermark
resize if necessary
Step 7 – Animation (optional)
Sybel an I use UGA to create our animations
the animation we used was found on Simone’s site (link at the begining of this tutorial)
you will find many other animations if you want to choose another one
your tag is finished
Thank you to have realized it
Don’t hesitate to write to Sybel

if you have any problem
or to send her your creations
It will be a real pleasure to see them and to present them at the end of this tutorial
Your Creations
My tag without animation

created by  Celia Celia

Back to the board of Sybel’s tutorials
board 1  board 2 board 2

|