Dragon light

Conditions of use of the material provided
It is forbidden to modifiy, change the name, take off the watermarks or alter the tubes.
It is forbidden to share them in groups or offer them on your site, blog or forum.
If you want to use them to create a tutorial, you must ask the permission to the authors.
Sybel has the permission of the creators to use their tubes, masks and decorations
Thank you to all of them.
Without their beautiful creations, no tutorials could be written.

Sybel uses PSPX6 to create her tags
I use PSPX7 to create my tags and translations
but you can realized these tutorials with any other version of PSP
Matérial
tubes - 2 masks - 1 animation by Simone


open all the tubes
window/duplicate. Close the originals and work with the copies
open the masks, minimize them
don’t forget to erase Sybel’s watermark before using her tubes and mists
Plugins
Axion
Fm Tile Tool
filtre personnalisé: Emboss 3
Simple
Pluging Galaxy
Carolaine and Sensibility
AAA Frames
Colors
foreground color -> color 1 -> # 7694ad (light blue)
background color -> color 2 -> #333e8a (dark blue)
white - black
use the pencil to follow the steps
left click to grab it

Realization
Step 1
open the misted landscape (or the character tube)
choose 2 colors (light and dark)
or you can use the same colors as Sybel
Step 2
open a new transparent raster layer 1000 * 650 pixels
flood fill this layer with color 1 (light color)
Step 3
layers/new raster layer
selections/select all
copy/paste the misted landscape into selection
selections/select none
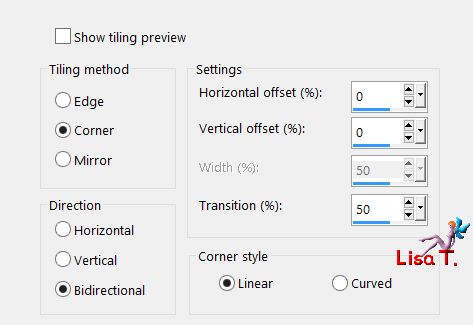
effects/image effects/sseamless tiling/default settings
adjust/blur/gaussian blur/50
layers/merge/merge down
Step 4
layers/new raster layer
flood fill this layer with color 2 (dark color)
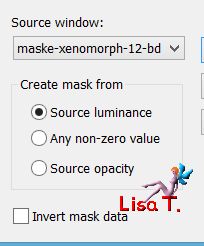
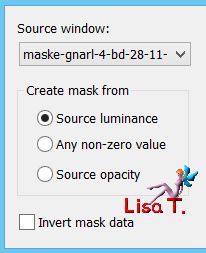
layers/new mask layer/from image
layers/merge/merge group
layers/duplicate - layers/merge/merge down
Step 5
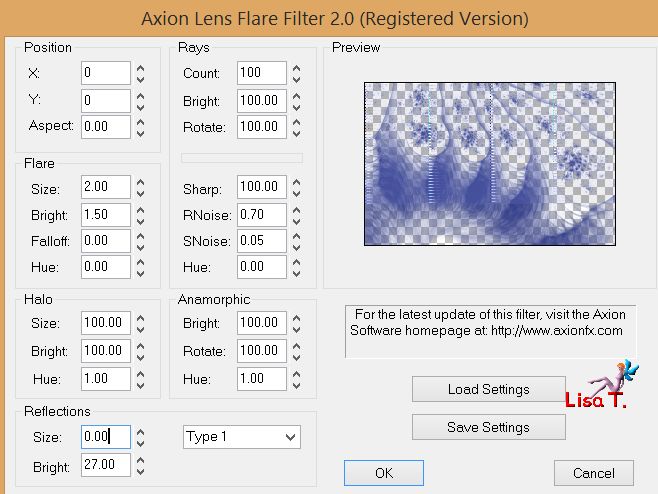
effects/plugins/Axion/Lens Flare
effects/distortion effects/twirl
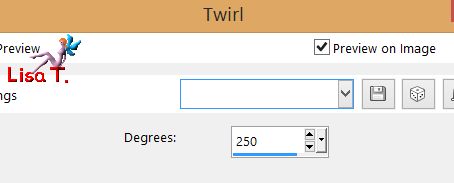
effects/user defined filter/emboss 3 --> apply this effects a second time
Step 6
layers/new raster layer - flood fill white
layers/new mask layer/from image
layers/merge/merge group
set the blend mode of the layer on « Dodge »
Step 7
copy/paste as new layer the misted landscape
image/resize/uncheck « resize all layers »/85%
move it to the right (see final result)
layers/duplicate - image/mirror/mirror horizontal
layers/arrange/move down
opacity of the layer : 90%
effects/plugins/FM Tile Tool/Blend Emboss/default settings
Step 8
copy/paste as new layer the misted « cadre fleurs »
move it to the left (see final result)
layers/duplicate - image/mirror/mirror horizontal - mirror/mirror vertical
Step 9
copy/paste as new layer the character tube
move it very slightly to the bottom (see final result)
Step 10
copy/paste as new layer the decoration tube « light »
move it to illuminate the character (see final result)
layers/arrange/move down 3 times (above « Copy of Raster 2 »)
your layers palette looks like this
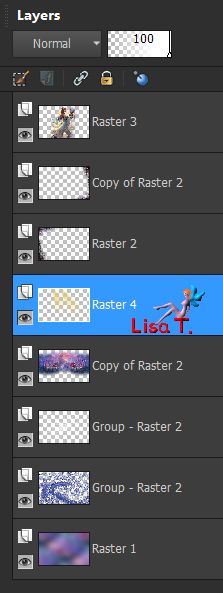
layers/merge/merge visible
Step 11
effects/plugins/Axion/Lens Flare

image/add obrders/2 pixels black
edit/COPY
Step 12
image/add borders/50 pixels white
select this borders with the magic wand tool

eidt/paste into selection
keep the selection active
effects/plugins/Simple/Top Left Mirror
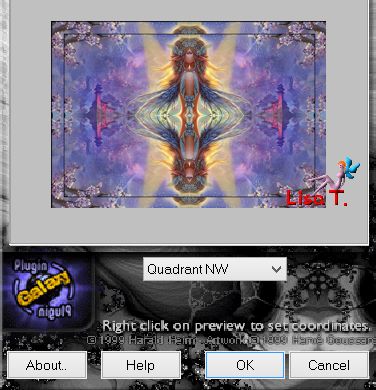
effects/plugins/plugin Galaxy/Instant Mirror
effects/plugins/Carolaine and Sensibility/CS-Reflexion
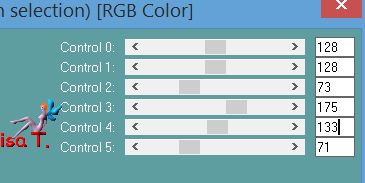
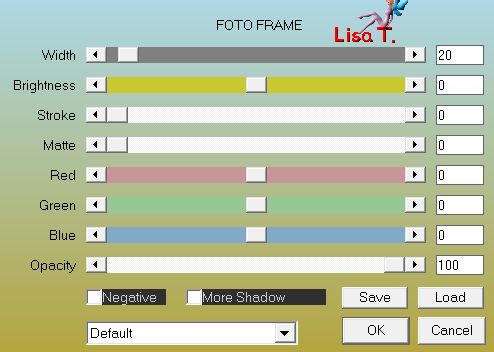
effects/plugins/AAA Frames/Foto Frame
selecitons/invert
effects/3D effects/drop shadow/ 0 / 0 / 100 / 25 / black
selections/select none
Step 13
image/add borders/2 pixels black
apply your signature
image/resize/1000 pixels wide
edit/save as... type jpeg
Animation
if you want to add an animation, use the one provided by Sybel
or find another one visiting the site below
your tag is finished
Thank you to have realized it
Don’t hesitate to write to Sybel

or to me
if you have any problem
or to send us your creations
It will be a real pleasure to present them at the end of this tutorial
Your Creations
Back to the board of Sybel’s tutorials

|