Lost City

I am member of TWInc
This tutorial is protected

Conditions of use of the material provided
It is forbidden to modifiy, change the name, take off the watermarks or alter the tubes.
It is forbidden to share them in groups or offer them on your site, blog or forum.
If you want to use them to create a tutorial, you must ask the permission of the authors.

Matérial
1 misted « fractal » by Bibiche

1 tube « woman with whistle” by Tititatoo

1 tube "woman with crow" by PSP devils

1 tube “woman with crow” by Ginamisted

1 image “landscape” fond on the web

Plugins
FM Tile Tools
Alien Skin Eye Candy 5
Alien Skin Xenofex 2
Colors palette
foreground color --> color 1 --> #e6c154
backgroud color --> color 2 --> #43321e
Use the paint brush to follow the steps
left click to grab it

Realization
Step 1
open a new transparent raster background 900 X 600 pixels
selections/select all
activate the image “landscapes_forest” (or any other picture of your choice)
edit/copy - back on your work - edit/paste into selection
adjust/sharpness/sharpen
effects/plugins/FMTile Tools/Blend Emboss

Step 2
activate the image “aaabibihdec0192”, edit/copy
back to your work
layers/new raster layer - edit/paste into selection
effects/edge effets/enhance
in the layers palette, set the opacity on 42%
selections/select none
Step 3
activate the tube “lost in my solitude”
edit/copy - back to your work - dit/paste as a new layer
place at the bottom, to the left of the tag
in the layers palette, set the opacity on 89% if you use another tube than the one provided
Step 4
activate the tube “image 4a”
edit/copy - back to your work - edit/paste as a new layer
place to the right as shown on the final result
adjust/sharpness/sharpen
in the layers palette, set the opacity on 89% if you use another tube than the one provided
Step 5
activate the tube “ginamistedfeerique20”
edit/copy - back to your work - edit/paste as a new layer
place slightly to the left as shown
in the layers palette, set the blend mode on “screen”
Step 6
layers/new raster layer
activate the image “pinceau” (paint brush)
file/export/custom brush
give a name to your new brush tip, and click OK
acivate the paint brush tool (B)
find your new brush by clicking on the little white window next to the tool

apply you brush 3 times (left click to use color 1)

Step 7
layers/duplicate (2 times)
rename raster 6 --> “animation 1”
rename copy of raster --> “animation 2”
rename copy (2) of raster 6 --> “animation 3”
your layers palette must be like this

Step 8
in the layers palette, activate “raster 3”
layers/arrange/bring to top
image/canvas size

selections/select all
layers/new raster layer
paint with color 1
selections/modify/contract/2 pixels
press the Delete key of your keyboard
paint with color 2
selections/modify/contract/46 pixels
press the delete key of your keyboard
paint with color 1
selections/modify/contract/2 pixels
press the delete key of your keyboard
selections/select none
Step 9
activate the magic wand tool (default settings) and select the edge of 46 pixels wide
selections/promote selection to layer
effects/plugins/Alien Skin Eye Candy 5/Textures/Stone Wall
in the tab “settings”, choose the preset “Tan Stones”
in the tab “basic”, stone color -> #251c17, mortar color -> color 2

effects/edge effects/enhance
selections/select none
Step 10
selections/select all
selections/modify/contract/48 pixels
effects/3D effects/drop shadow

again, drop shadow, replacing (7) by (-7)
selections/select none
Step 11
apply your signature
If you do not want to animate your tag, merge all and save as... type jpeg

If you want to animate your tag
ANIMATION
in the layers palette, activate the layer “animation 1”
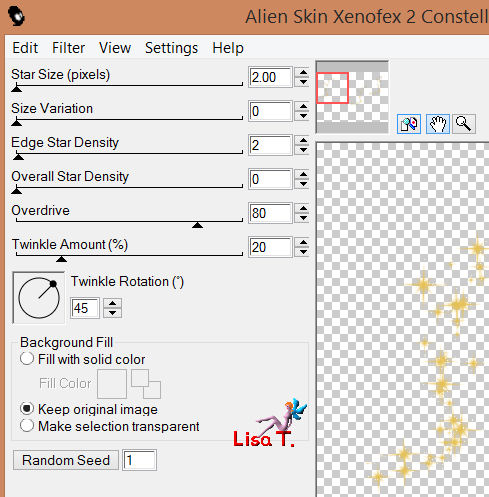
effects/plugins/Alien Skin Xenofex 2/Constellation
in the layers palette, activate the layer « animation 2 »
use the same plugin, don’t change any setting, just click on “random seed”
close the visibility toggle of this layer
in the layers palette, activate the layer “animation 3”
use the same plugin, the same settings, click on “random seed”
close the visibility toggle of this layer
activate the upper layer of the stack
edit/copy special/copy merged
Open Animation Shop
edit/paste as a new animation
back in PSP
in the layers palette, close the visibility toggle of “animation 1”
open the visibility toggle of “animation 2”
edit/copy special/copy merged
back in Animation Shop
edit/paste/paste after current frame
back in PSP
in the layers palette, close the visibility toggle of “animation 2”
open the visibility toggle of “animation 3”
edit/copy special/copy merged
back in Animation Shop
edit/paste/paste after current frame
edit/select all
animation/frame properties/10
file/save as
your tag is now finished
Thank you to have realized it
Don’t hesitate to write to Sybel

or to me
if you have any problem
or to send us your creations
It will be a real pleasure to present them at the end of this tutorial
Your Creations
Back to the board of Sybel’s tutorials


|