Autumn light

Conditions of use of the material provided
It is forbidden to modifiy, change the name, take off the watermarks or alter the tubes.
It is forbidden to share them in groups or offer them on your site, blog or forum.
If you want to use them to create a tutorial, you must ask the permission of the authors.

Sybel has the permission of the creators to use their tubes, masks and decorations
Thank you to all of them.
Without their beautiful creations, no tutorials could be written.
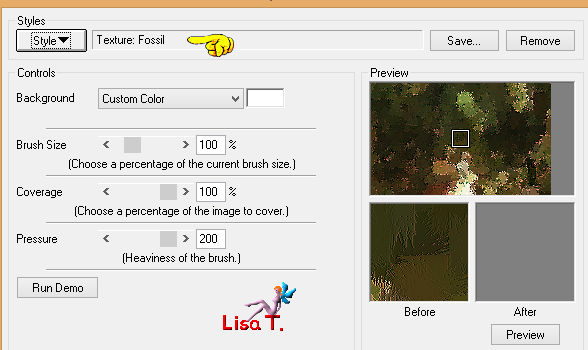
Sybel uses PSPX6 to create her tags
I use PSPX8 to create my tags
but you can realized these tutorials with any other version of PSP
Matérial
tubes by Sybel – mask – animation by Simone - fractal

open all tubes
window/duplicate. Close the originals and work with the copies
open the mask and minimize it to tray
Plugins
Impressionist
Xero - improver
Graphics Plus - Cross Shadow
Simple - Top Left Mirror
Colors palette
foreground color -> color 1 -> #772f30
background color -> color 2 -> # dfda35
color 3 -> #000000
color 4 -> #542810
color 5 -> #340c0c
use the pencil to follow the steps
Left click to grab it

Realization
Step 1
open the landscape picture
you can also open a new transparent raster layer 900 * 557 pixels
select all and copy / paste upir own landscape into selection
selections > select none
effects > art media effects > brush strokes

effects > plugins > Impressionist
Step 2
copy / pasete as new layer the misted image « fantasy 5 11-2012 »
image > resize > uncheck « all layers » > 85%
move it to the left (see final result)
opacity of the layer : 89%
Step 3
copy / paste as new layer the fractal image
blend mode of the layer : hard light – opacity : 44%
move the layer to the left
Step 4
copy / paste as new layer the image « femme-oiseau »
move it to the left
Step 5
copy / paste as new layer the misted image « lunafemme240 »
move it to the right
opacity : 92%
effects > plugins > Xero > Improver – click on « landscape »
effects > 3D effects > drop shadow

Step 6
open the brush tip « lumière 1 »
file > export > custom brush
give a name to this brush
layers > new raster layer
activate the paint brush tool, find your new brush tip

zoom out your tag to 80% to see the outlines of your brush
flood fill with color 2 (one click)
layers > duplicate – image > mirror > mirror vertical
move tyis layer where you like
Step 7
activate the top layer
layers > merge > merge down
layers > arrange, and move this layer down. It must be placed second from the bottom

Step 8
image > add borders > check « symmetric » > 2 pixels black
effects > 3D effects > buttonize

image > add borders -->
2 pixels color 2
2 pixels black
60 pixels color 4
select the large borders with the magic wand tool
effects texture effects > fine leather

effects > plugins > Graphic Plus > Cross Shdow > default settings
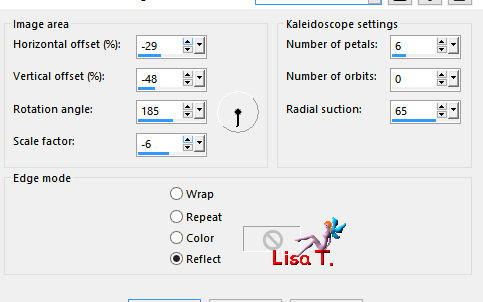
effects > reflection effects > kaleidoscope
selections > invert
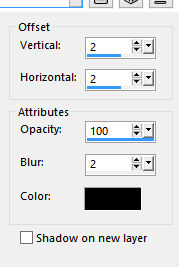
effects > 3D effects > drop shadow

edit > repeat « drop shadow »
selections > select none
image > add borders -->
2 pixels black
2 pixels color 2
2 pixels black
Step 9
copy / paste as new layer the tube « bordure 1 »
image > resize > 24%
move this border in the upper left corner
adjust > sharpness > sharpen
effects > 3D effects > drop shadow
effects > plugisn > Simple > Top Left Mirror
Step 10
apply your watermark
image > resize > widht : 1000 pixels (or other of your choice)
Animation (optional)
Sybel uses Ulead Gif Animation
the animation she provides in the material has been created by Simone
you might like to use another one on her site
your tag is finished
Thank you to have realized it
Don’t hesitate to write to Sybel

if you have any problem
or to send her your creations
It will be a real pleasure to present them at the end of this tutorial
Your Creations
coming soon !!!..........
Back to the board of Sybel’s tutorials
board 1  board 2 board 2

|