 New Year New Year

I am member of TWInc
My translations are protected


Material
tubes by « simplement Sylvie » - J Hanna - Monique
1 alpha layer with selections
1 preset Eye Candy 5 Impact (Glass)
double click on the preset , and it will be automatically installed in the right plugin
Thank you to the tubers

Filters used
&BKG Kaleidoscope - Mehdi - Simple - Tramages - Italian Editors Effect
Unlimited 2 - Eye Candy 5 /Impact
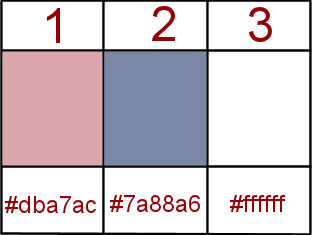
Colors palette
foreground color / color 1 / #dba7ac
background color / color 2 / #7a88a6
color 3 / #ffffff (white)
you can use the paint brush to follow the steps
left click to grab it

Realization
activate the alpha layer « calque_alpha_nouvel_an »
window/duplicate - close the original and work with the copy
in the materials palette, prepare a linear gradient 90 / 0
(you can replace the colors indicated by Vivi by your own colors of course
choose 2 contrasting colors in your tubes
light color (not too light however..) as foreground, and dark color as background)
fill the layer with this gradient

selections/select all
activate the misted tube “SSmistednoel118”
edit/copy - back to your work - edit/paste into selection
selections/select none
effects/image effects/seamless tiling/default settings
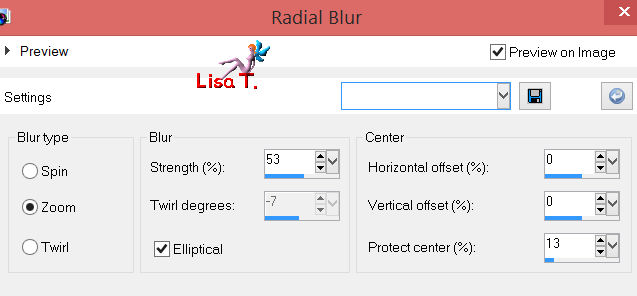
adjust/blur/radial blur
adjust/blur/gaussian blur/13
layers/duplicate
image/resize/uncheck “resize all layers”/80%
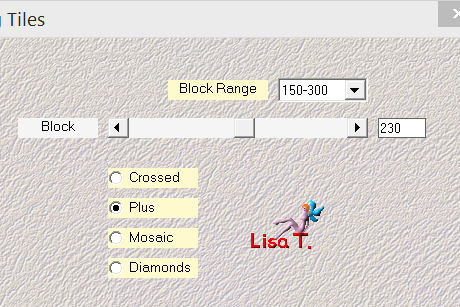
effects/plugins/Mehdi/Sorting Tiles
effects/plugins/Simple/Blintz
effects/image effects/seamless tiling/default settings
in the layuers palette, set the blend mode on “overlay”’ (or hard light) and the opacity on 75%
layers/merge/merge visible
adjust/sharpness/sharpen
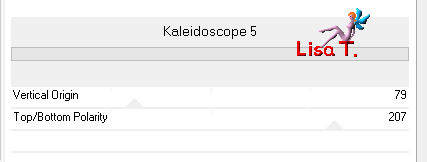
effecs/plugins/&BKG Kaleidoscope/Kaleidoscope 5
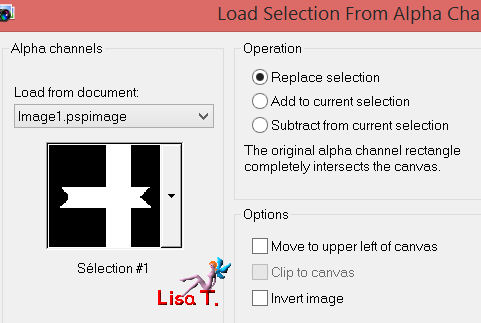
selections/load-save selection/from alpha channel/selection #1
selections/promote selection to layer
selections/select none
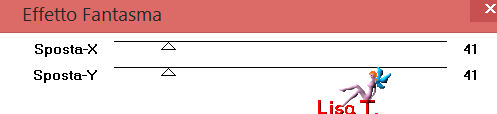
effects/plugins/Italian Editors Effect/Effeto Fantasma
layers/duplicate - image/mirror
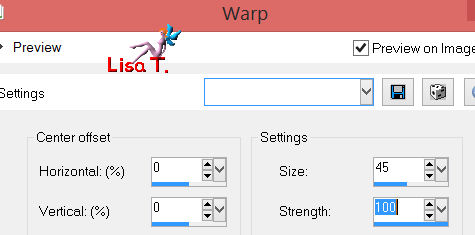
effects/distortion effects/warp
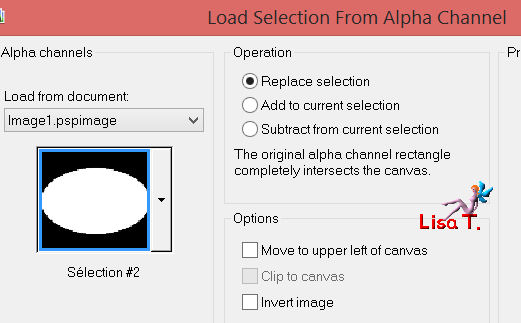
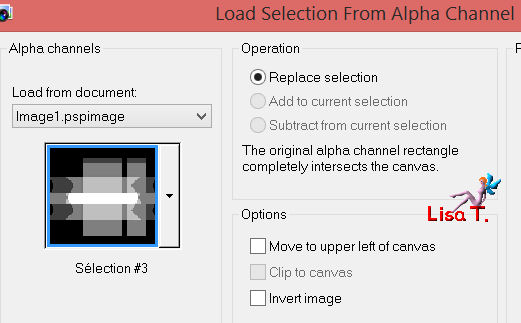
selections/load-save selection/from alpha channel/selection #2
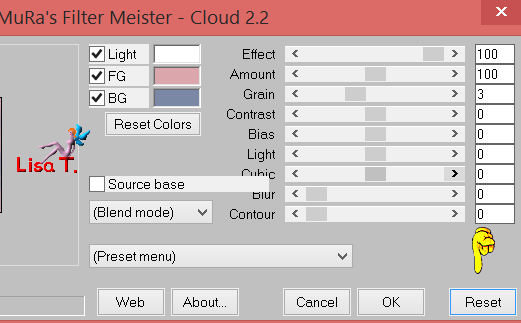
effecs/plugins/Mura’s Meister/Cloud (click on « reset » to retrieve your colors)
selections/invert
ress the Delete key of your keyboard
selections/invert
layers/new raster layer
edit/paste into selection (the tube of the landscape is still in the clipboard)
in the layers palette, set the opacity on 70%
adjust/sharpness/sharpen - layers/merge/merge down
effects/plugins/unlimited2/Edges Round/Round Edge 11
effects/3D effects/drop shadow 0 / 0 / 55 / 20 / black
selections/select none
in the layers palette, activate the layer below
selections/load-save selection/from alpha channel/selection #3
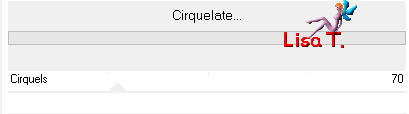
effects/plugins/Tramages/Cirquelate (install this plugin in Unlimited2)
effects/3D effects/drop shadow as before
selections/select none
(according to the colors you chose, if the “normal” blend mode is too dark
set the blend mode on “Luminance” or” Luminance (Legacy)”)
in the layers palette, activate the layer on top of the stack
layers/new raster layer
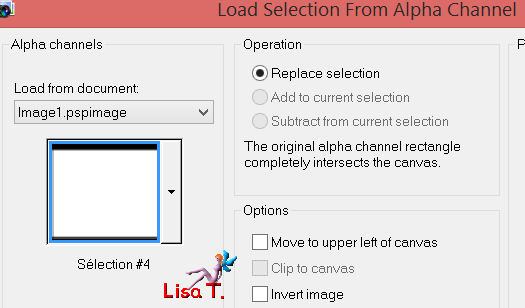
selections/load-save selection/from alpha channel/selection #4
in the materials palette, set color 3 as foreground and fill your selection
selections/modify/contract/20 pixels
press the delete key of your keyboard
selections/select none
effects/3D effects/drop shadow 0 / 0 / 55 / 5 / black
rename this layer “frame 1”
layers/duplicate - image/mirror, rename this layer “frame 2”
in the layers palette, activate the layer “frame 1”
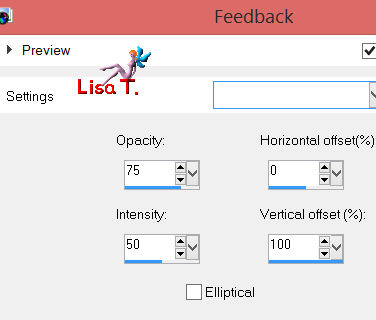
effects/reflection effects/feedback
layers/duplicate - image/flip - layers/merge/merge down
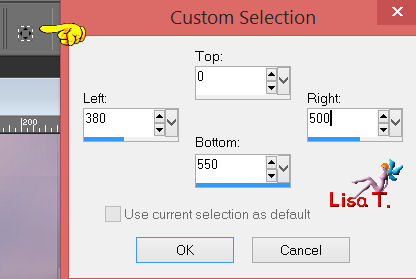
activate the selection tool (S)/rectangle/custom selection
press the delete key of your keyboard
selections/select none
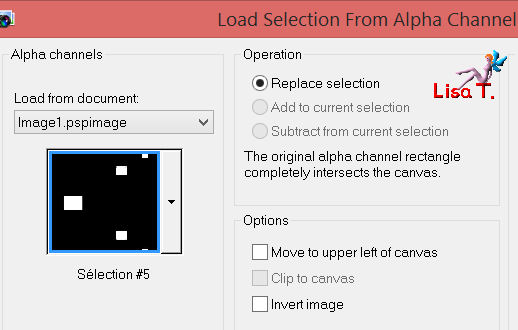
selections/load-save selection/from alpha channel/selection #5
edit/copy the tube “SS mistednoel118”
edit/paste as a new layer, and move it on the little squares, to keep the part of the tube that suits you
enlarge the image if necessary (here, Vivi enlarged to 118% and she inverted the image)
selections/invert - press the delete key of your keyboard
selections/select none
layers/arrange/move down
in the layers palette, activate the layer “frame 2”
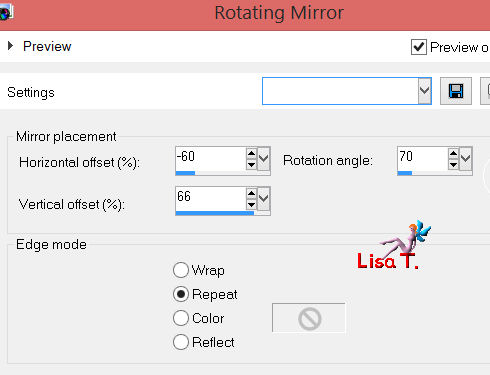
effects/reflection effects/rotating mirror
effects/plugins/Eye Candy 5 Impact/Glass/preset “nouvel an vivi”
select the 2 frames with the magic wand

layers/new raster layer
edit/copy the tube “SSmistednoel118” (to its normal size)
edit/paste into selection
selections/select none
layers/arrange/move down
adjust/sharpness/sharpen
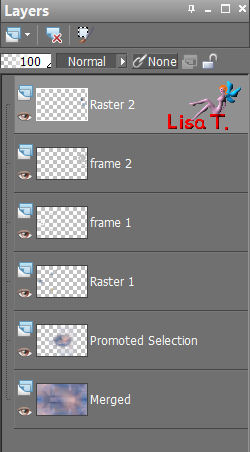
your layer palette must be like this
layers/merge/merge all (flatten)
layers/new raster layer
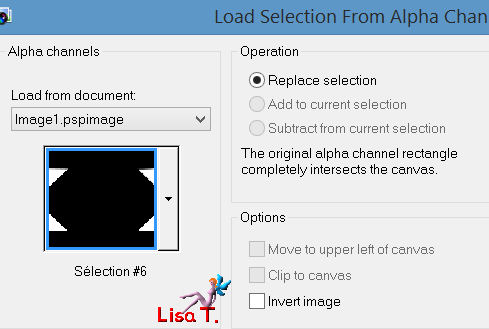
selections/load-save selection/from alpha channel/selection #6
fill with the linear gradient you prepared at the begining
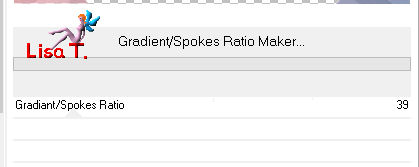
effects/plugins/Tramages/Gradient/Spokes Ratio Maker
selections/select none
effects/3D effects/drop shadow 0 / 0 / 75 / 50 / black
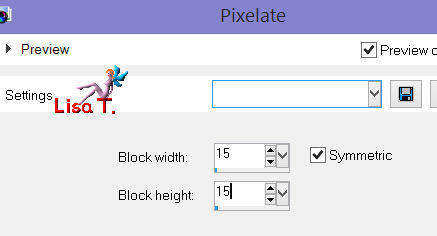
effects/distortion effects/pixelate
layers/merge/merge all
image/add borders/check symmetric
2 pixels color 2
2 pixels color 1
selections/select all
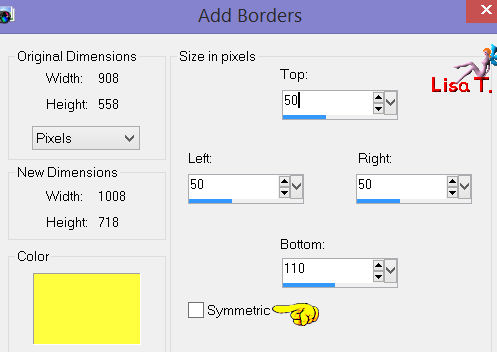
image/add border/contrasting color/uncheck symmetric
selections/invert
fill with the linear gradient
effects/plugins/Tramages/Gradient/Spokes/Ratio Maker/39 (as before)
selections/invert
effects/3D effects/drop shadow/ 0 / 0 / 75 / 55 / black
selections/select none
activate the word art “06 monique”
image/resize (uncheck “resize all layers”)/80%
edit/copy - back to your work - edit/paste as a new layer - move it as shown on the final result
adjust/sharpness/sharpen
effects/3D effects/Drop shadow as you like
activate the tube “J Hanna 258” - edit/copy - back to your work - edit/paste as a new layer
place it to your liking
effects/3D effects/drop shadow/ 0 / -15 / 35 / 25 / black
apply your signature
layers/merge/merge all (flatten)
image/add borders/check symmetric
2 pixels color 2
1 pixels color 3

resize if necessary
save as ... type jpeg
thank you to have realized this tutorial
if you want Vivi to see your creation
she will be very glad to receive it and present it at the end of her tutorial

My try with my tubes

Back to the boards of Vivi's tutorials
board 1  board 2 board 2

|