Broken inside

Material
1 alpha layer - tubes - 1 preset Eye Candy
double click on the preset to install it
window/duplicate the alpha layer. Close the original and work with the copy

Thank you to the tubers : Babette - Calguis - Lizztish - Deco1 (Narah’s mask)

Filters used
Toadies - Mehdi - AAA Frames - BKG sf10I - Two Moon - Eye Candy 5 Impact
Colors
color 1 -> foreground color -> #aacbde (light color)
color 2 -> background color -> #4c779a (dark color)

Use the pencil to follow the steps
left click to grab it

Realization
choose two colors in your main tube and prepare your materials palette
fill the alpha layer with color 2
selections/select all
copy/paste the character tube into selection
selections/select none
effects/image effects/seamless tiling

adjust/blur/radial blur

layers/duplicate
image/mirror/mirror vertical
blend mode : soft light (or screen if your own colors are too dark)
opacity +/- 100%
layers/merge/merge visible
effects/plugins/Mehdi/Sorting Tiles

effects/image effects/seamless tiling as before
adjust/sharpness/sharpen more
selections/load selection from alpha channel/selection 1
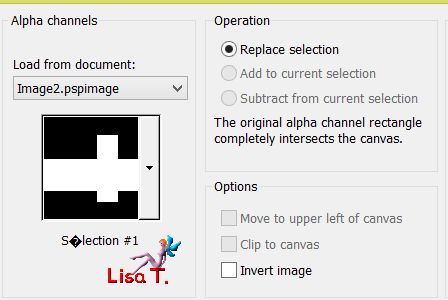
selections/promote selection to layer
effects/plugins/BKG Sf10I/Cruncher

selections/select none
blend mode/Overlay (or Hard Light)
effects/Toadies/Weaver

effects/image effects/seamless tiling as before
adjust/sharpness/sharpen more
selections/load selection from alpha channel/selection 2

selections/promote selection to layer
effects/plugins/Two Moon/Rotoblades/default settings

blend mode/Luminance (Legacy) or Luminance
selections/select none
actiate the background layer (Merged)
selections/load selection from alpha channel/selection 3

selections/promote selection to layer
layers/arrange/bring to top
effects/art media effects/brush strokes/default settings

effects/plugins/AAA Frames/Foto Frame

effects/plugins/Eye Candy Impact 5 Impact/Glass/preset Clear
window/duplicate
edit/copy as new image and set aside for a later use. Back to your work
selections/load selection from alpha channel/selection 3
selections/modify/contract/15 pixels
copy/paste the tube « Mizztisch surrealscape » into selection
selections/select none
blend mode : overlay and opacity 45%
effects/edge effects/enhance
activate the layer « promoted selection »

layers/duplicate
effects/geometric effects/skew

selection tool/rectangle/custom selection
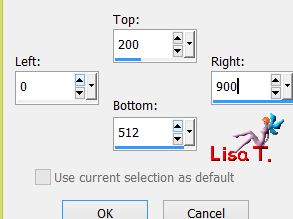
hit the delete key of your keyboard
bland mode : hard light and opacity 65% (or other)
layers/new raster layer
effects/3D effects/drop shadow/ 0 / 0 / 60 / 20 / black
selections/select none
activate the image set aside and merge visible
image/resize/uncheck « resize all layers »/50%
with the magic wand tool (default settings) select the transparent part
selections/invert
effects/3D effects/drop shadow as before
selections/modify/expand/8 pixels
layers/new raster layer and fill the selection with color 1
layers/arrange/send to bottom
selections/modify/expand/20 pixels
layers/new raster layer and fill the selection with color 2
selections/select none
layers/arrange/send to bottom
edit/copy special/copy merged
activate your work again and paste as new layer and send on top of the stack
image/resize/uncheck « resize all layers »/50%
effects/3D effects/drop shadow as before
image/mirror/mirror vertical
effects/image effects/offset

activate the backgound layer (merged)
copy/paste the tube « deco1_vivi » as new layer
blend mode : screen and opacity 100%
adjust/shrapness/sharpen
layers/merge/merge visible
copy/paste the tube « deco2_vivi » as new layer
effects/image effects/offset

layers/new raster layer
selections/load selection from alpha channel/selection 4

fill the selection with color 2
effects/3D effects/drop shadow/ 1 / 1 / 70 / 2 / black
selections/select none
effects/plugins/Eye Candy 5 Impact/Perspective Shadow/preset provided « broken vivi »
effects/image effects/offset

layers/merge/merge all (flatten)
image/add borders/check « symmetric » -->
2 pixels color 1
2 pixels color 2
2 pixelscolor 1
selections/select all
edit/COPY
image/add borders/60 pixels contrasting color
selections/invert
edit/paste into selection
adjust/blur/gaussian blur/30
effects/texture effects/straw wall/color #555555

selections/invert
effects/3D effects/drop shadow/ 0 / 0 / 60 / 35 / black and select none
image/add borders/2 pixels/color 2
image/add borders/30 pixels white
copy/paste the tube « 2 Babette » as new layer
move it as shown on the final result
adjust/sharpness/sharpen
effects/3D effects/drop shadow/ 10 / 10 / 50 / 28,71 / black
copy/paste the tube « Calguis deco TMAX » as new layer and move it opposite to the character
drop the same shadow as before
apply your signature on a new layer
layers/merge/merge all (flatten)
image/add borders/2 pixels color 2
resize if necessary and seave as .. type jpeg
****
thank you to have realized this tutorial
if you want Vivi to see your creation
she will be very glad to receive it and present it at the end of her tutorial

Back to the boards of Vivi’s tutorials
Board 2  board 3 board 3

|