Beauty

I am member of TWInc
My translations are protected


Material
tubes - mask - selection
copy the selection into the special folder “selections” of “My PSP Files”
open all other tubes, mask and decoration
duplicate and close the originalsWork with the copies

Thank you to the tubers : Karine Dreams - Claudi Viza
Filters used
Simple - Visual Manipulations - Toadies - AFS Import - Plugins Galaxy - factory M - AAA Frames
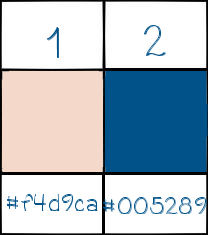
Colors palette
foreround color -> #f4d9ca -> color 1
background color -> #005289 -> color 2
you can use the paintbrush to follow the steps
left click to grab it

Realization
choose 2 contrasting colors in your main tube
light color as foreground, dark color as background
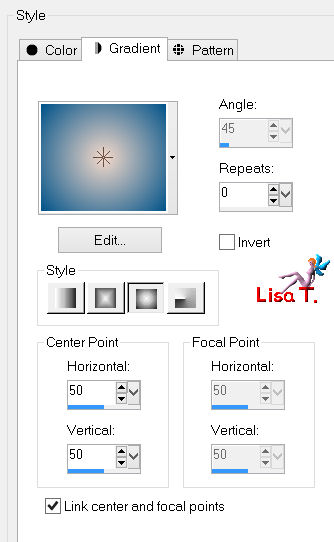
in the materials palette, prepare a sunburst gradient with the following settings
open a new background raster layer, transparent, 900 * 600 pixels
paint with the gradient
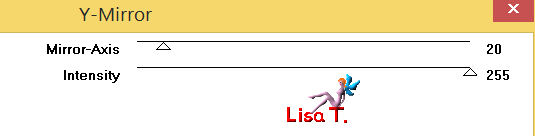
effects/plugins/Visual Manipulation/Y Mirror
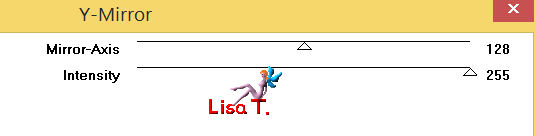
again, same plugin, with the following settings
adjust/sharpness/sharpen more
layers/duplicate
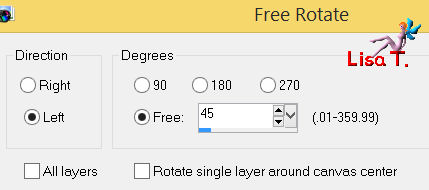
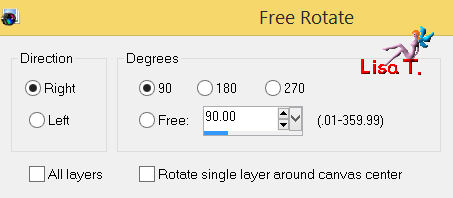
iamge/free rotate
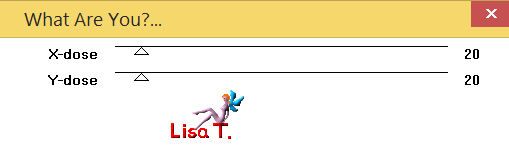
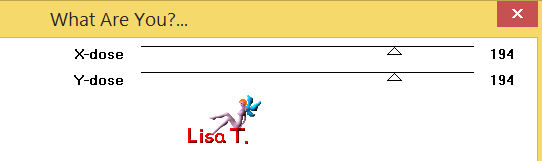
effects/plugins/Toadies/What Are You?
effecgs/3D effects/drop shadow/ 0 / 0 / 40 / 50 / black
effecs/plugins/Simple/4Wa Average
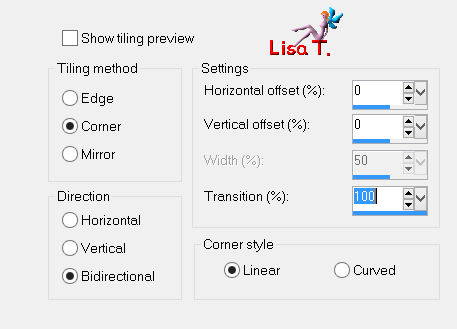
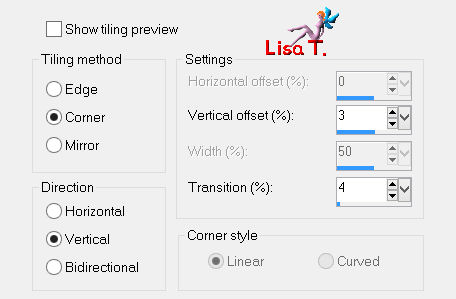
effects/image effects/seamless tiling
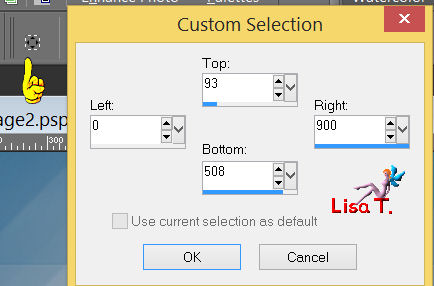
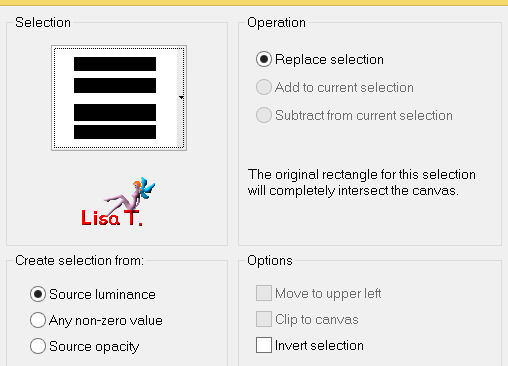
activate the selection tool/rectangle/custom selection
effects/3D effects/drop shadow/ 0 / 0 / 75 / 35 / black
selections/promote selection to layer
selections/select none
image/free rotate
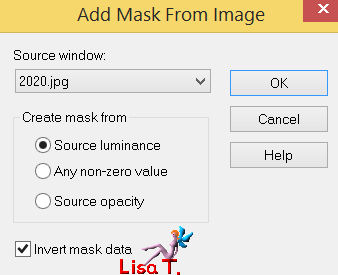
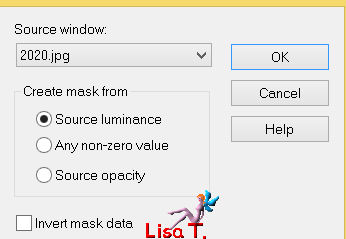
layers/new mask layer/from image/mask 2020
adjust/sharpness/sharpen
layers/merge/merge group
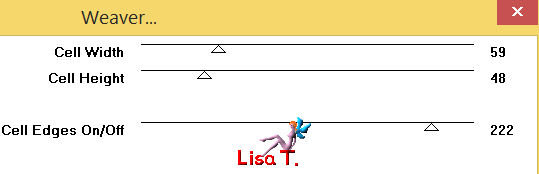
effects/plugins/Toadies/Weaver/Default settings
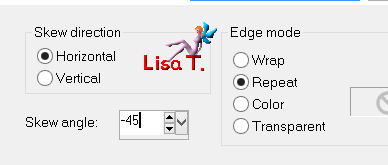
effects/geometric effects/skew
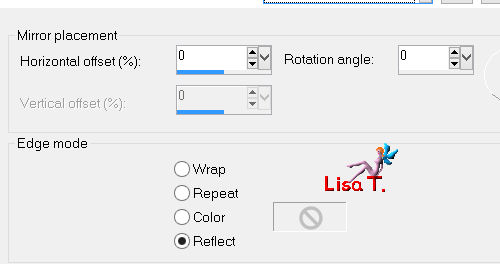
effects/reflection effects/rotating mirror/default settings
layers/duplicate - image/flip
layers/merge/merge down
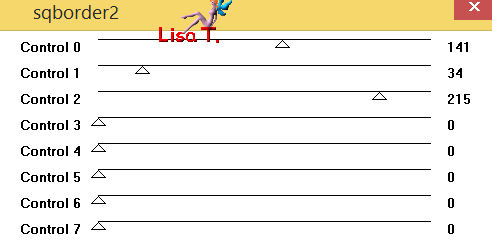
effects/plugins/AFS Import/sqborder2/default settings
effects/3D effects/drop shadow/ 0 / 0 / 40 / 50 / black
effects/distortion effects/pinch
apply the same effect once more
effects/image effects/seamless tiling
in the layers palette, set the blend mode of the layer on “screen”
and the opacity between 90% and 95% (according to your colors)
layers/new raster layer
selections/load-save selection/from disk/selection #Vivi 344
effects/3D effects/drop shadow/ 0 / 0 / 60 / 30 / black
selections/select none
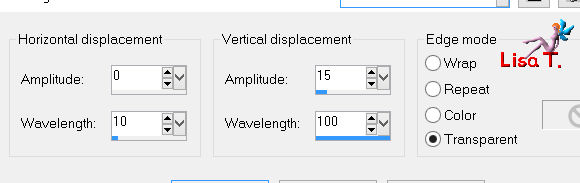
effects/distortion effects/wave
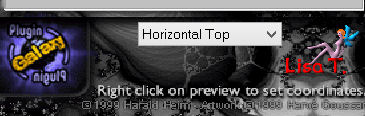
effects/lugins/Plugin Galaxy/Instant Mirror/Horizontal Top
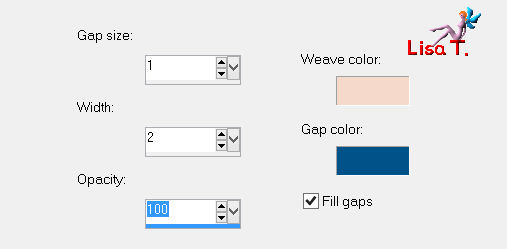
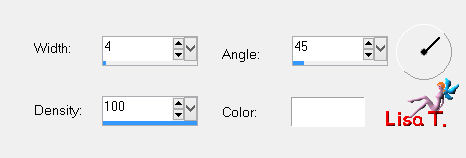
effects/texture effects/weave/ weave color n°1 and gap color n°2)
in the layers palette, activate the background layer (raster 1) and duplicate it
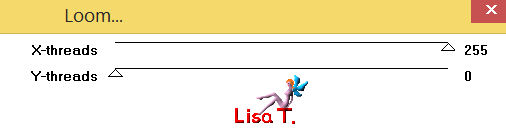
effects/plugins/Filter Factory/Gallery M/Loom
effects/artistic effects/topography
adjust/sharpness/sharpen
layers/new mask layer/from image/mask 2020/uncheck “invert”
layers/merge/merge group
in the layers palette, set the blend mode of the layer on ”Hard Light” or “Luminance (Legacy)”
(or other)
and the opacity on 100%
layers/merge/merge all (flatten)
selections/select all
layers/new raster layer, and fill with color 1
selections/modify/contract/2 pixels
press the Delete key of your keyboard
selections/select none
layers/merge/merge down
selections/select all
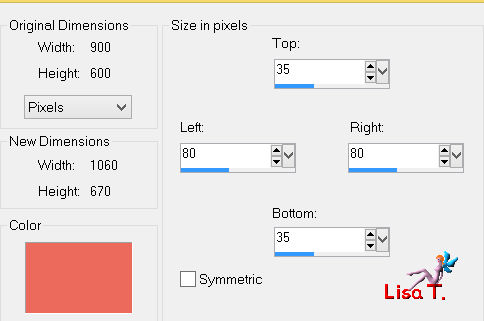
image/add borders/contrasting color/uncheck “symmetric”
edit/copy
selections/invert - edit/paste into selection
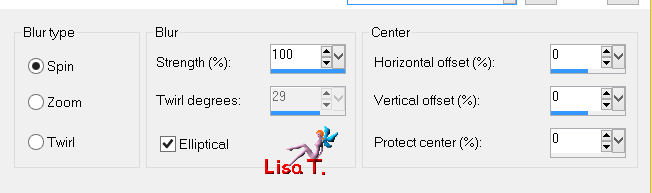
adjust/blur/radial blur
effects/plugins/Toadies/What Are You?
selections/invert
effects/3D effects/drop shadow/ 0 / 0 / 70 / 35 / black
selections/select none
acitvate the tube “deco Vivi”
edit/copy - back to your work - edit/paste as a new layer
don’t move it
activate the tube “Karine Dreams Sweet Lady”
image/resize/620 pixels height
edit/copy - back to your work - edit/paste as a new layer
move it to the left (see final result)
adjust/sharpness/sharpen
effects/3D effects/drop shadow/ 35 / 35 / 25 / 40 / black
activate the tube “Claudia Viza Stillife112”
image/resize/70%
edit/copy - back to your work - edit/paste as a new layer
move it to the right (see final result), opposite of the character
effects/3D effects/drop shadow as before (or other )
layers/merge/merge all (flatten)
image/add borders/ check “symmetric”
2 pixels/color 2
1 pixel color 1
15 pixels color 2
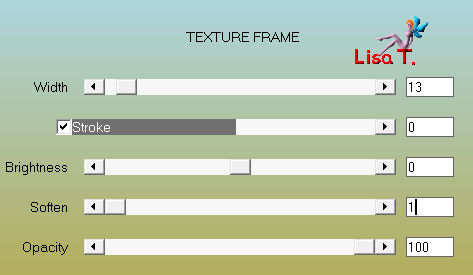
effects/plugins/AAA Frames/Texture Frame
layers/new raster for your signature
layers/merge/merge all (flatten)
resize if necessary, save as... type JPEG
thank you to have realized this tutorial
if you want Vivi to see your creation
she will be very glad to receive it and present it at the end of her tutorial

Back to the board of Vivi’s tutorials
Board 1  board 2 board 2

|