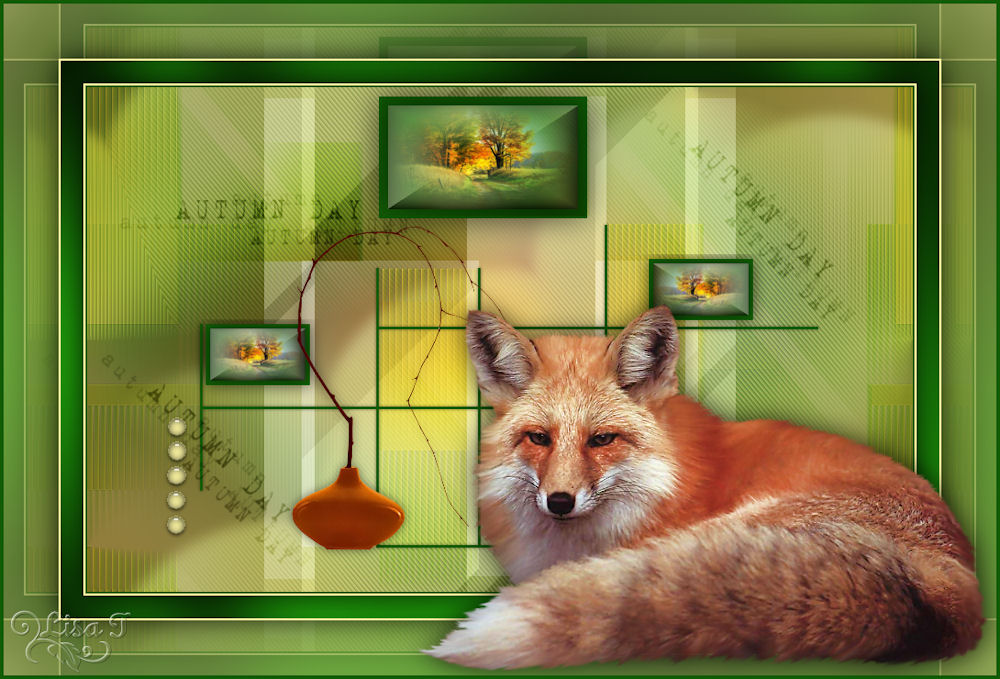
Autumn Day

Material
1 alpha layer
tubes (except the character, the tuber prohibits sharing)
note of the translator :I realized the tag with one of my tubes. You can find it on page 10 (women) of my site
thank you to the tubers : Zényra - Guismo - Talanat - Palvinka


Filters used
Graphic Plus - Vanderlee (Unplugged X) - Toadies - Eye Candy 5 Impact
Colors palette
color 1 -> foreground color -> #e9cd9b
color 2 -> background color -> #b74533
color 3 -> #ffffff
prepare colors 1 and 2 in the materials palette


Use the pencil to follow the steps
left click to grab it
 |
Realization
open the alpha layer
window/duplicate
close the original, and work with the copy
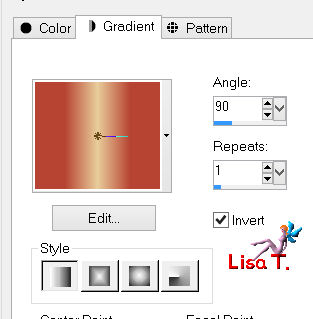
in the materials palette, prepare a linear gradient/ angle : 90 and repeats : 1 / check « invert »
fill the layer with the gradient
selections/select all
activate the tube « Talanat Paysage012 »
edit/copy - back to your work - edit/paste into selection
selections/select none
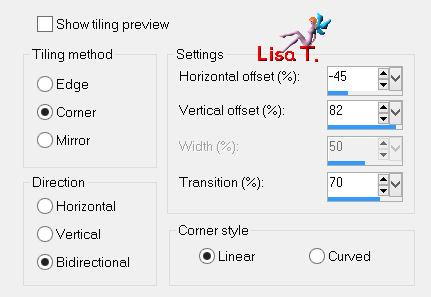
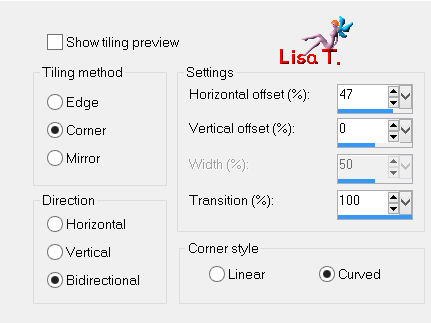
effects/image effects/seamless tiling/default settings
adjust/blur/radial blur

adjust/blur/gaussian blur/33
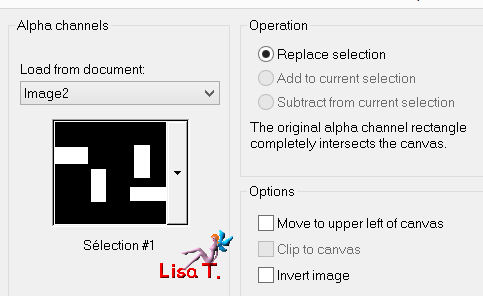
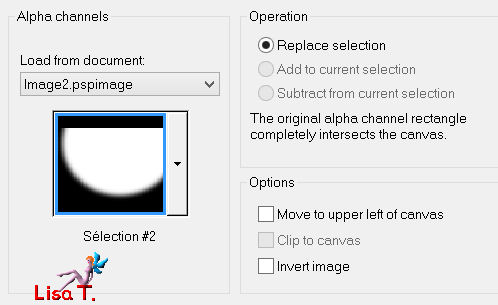
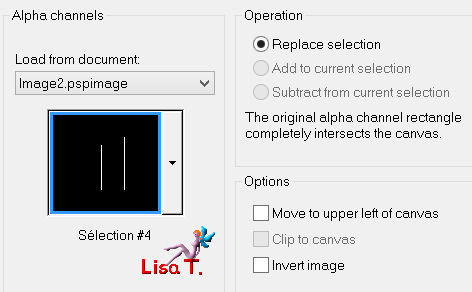
selections/load-save selection/from alpha channel/selection #1
selections/promote selection to layer
selections/select none
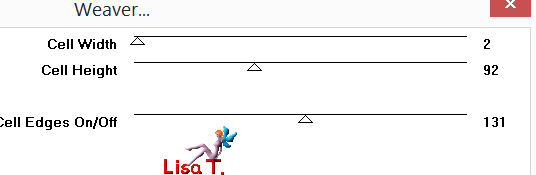
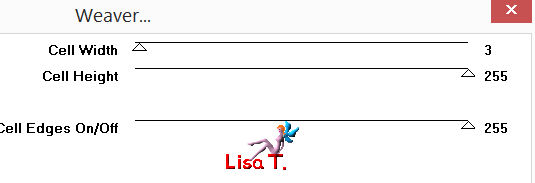
effects/plugins/Toadies/Weaver
adjust/sharpness/sharpen
effects/image effects/seamless tiling
in the layers palette, set the blend mode on « overlay » or « hard light » and the opacity on 80%
activate the layer above (Raster 1)
selections/load-save selection/from alpha channel/selection #2
selections/promote selection to layer
effects/plugins/Toadies/Weaver
selections/select none
effects/image effects/seamless tiling/default settings
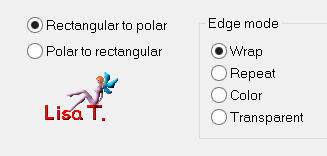
effects/distortion effects/polar coordinates
layers/duplicate
image/mirror - image/flip
layers/merge/merge down
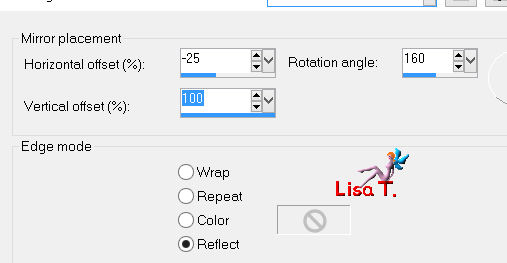
effects/reflection effects/rotating mirror
effects/image effects/seamless tiling
adjust/sharpness/sharpen
in the layers palette, set the blend mode on « screen » and the opacity on «85%
layers/new raster layer
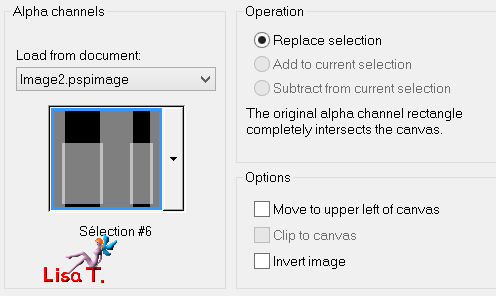
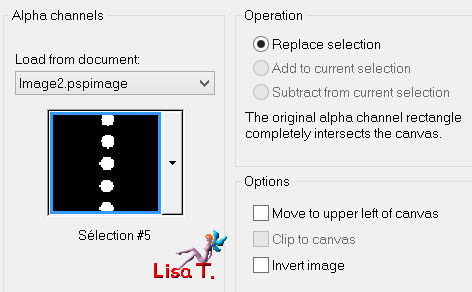
selections/load-save selection/from alpha channel/selection #6
fill selection white and select none
adjsut/sharpness/sharpen more
effects/edge effects/dilate
in the layers palette, set the opacity on 85%
layers/duplicate
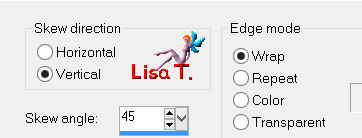
effects/geometric effects/skew
in the layers palette, set the blend mode on « Luminance (Legacy ) » and the opacity on 80%
layers/new raster layer
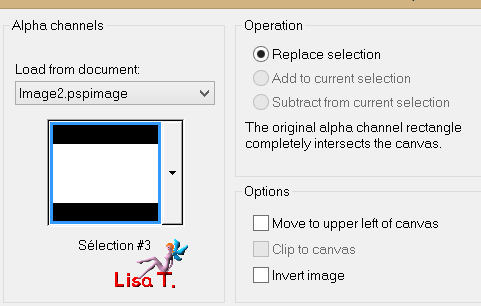
selections/load-save selection/from alpha channel/selection #3
fill the selection ith color 2 (dark color)
selections/modify/contract/10 pixels
effects/3D effects/drop shadown/ 0 / 0 / 50 / 50 / black
activate the flood fill tool, match mode on « none » and fill the selection with the gradient of the begining
effects/distortion effects/wind/from right/100
activate the tube « Talanat paysage012 »
edit/copy - back to your work - edit/paste into selection
effects/3D effects/buttonize (white)
selections/select none
effects/3D effects/drop shadow as before
in the layers palette, rename this layer « frame »
acitvate the top layer
layers/new raster layer
selections/load-save selection/from alpha channel/selection #4
fill the selection with the color you like (light o dark) and select none
effects/3D effects/drop shadow/ 0 / 0 / 50 / 5 / black
activate the tube « Calquis vigne vierge »
image/resize/uncheck « resize all layers »/50% - edit/copy
back to your work - edit/paste as new layer
place this layer as you want on the grid (selection 4)
effects/3D effects/drop shadow/ 0 / 0 / 50 / 15 / black
layers/new raster layer
selections/load-save selection/from alpha channel/selection #5
selections/modify/expand/
pixels
fill with color 1
effects/plugins/Alien Skin Eye Candy 5 Impact/Glass/preset : Clear
selections/select none
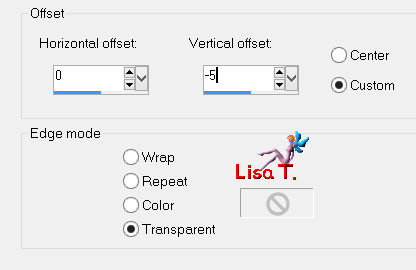
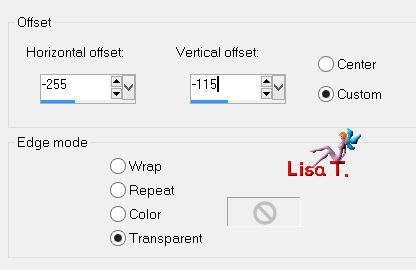
effects/image effects/offset
in the layers palette, activate the layer « frame »
layers/duplicate
image/resize/uncheck « resize all layers »/50%
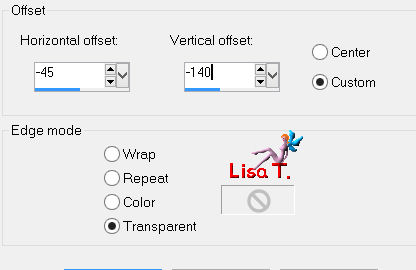
effects/simage effects/offset
layers/arrange/bring to top
layers/duplicate - image/mirror
effects/imgae effects/offset
activate the layer « Autumn Day »
edit/copy - back to your work - edit/paste as new layer
in tje layers palette, set the blend mode on « overlay » and the opacity on 90%
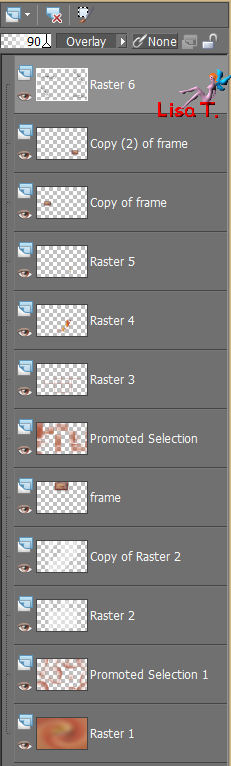
your layers palette looks like this
layers/merge/merge all (flatten)
image/add borders/check « symmetric » ->
2 pixels color 2
2 pixels color 1
selections/select all
image/add borders/check « symmetric » ->25 pixels color 2
effects/3D effects/drop shadow/ 0 / 0 / 75 / 40 / black
selections/invert
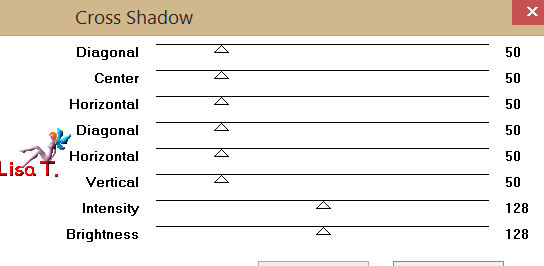
effects/plugins/Graphic Plus/Cross Shadwo/default settings
selections/select none
image/add borders/check « symmetric »/2 pixels/color 1
edit/COPY
selections/select all
image/add borders/check « symmetric »/60 pixels/contrasting color
selections/invert - edit/paste into selection
adjust/blur/gaussian blur/33
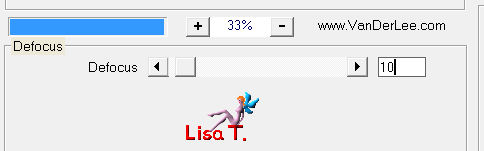
effects/plugins/Vanderlee/Unplugged X/Defocus/10
selections/invert
effects/3D effects/drop shadow as before/ 0 / 0 / 75 / 40 / black
selections/select none
acivate the tube of the character
resize it eventually
edit/copy - back to your work - edit/paste as new layer
apply a dropped shadow of your choice
apply your signature
layers/merge/merge all (flatten)
image/add borders/4 pixels/color 2
resize eventually
file/save as... type jpeg
thank you to have followed this tutorial
if you want Vivi to see your creation
she will be very glad to receive it and present it at the end of her tutorial

My tag with my tubes
Back to the boards of Vivi’s tutorials
board 1  board 2 board 2

|