Asia

I am member of TWInc
My translations are protected


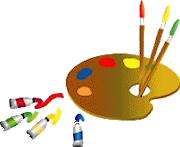
Material
1 alpha layer
tubes
free plugins
open all tubes with PSP, copy them, minimize the copies, close the originals
always work with the copies

Plugins
Filter Factory Gallery Q
Toadies
Carolaine & Sensibility
Pixelate (provided -> import in Unlimited 2)
Simple
Mehdi
RCS Filter Pack 1.0
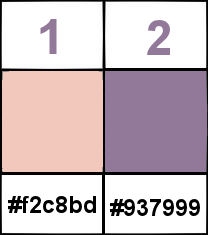
Colors palette
foregrond color --> #f2c8bd --> color 1
background color --> #937999 --> color 2
Use the paint brush to follow the steps
Left click to grab it

Realization
open the alpha layer/window/duplicate/close the original/use the copy for your work
choose 2 different colors in your main tube
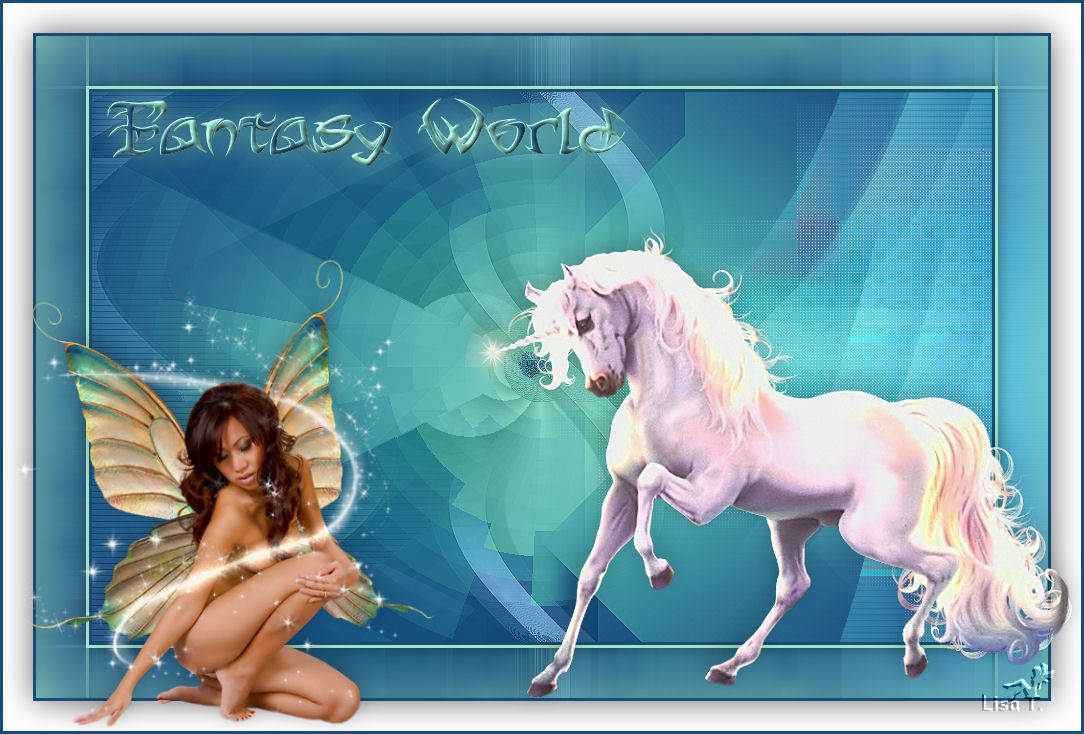
if you can, use an oriental tube (in agreement with the title..)
find 2 colors that go well together of course
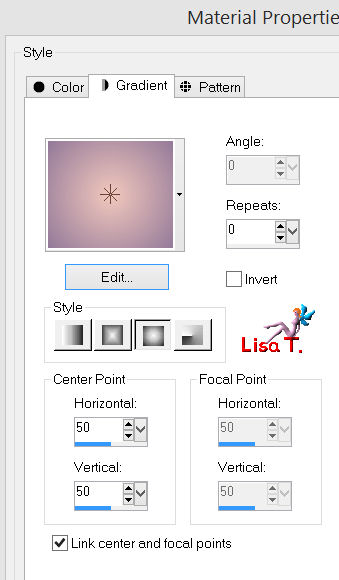
set light color as foreground, and dark color as background
in the materials palette, prepare a sunburst gradient and paint your alpha layer
effects/plugins/Simple/Pizza Slic Mirror
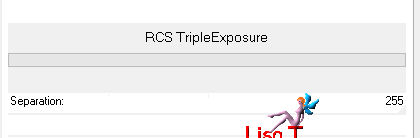
effects/plugins/RCS Filter Pack 1.0/Triple Exposure
adjust/sharpness/sharpen
layers/duplicate - image/mirror
in the layers palette, set the blend mode on Overlay or Multiply (or other according to your colors)
and the opacity on 60%
layers/merge/merge visible
layers/duplicate
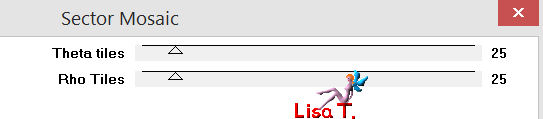
effects/plugins/Pixelate/Sector Mosaic
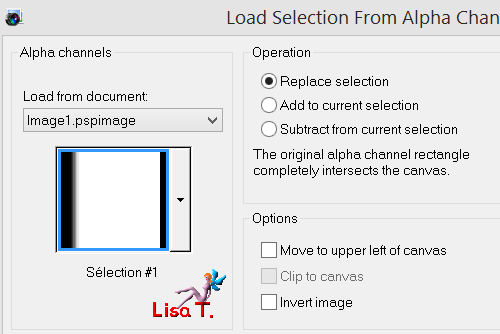
selections/load-save selection/from alpha channel/selection #1
press the Delete key of your keyboard (or edit/cut)
selections/select none
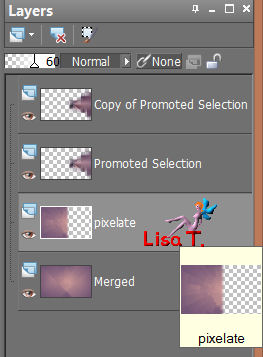
in the layers palette, rename that layer “Pixelate”
adjust/sharpness/sharpen
in the layers palette, set the opacity on 60%
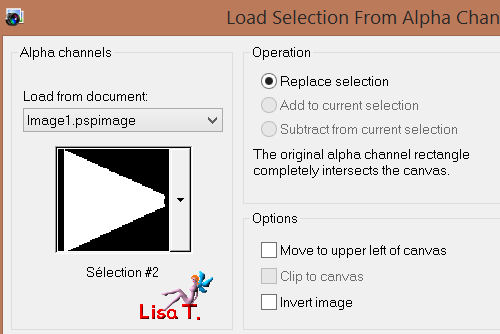
selections/load-save selection/from alpha channel/selections #2
selections/promote selection to layers
selections/select none
image/mirror
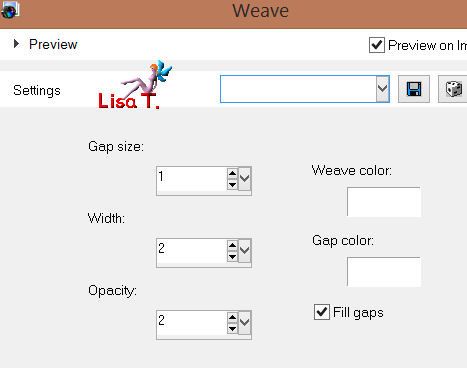
effects/plugins/Mehdi/Weaver/150

effects/plugins/Filter Factory Gallery Q/Gravity Blossom
effects/texture effects/weave (white)
in the layers palette, set the blend mode on Screen, and the opacity on 90%
layers/duplicate
in the layers palette, set the blend mode on Soft Light, and the opacity on 60%
adjust/sharpness/sharpen
in the layers palette, activate the laeyrs named “Pixelate”
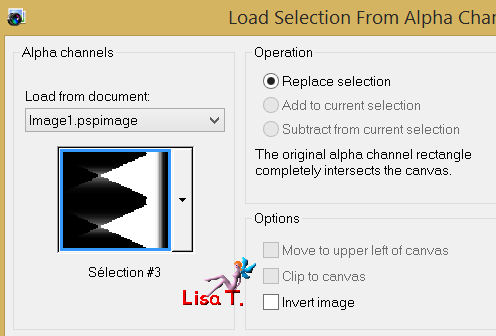
selections/load-save selection/from alpha channel/selection #3
selections/promote selection to layer
selections/selct none
image/rotate right (all the layers will rotate)

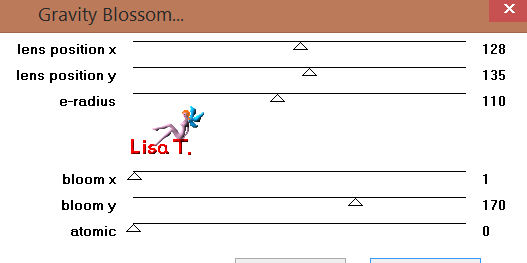
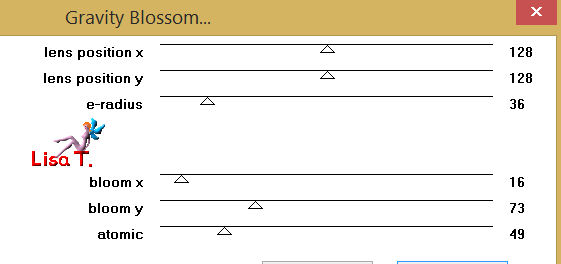
effects/plugins/Filter Factory Gallery Q/Gravity Blossom, with the following new settings
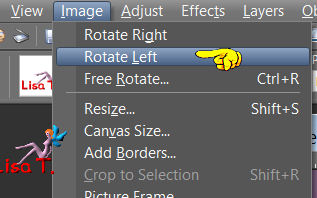
image/rotate left (all the layers wil rotate)
in the layers palette, activate the background layer (merged)
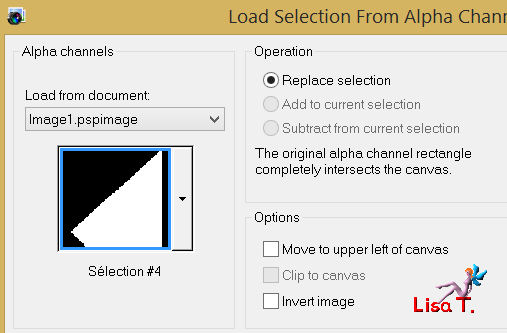
selections/load-save selection/from alpha channel/selection #4
selections/promote selection to layer
selections/select none
layers/arrange/bring to top
effects/distortion effects/warp

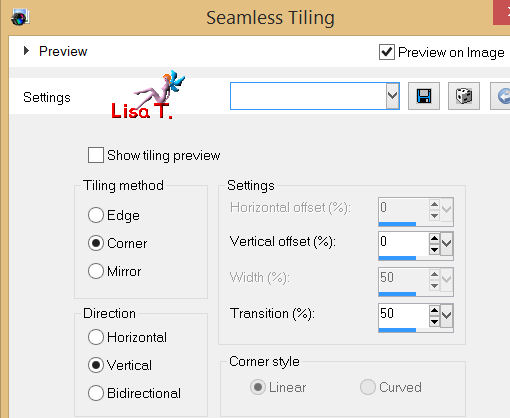
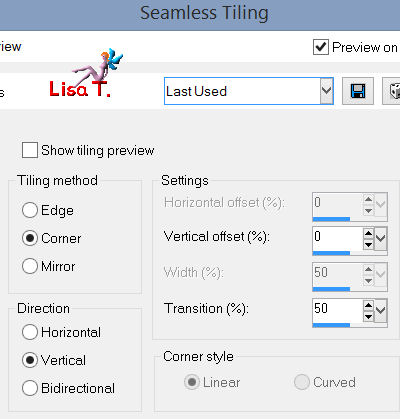
effects/image effects/seamless tiling
effects/plugins/Toadies/What Are You?/ 20 /0

effects/plugins/Carolaine & Sensibility/CS Halloween 2

in the layers palette, set the blend mode on Luminance (Legacy) or Screen
and the opacity between 65% and 85%, according to the blend mode you chose
layers/duplicate
image/mirror - image/flip
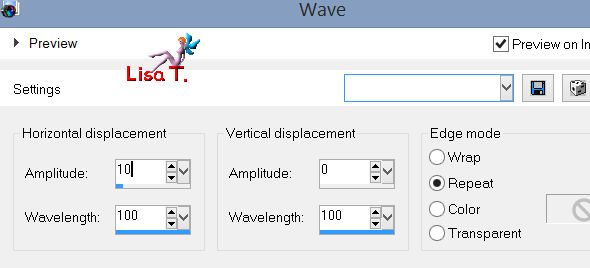
effects/distortion/wave

in the layers palette, set the blend mode on Screen or Luminance (Legacy)
invert the blend mode compared to what you chose just before
set the opacity on 45%
adjust/sharpness/sharpen more
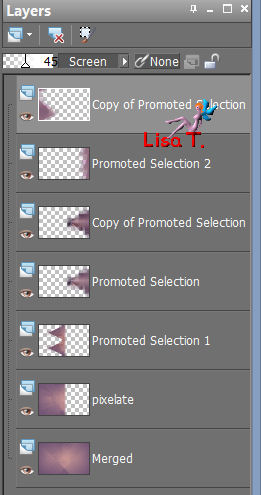
your layers palette must be like this
layers/merge/merge visible
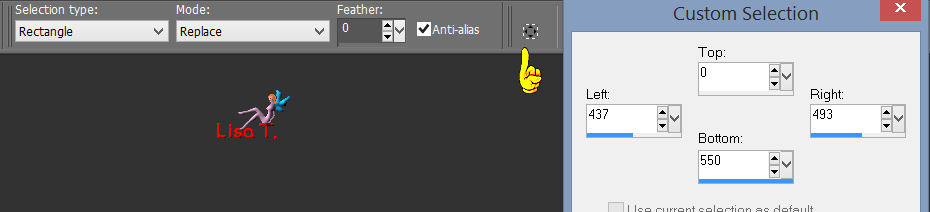
activate the Selection Tool/rectangle/custom selection
selections/promote selection to layer and select none
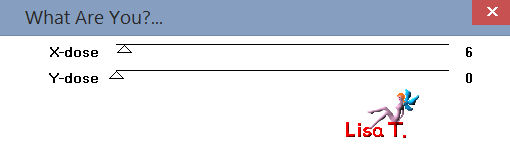
effects/plugins/Toadies/What Are You?/ 6 / 0
effects/distortion effects/wave
effects/image effects/seamless tiling
in the layers palette, set the blend mode on Luminance (Legacy) or Lighten
and the opacity on 75%
adjust/sharpness/sharpen
layers/merge/merge all
image/add borders
3 pixels/color 2
3 pixels color 1
selections/select all - edit/copy
image/add borders/50 pixels (contrasting color)
selections/invert - edit/paste into selection (the image is in the clipboard)
adjust/blur/gaussian blur/20
effects/plugins/Mehdi/Weaver/150
selections/promote selection to layer, and select none
image/flip, set the opacity on 50%
selections/select all
selections/modify/contract/50 pixels
effects/3D effects/drop shadow 0 / 0 / 85 / 25 / black
layers/merge/merge down
selections/select none
image/add borders
3 pixels color 2
30 pixels/white
activate the magic wand tool (default settings) and select that border
selections/invert
effects/3D effects/drop shadow 0 / 0 / 60 / 50 / black, and select none
activate the tube “Woman 769”, resize it to 90%
edit/copy - back on your work - paste as a new layer, and move it to the left (see the example)
adjust/sharpness/sharpen
effects/3D effects/drop shadow -7 / -20 / 26 / 33 / black
activate the tube “galet orchidee”, resize it to 40%, edit/copy
back on your work, edit/paste as a new layer, and move it to the right (see the example)
effects/3D effects/drop shadow as before
adjust/shapness/sharpen
activate the tube “texte_vivi”, copy and paste as a new layer
effects/image effects/offset

effects/3D effects/drop shadow 1 / 1 / 60 / 2.97 / black
in the layers palette, set the blend mode on Luminance (Legacy) or Luminance
and the opacity on 100%
new raster layer to apply your signature and merge all (flatten)
image/add borders/3 pixels/color 2
resize if necessary and save as ... type JPEG
thank you to have realized this tutorial
if you want Vivi to see your creation
she will be very glad to receive it and present it at the end of her tutorial

My creation with my tubes
Back to the boards of Vivi's Tutorials
board 1  board 2 board 2

|