Le
Noël de Lila - animation
  vous
trouverez les explications en français au bas de cette
page vous
trouverez les explications en français au bas de cette
page

this tutorial is an add-in to create the animation "falling
snow"
click on Virginia's banner to find the link to the
french tutorial (non-animated tag)
click on my banner to find the tutorial
(non-animated tag) translated into english

tutorial using
Ulead Gif Animator (UGA), or Animation Shop (AS)

use the pencil to follow the steps
hold down left click to grab it and move it

AS is a common software that everyone has (in principle)
so I don’t offer it to you
on the opposite, UGA is less « common »
with this software, you can create light animated tags,
with a much better quality
you can download it here (click on the dragon) (english
version)

you will find many tutorials to learn UGA on the web if
you want to know more about UGA
Animation using UGA
1
in step 23 of the tutorial, after applying your watermark,
don’t
add borders
this action flattens your work. So we will do without this
tiny border
image -> resize -> tick « resize all layers » -> 950
pixels (width)
2
in the layers palette, highlight bottom layer
layers -> new raster layer -> rename it « animation
1 »
3
layers -> duplicate TWICE
rename the 2 new layers « animation 2 » and « animation
3 »
4
enable Selection Tool -> rectangle
custom selection with the following settings
Top : 0 / Left : 0 / Bottom : 600 / Right :
950
5
highlight « animation 1 »
effects -> plugins -> VDL Adrenaline -> Snowflakes

6
highlight « animation 2 »
effects -> plugins -> VDL Adrenaline -> Snowflakes
random seed : 50
7
highlight « animation 3 »
effects -> plugins -> VDL Adrenaline -> Snowflakes
random seed : 100
selections -> select none
8
highlight « animation 1 »
close the ye of « animation 2 » and « animation
3 »
9

file -> save a... type .PSD (photoshop)
10
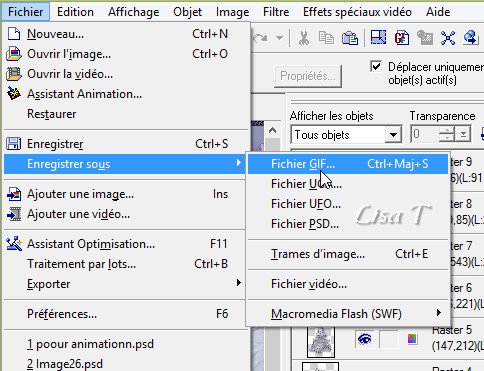
open UGA and open your work (file -> open)
follow the screenshots below step by step
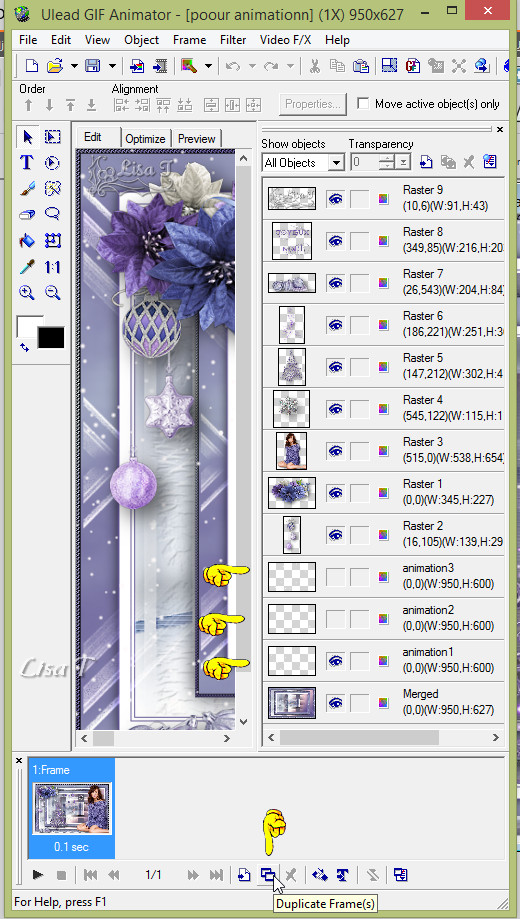
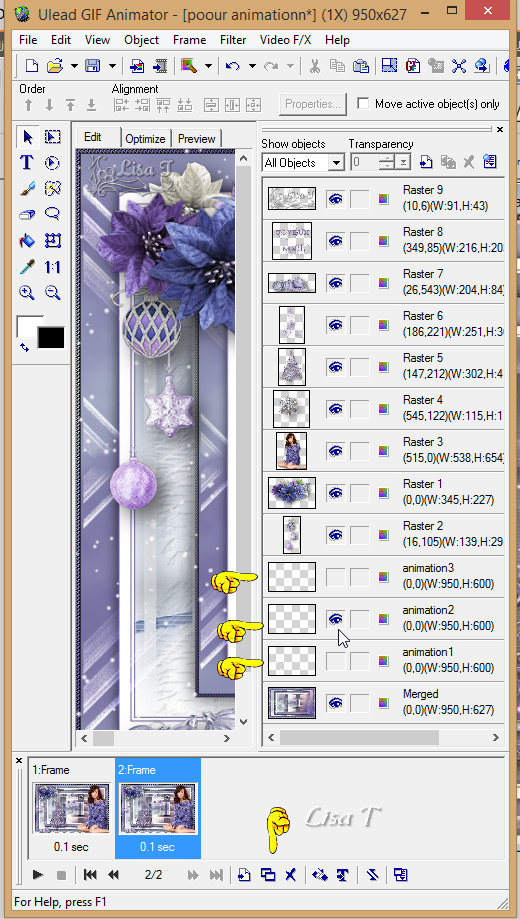
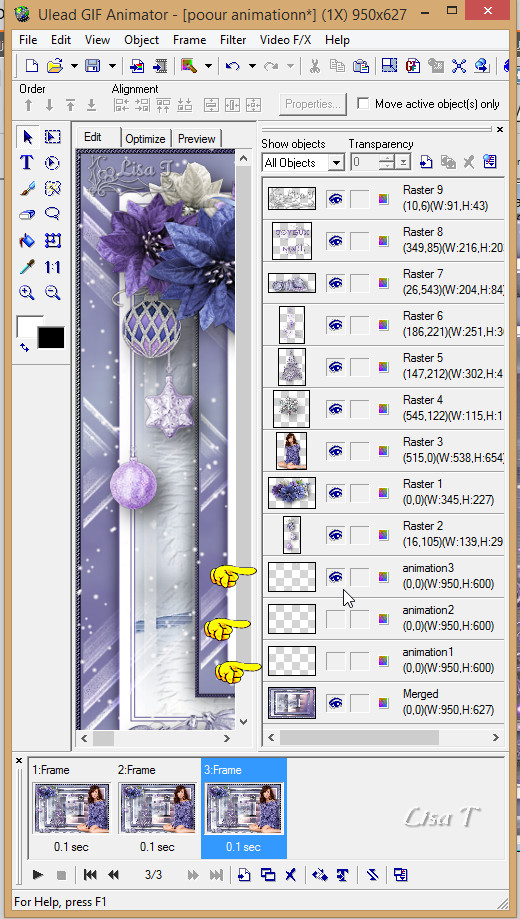
file -> saves as... -> GIF file
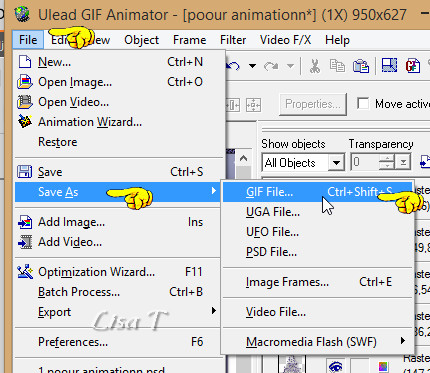
give a name to your creation
you can close UGA
answer NO to the question when UGA wants to shut off
Animation with AS
1
in step 23, after applying your watermark, don’t
add borders
this action flattens your work. So we will do without this
tiny border
image -> resize -> tick « resize all layers » -> 950
pixels (width)
2
in the layers palette, highlight bottom layer
layers -> new raster layer -> rename it « animation
1 »
3
layers -> duplicate TWICE
rename the 2 new layers « animation 2 » and « animation
3 »
4
highlight top layer and merge down 6 times
now all the elements are on the same layer
5
enable Selection Tool -> rectangle
custom selection with the following settings
Top : 0 / Left : 0 / Bottom : 600 / Right : 950
6
highlight « animation 1 »
effects -> plugins -> VDL Adrenaline -> Snowflakes
7
highlight « animation 2 »
effects -> plugins -> VDL Adrenaline -> Snowflakes
random seed : 50
8
highlight « animation 3 »
effects -> plugins -> VDL Adrenaline -> Snowflakes
random seed : 100
selections -> select none
9
close the eyes of "animation 2" and "animation 3"

edit -> copy special -> copy merged
10
open AS
edit -> paste as new animation
11
back into PSP
close the eye of « animation 1 » and
open the eye of « animation 2 »
edit -> copy special -> copy merged
12
into Animation shop -> edit -> paste after current
frame
13
back into PSP
close the eye of « animation 2 » and open the
eye of « animation 3 »
edit -> copy special -> copy merged
14
into Animation shop -> edit -> paste after current
frame
15
file -> save as... type .GIF
give a name to your work
the animation is done
thank you for following this tutorial
if you have any problem with it, don’t hesitate to
write to me

Animation à rajouter au tutoriel de Virginia
(non-animé) :
"Le Noël
de Lila"
cliquer sur la bannière de Virginia au début de la page
pour voir le tutoriel non-animé en français
vous trouverez
ci-dessous les explications pour ajouter la neige qui tombe à ce
tutoriel
les explications ci-dessous sont conçues pour faire cette animation soit
avec le logiciel Ulead Gif Animator (UGA)
soit avec Animation Shop (AS)
prenez ce crayon pour suivre les étapes
clic gauche maintenu pour le prendre et le déplacer
AS est un logiciel courant que tout le monde possède en principe
donc partant de ce principe je ne le fournis pas ici
par contre UGA est moins connu. Pourtant les résultats sont au rendez-vous !
on obtient au final des animations beaucoup moins lourdes
et de meilleure qualité
je vous le fournis en français, cliquez sur le dragon
(version française)
si vous souhaitez apprendre à bien maîtriser
cet outil passionnant
vous pouvez vous inscrire à l’école « A vos Pinceaux »

tutoriel pour animer avec UGA
1
A l’étape 23, après avoir ajouté votre
signature,
n’ajoutez pas les bordures, car cela aplatit votre image ;
pour pouvoir animer, nous nous passerons donc de cette
petite bordure.
redimensionnez votre tag -> cochez « redimensionner tous les calques » -> 950
pixels de large
2
Dans la palette des calques, activez le calque du bas
calques -> ajouter un calque raster -> le renommer « animation
1 »
3
calques -> dupliquer 2 fois
renommer les deux autres calques « animation
2 » et « animation 3 »
4
activez l’outil Sélection , sélection
rectangle -> sélection personnalisée
avec les valeurs suivantes --> Haut : 0 / Gauche :
0 / Bas : 600 / Droite : 950
5
activez le calque « animation 1 »
effects -> modules externes -> VDL Adrenaline -> Snowflakes
6
activez le calque « animation 2 »
effects -> modules externes -> VDL Adrenaline -> Snowflakes
Random seed -> 50
7
activez le calque « animation 3 »
effects -> modules externes -> VDL Adrenaline -> Snowflakes
Random seed -> 100
sélections -> ne rien sélectionner
8
activez le calque « animation 1 »
fermer les yeux des calques « animation 2 » et « animation
3 »
9
fichier -> enregistrer sous... type .PSD (photoshop)
10
ouvrez UGA et ouvrez votre travail (fichier -> ouvrir)
vous allez suivre pas à pas les captures d’écran
suivantes


fichier -> enregistrer sous -> fichier GIF
donnez un nom à votre création
vous pouvez fermer UGA
une petite alerte apparaîtra alors, vous demandant
si vous voulez modifier votre création
vous répondez NON

c’est terminé
tutoriel pour animer avec AS
1
A l’étape 23, après avoir ajouté votre
signature,
n’ajoutez pas les bordures, car cela aplatit votre
image ;
pour pouvoir animer, nous nous passerons donc de cette
petite bordure.
redimensionnez votre tag -> cochez « redimensionner
tous les calques » -> 950 pixels de large
2
Dans la palette des calques, activez le calque du bas
calques -> ajouter un calque raster -> le renommer « animation
1 »
3
calques -> dupliquer
renommer les deux autres calques « animation 2 » et « animation
3 »
4
activez l’outil Sélection , sélection
rectangle -> sélection personnalisée
avec les valeurs suivantes --> Haut : 0 / Gauche : 0
/ Bas : 600 / Droite : 950
5
activez le calque du haut
calques -> fusionner le calque du bas -> 6 fois
vous
devez avoir tous les éléments sur
un même calque en haut de la pile des calques
6
activez le calque « animation 1 »
effects -> modules externes -> VDL Adrenaline -> Snowflakes
7
activez le calque « animation 2 »
Random seed -> 50
8
activez le calque « animation 3 »
Random seed -> 100
Sélections -> ne rien sélectionner

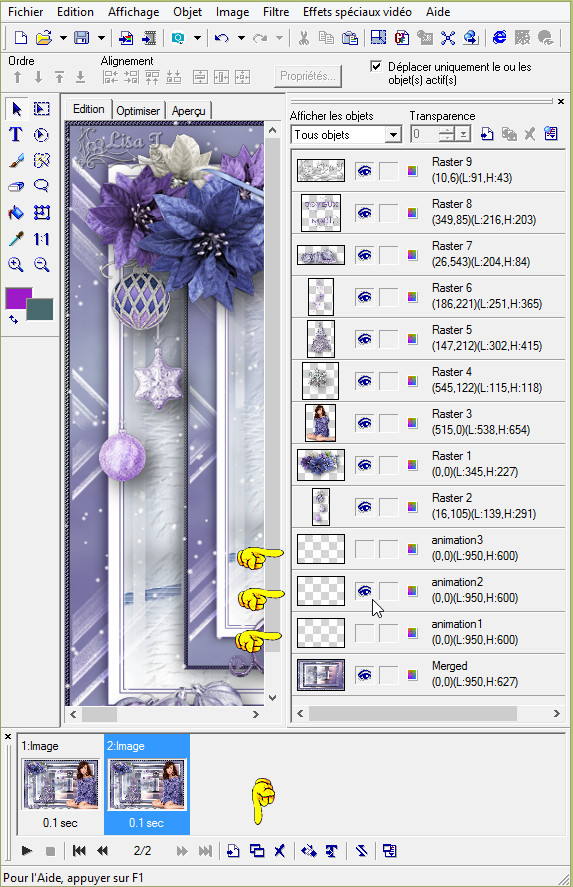
fermez
les yeux des calques "animation 2" et "animation 3"
votre
palette de calques ressemble à ceci
9
édition -> copie spéciale -> copier avec fusion
10
ouvrez AS
ouvrez votre travail
édition -> coller comme nouvelle animation
11
de retour dans PSP
fermez l’oeil de « animation 1 »,
et ouvrez l’oeil de « animation 2 »
édition -> copie spéciale -> copier avec fusion
12
allez dans AS
édition -> copier après l’image active
13
de retour dans PSP
fermez l’oeil de « animation 2 », et
ouvrez l’oeil de « animation 3 »
édition -> copie spéciale -> copier avec fusion
14
allez dans AS
édition -> copier après l’image active
15
fichier -> enregistrer sous.... type .gif
et donnez un nom à votre travail
c’est terminé
merci d’avoir suivi ce petite tutoriel
si vous avez le moindre souci, n’hésitez pas à me
contacter

|