
you wil find the orignal tutorial here
This tutorial is a personal creation.
Virginia works with PSP19
I work with PSP20 Ultimate
but you can follow this tutorial with any other version of PSP

Any resemblance with another one would be pure coincidence.
It is stricly forbidden to modify images, to change their name or take off the matermarks,
To present them on your sites or blog,
To share them in groups,
to make a bank of images, or to use them on lucrative purposes.
Thank you to respect Virginia’ work and the tubers work.
Don’t hesitate to warn her if you have any trouble with this tutorial.
some tubes were received in sharing groups
if one of them is yours, or not copyright free, please let Virginia know
and a link to your site will be added
either she will delete it from the material provided if you prefer
Material
Tubes – selections – colors Palette – Texture
Place the supplies and selections into the dedicated folders of « Corel PSP » general folder

Plugins
Unlimited 2
Alien Skin EyeCandy 5 - Impact
* Andrew's Filter Collection 60
* Filter Factory Gallery F
Mehdi - Wavy Lab 1.1
Mura's Meister - Perspective Tiling
* Penta Com - à importer dans Filters Unlimited
Picture Man - Collection Art Gallery - Bright Noise
* Visual Manipulation -
filters with a * can be imported and used with Filters Unlimited
Thank you very much Renée Salon for sharing with us your plugins page

Colors
Virginia chose these colors

Don't hesitate to change the colors and the blend mode of the layers, and the shadows,
according to your tubes and images.
Important
Open all images in PSP, duplicate them and close the originals. (shift + key D)
always work with the copies to preserve original files
TIP 1 -> if you don’t want to install a font -->
open it in a software as « Nexus Font » (or other font viewer software of you choice)
as long as both windows are opened (software and font), your font will be available in your PSP
TIP 2 -> from PSPX4, in the later versions of PSP the functions « Mirror » and « Flip » have been replaced by -->
« Mirror »has become --> image => mirror => mirror horizontal
« Flip » has become --> image => mirror => mirror vertical
Virginia’s tip concerning this tutorial =>
If you want another harmony of colors than mine,
I advise you to start the tutorial by taking the same colors as me.
Then colorize the result obtained.
Otherwise, choose fairly clear colors at the start of the tutorial.
use the pencil to follow the steps
hold down left click to grab and move it

prepare your material
Instructions
prepare the materials palette, color 1 & 2 as FG and BG colors
don’t forget to save your work as often as possible
1
open a new image => transparent => 950 * 600 px
effects => plugins => Mehdi => Wavy Lab 1.1 => colors 2 / 1 / 6 / don’t modifiy the fourth color

2
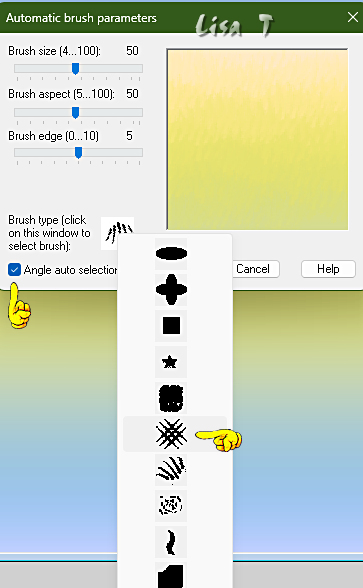
effects => plugins => Picture Man / Collection Art Gallery / Automatic Brush
Configuration => ...
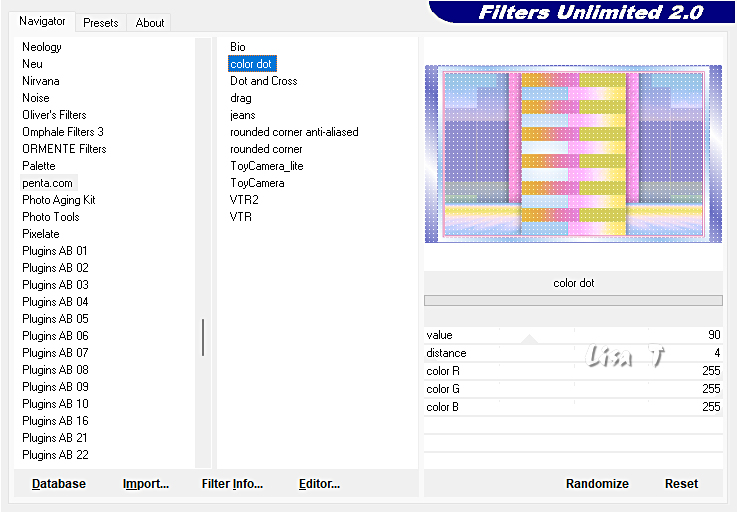
In the filter window, at the bottom, left,
Click on the small white square to open the drop-down menu and choose the brush (see screen capture below)
edit => Repeat
effects => edge effects => enhance
3
layers => duplicate
image => resize => untick « resize all layers » => 80%
4
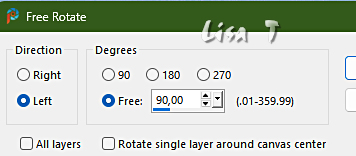
image => free rotate
effects => plugins => Unlimited 2 => Andrew’s Filter Collection 60 / Odd Kind of Pastels
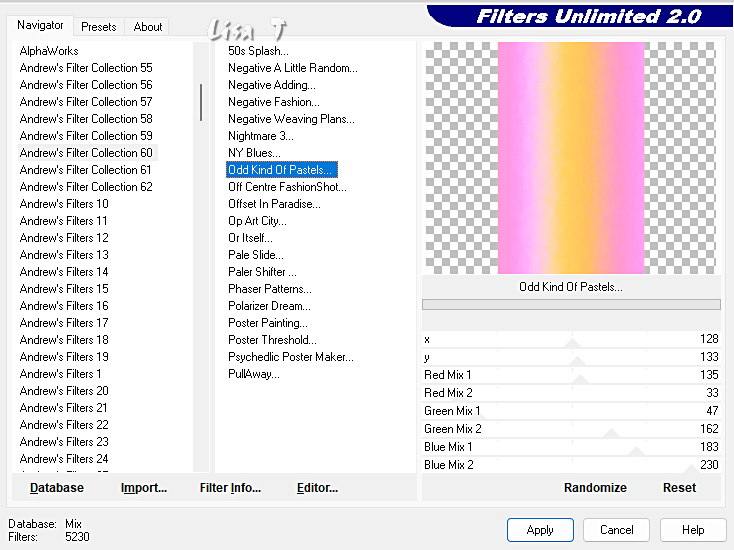
Note => You can change the color obtained by playing on the adjustment of the Red/Green/Blue Filter values
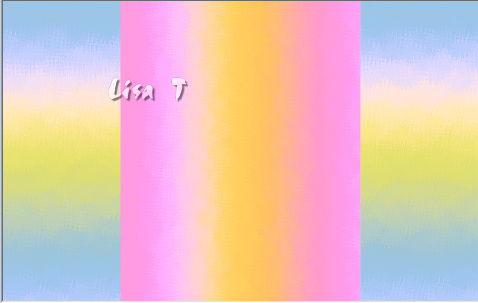
your work looks like this
5
layers => duplicate
image => resize => untick « resize all layers » => 80%
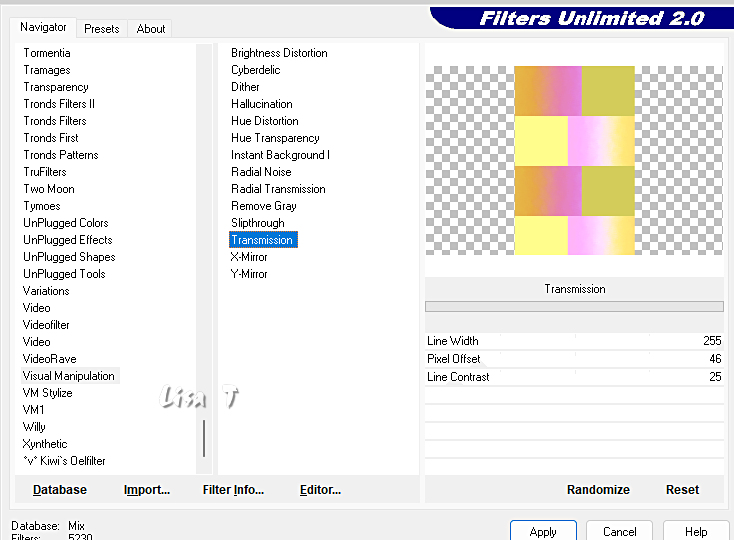
effects => plugins => Unlimited 2 => Visual Manipulation / Transmission
6
set FG to color 1 and BG to color 3 in the materials palette
prepare a sunburst gradient
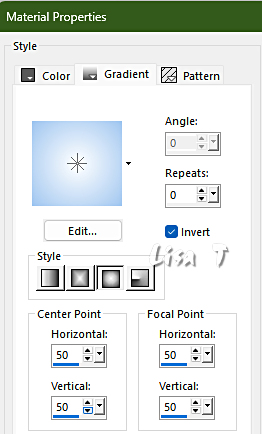
selections => load-save selection => from disk => selection # 1
flood fill selection with the gradient
selections => select none
7
effects => edge effects => enhance
effects => image effects => offset => H : 0 / V : -4 / tick « custom » and « transparent »
effects => 3D effects => drop shadow => 0 / 0 / 60 / 40 / black
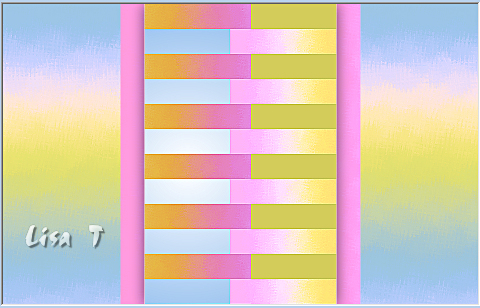
your work looks like this
8
highlight bottom layer
layers => duplicate
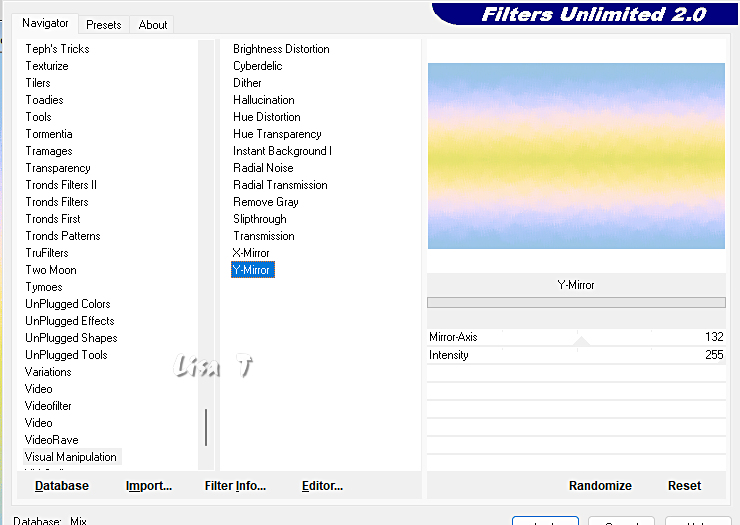
effects => plugins => Unlimited 2 => Visual Manipulation / Y-Mirror / default settings
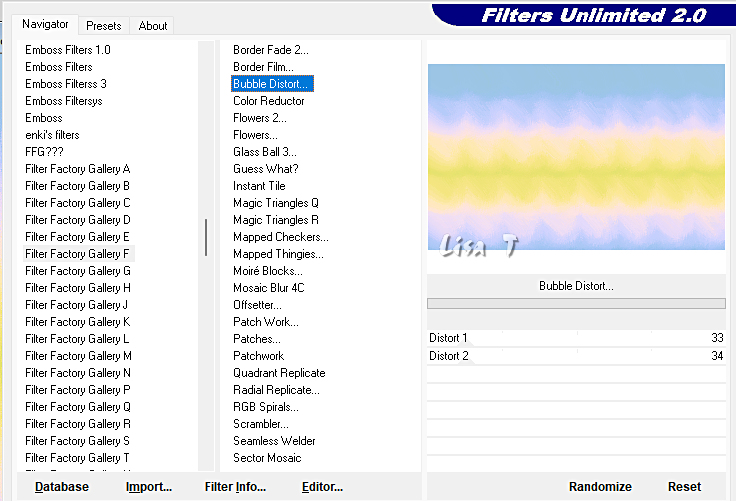
effects => plugins => Unlimited 2 => Filter Factory Gallery F /* Bubble Distort / default settings
9
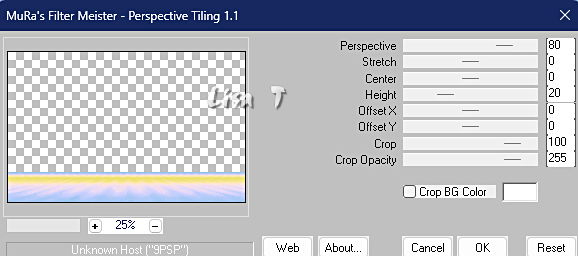
effects => plugins => Mura’s Meister => Perspective Tiling
effects => 3D effects => drop shadow => 0 / 0 / 40 / 60 / black
layers => arrange => move up
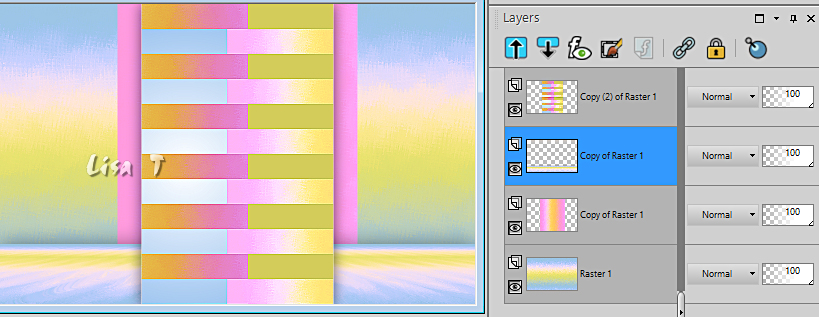
your layers palette and tag look like this
10
highlight layer below (second from bottom) (copy of Raster 1)
effects => texture effects => texture / use the Texture provided / White
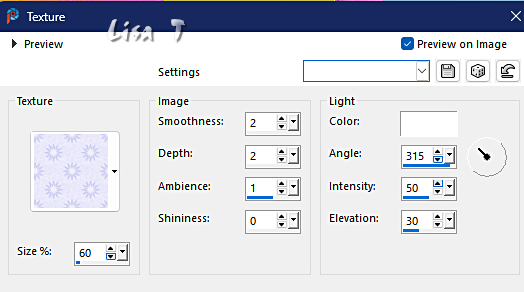
effects => 3D effects => drop shadow => 0 / 0 / 50 / 40 / black
11
set FG to color 4 and BG to color 3 in the materials palette
highlight bottom layer
layers => new raster layer
flood fill with color 4 (FG Color)
12
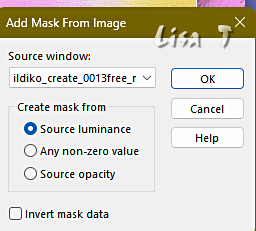
layers => new mask layer => from image
effects => edge effects => enhance
layers => merge => merge group
13
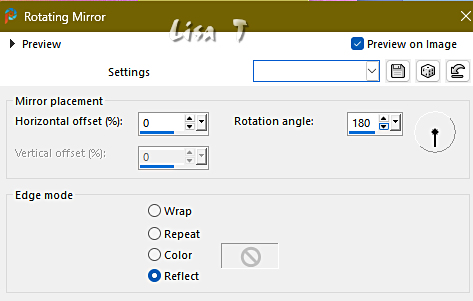
effects => reflection effects => rotating Mirror
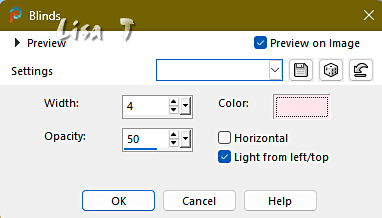
effects => texture effect => Blinds / color 6
layers => merge => merge all (flatten)
14
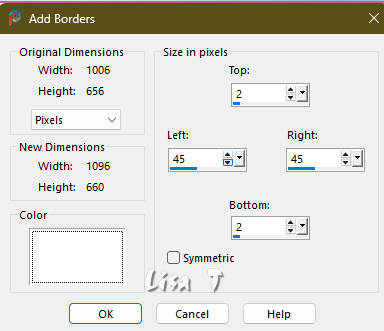
set FG to color 5 and BG to color 3 in the materials palette
image => add borders => tick « symmetric » => ...
2 px color 5
4 px color 3
2 px color 5
15
set FG to color 1 and BG to color 3 in the materials palette
prepare a linear gradient
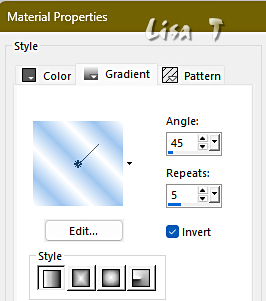
image => add borders => tick « symmetric » => 18 px color 3
16
enable the Magic Wand Tool

select the White border
flood fill selection with the gradient
selections => select none
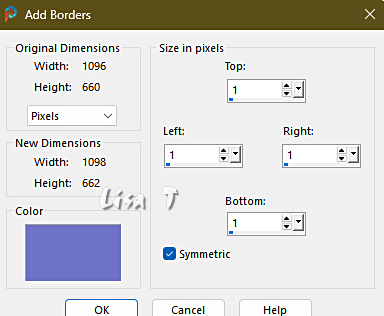
image => add borders => tick « symmetric » => 2 px color 4
17
set FG to color 5 and BG to color 4 in the materials palette
prepare a linear gradient, same as in step 15 but UNtick “invert”
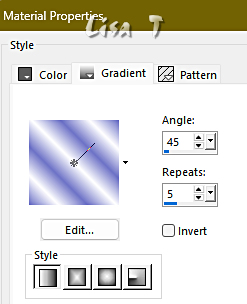
image => add borders => UNtick « symmetric » => White
right click on the background layer and choose => promote background layer
18
select the White border
flood fill selection with the new gradient
effects => plugins => Unlimited 2 => Penta.com => color dot
keep selection active
19
effects => edge effects => Dilate
selections => invert
effects => 3D effects => drop shadow => 0 / 0 / 50 / 70 / black
selections => select none
20
image => add borders => tick « symmetric » => 1 px color 4
21
copy / paste « deco01_delia.png » as new layer on your main work
colorize if necessary (or set the blend mode on Luminance)
effects => image effects => offset => H : 0 / V : 186 / tick « custom » and « transparent »
effects => 3D effects => drop shadow => 0 / 0 / 40 / 70 / black
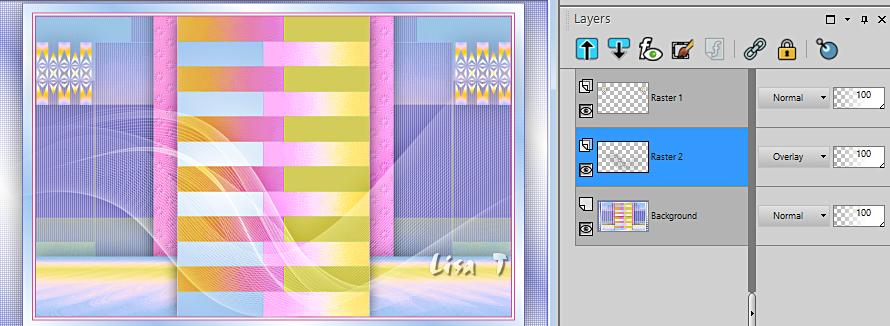
22
highlight bottom layer
copy / paste « deco02_delia.png » as new layer on your main work
effects => image effects => offset => H : 0 / V : -50 / tick « custom » and « transparent »
blend mode of the layer : Overlay
effects => 3D effects => drop shadow => 0 / 0 / 50 / 60 / black
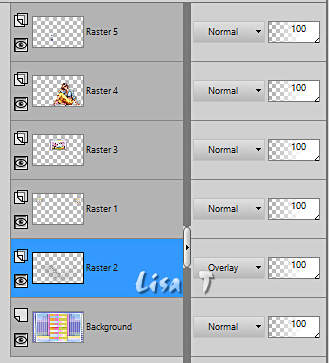
your layers palette and tag look like this
23
highlight top layer
copy / paste « deco03_delia.png » as new layer on your main work
enable the Pick tool with the following settings, to move the layer acurately => position X : 355 / position Y : 77
hit the « M » key of your keyboard to disable the tool
24
selections => load-save selection => from disk => selection # 2
25
open « CV_paysage_Delia.png »
erase the Watermark
image => resize => untick « resize all layers » => 45%
adjust => sharpness => sharpen
edit => copy / paste as new layer on your main work
place properly in the selection
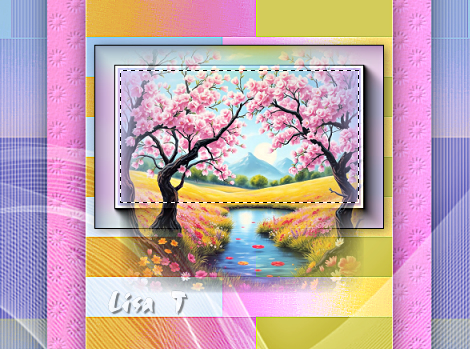
keep selection active
26
selections => invert
hit the DELETE key of your keyboard
selections => invert
layers => merge => merge down
keep selection active
27
effects => plugins => Alien Skin Eye Candy 5 Impact / Glass
sezttings tag => Clear
basic tab =>

selections => select none
28
open « CV_femme_Delia.png »
erase the Watermark
image => resize => untick « resize all layers » => 70%
edit => copy / paste as new layer on your main work
enable the Pick tool with the following settings, to move the layer acurately => position X : 405 / position Y : 145
effects > 3D effects > drop shadow > -1 / 13 / 50 / 40 / black
29
copy / paste « deco04_delia.png » as new layer on your main work
enable the Pick tool with the following settings, to move the layer acurately => position X : 378 / position Y : 384
30
highlight Raster 2 (second from bottom)
copy / paste « deco04_delia.png » as new layer on your main work
enable the Pick tool with the following settings, to move the layer acurately => position X : 215 / position Y : 238
effects > 3D effects > drop shadow > 3 / -13 / 40 / 50 / black
31
highlight top layer
open « Delia_fleurs.png »
image => resize => untick « resize all layers » => 60%
edit => copy / paste as new layer on your main work
enable the Pick tool with the following settings, to move the layer acurately => position X : 88 / position Y : 375
effects > 3D effects > drop shadow > -14 / 7 / 40 / 60 / black
layers => merge => merge all (flatten)
32
image => add borders => tick « symmetric » => ...
10 px color 3
2 px color 4
33
apply your watermark and Virginia’s watermark on new layers
place where you like
layers > merge > merge all (flatten)
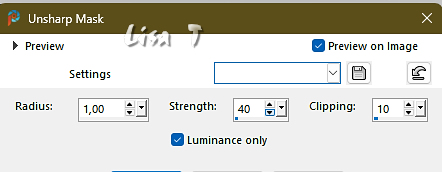
image => resize => tick « resize all layers » => 950 px width
adjust => sharpness => unsharp mask
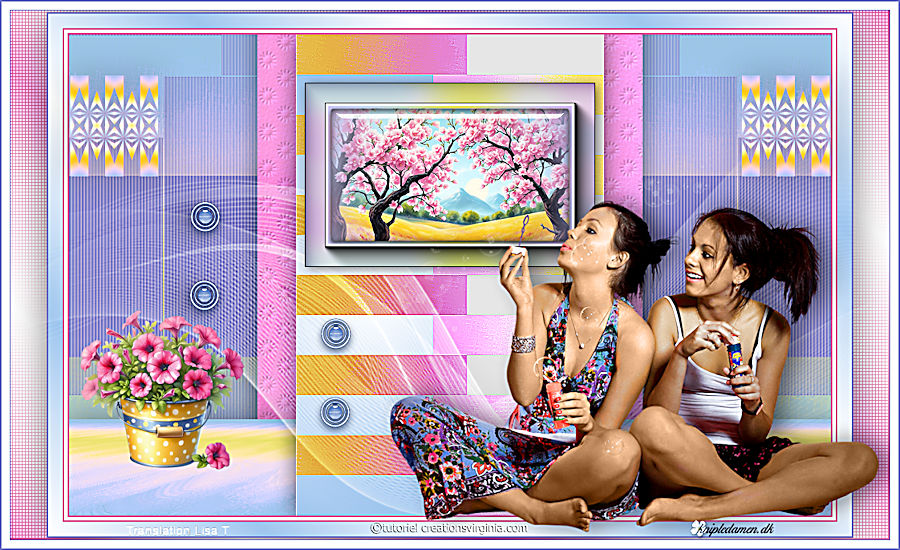
your tag is finished
save as... type jpeg
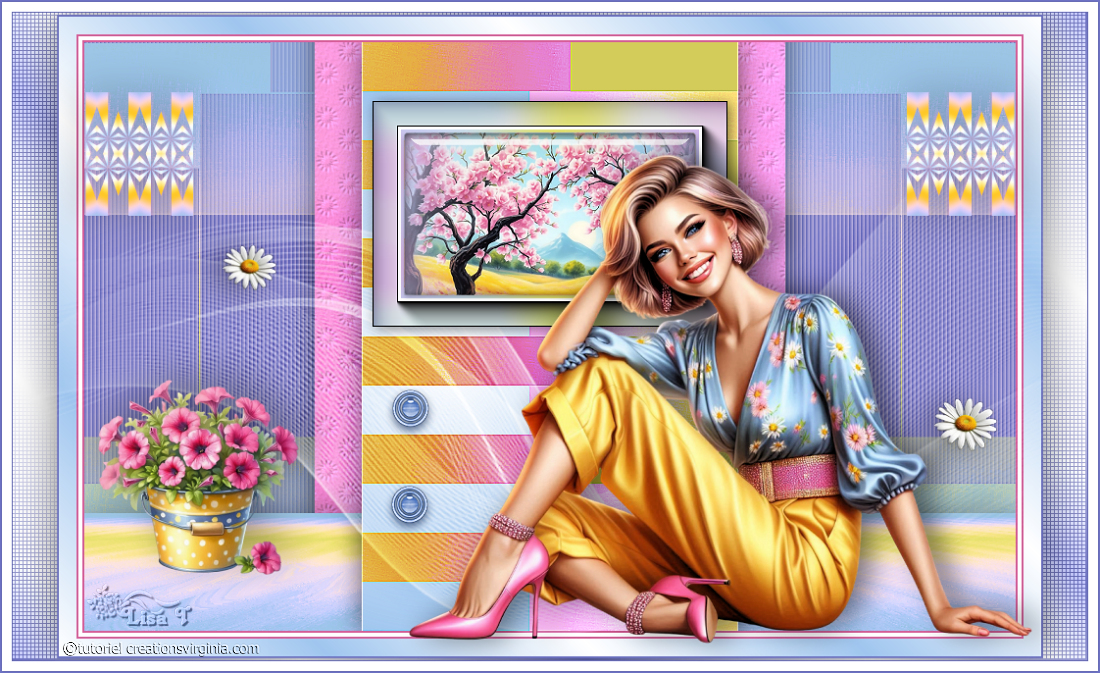
My tag with my tubes

Don't hesitate to write to me if you have any trouble with this translation
Don’t hesitate to send me your creations
It will be a real pleasure for me to present them in the gallery below

created by ▼ Birte
Back to the board of Virginia’s tutorials
20 tutorials on each board
board 2 => 
at the bottom of each board you will find arrows allowing you to navigate from one board to another


|