To my lover....

you wil find the orignal tutorial here

This tutorial is a personal creation.
Virginia works with PSP17
I work with PSP18
but you can follow this tutorial with any other version of PSP

Any resemblance with another one would be pure coincidence.
It is stricly forbidden to modify images, to change their name or take off the matermarks,
To present them on your sites or blog,
To share them in groups,
to make a bank of images, or to use them on lucrative purposes.

Thank you to respect Virginia’ work and the tubers work.
Don’t hesitate to warn her if you have any trouble with this tutorial.
some tubes were received in sharing groups
if one of them is yours, or not copyright free, please let Virginia know
and a link to your site will be added
either she will delete it from the material provided if you prefer


Material
tubes - selections - color palette

the woman tube was created by MiHWn 
scraps elements by Cajoline

Filters used
to download the filters, click on the banner below
Thank you very much to Janaly and Gigi for their kind permission

If you don’t know how to install filters into Unlimited 2, just click on the link below


Colors used
Virginia used these colors

I used these colors

translator’s note : I translate Virginia’s tutorial to create a tag similar to hers
I used different colors and tubes to create my version
Don't hesitate to change the colors and the blend mode of the layers, and the shadows,
according to your tubes and images.
the tag’s color depends on the first 2 colors
Virginia recommends to choose the main tube after completing step 1

Important
Open all images in PSP, duplicate them and close the originals. (shift + key D)
always work with the copies
some tubes provided are not « visible » (in order to reduce the weight of the material file)
click on visibility toggle of the layer to make it visible again
open the masks, and minimize them to tray
copy/paste selections into the special folder « selections » of « My PSP Files »

use the pencil to follow the steps
left click to grab it


prepare your material
in the materials palette, set colors 1 and 2 as FG and BG colors

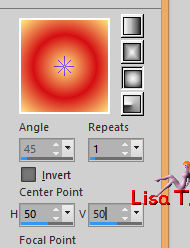
prepare sunburst gradient with the following settings

save your work as often as possible
Realization
Step 1
open a new transparent raster layer 900 * 550 pixels
flood fill with the gradient

Step 2
effects > plugins > Graphic Plus > Button Beveller II

effects > reflection effects > pattern

effects > edge effects > enhance more
Step 3
selections > load-save selection > from disk > selection #1

selections > promote selection to layer
keep the selection active
Step 4
effects > plugins > Unlimited 2 > Filter Factory A > Holidays in Egypt

effects > plugins > Unlimited 2 > Unplugged Tools > Vertical Tile > default settings
effects > plugins > Unlimited 2 > Simple > 4 Way Average > default settings
selections > select none
adjust > sharpness > sharpen more
your tag looks like this

Step 5
layers > new raster layer
selection tool > custom selection


(don’t worry about the precision of this selection)
effects > plugins > Mehdi > Wavy Lab1-1

selections > select none
Step 6
effects > plugins > Mehdi 2 > Quick Pattern 1-1
your tag looks like this

effects > image effects > seamless tiling

layers > arrange > send to bottom
effects > texture effects > mosaic glass


Step 7
in the materials palette, set color 3 as FG color
prepare a linear gradient

activate the top layer - layers > new raster layer
selections > load-save selection > from disk > selection #2

flood fill the selection with the gradient
selections > select none
Step 8
with the magic wand tool, click inside the central rectangle (feather and tolerance : 0)

layers > new raster layer
copy / paste into selection the tube « 143NLF160108.psp »
selections > select none
adjust > sharpness > sharpen (optional)
Step 9
activate « Raster 3 » (the frame)
effects > image effects > seamless tiling

selections > load-save selection > from disk > selection #3

selections > invert
DELETE
selections > select none
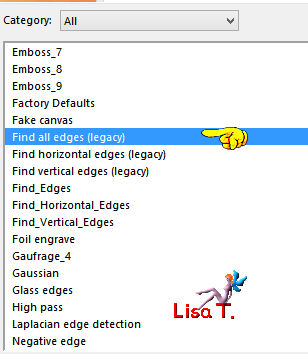
effects > User Defined Filter > find edges (legacy)

effects > plugins > Alien Skin Eye Candy Impact > Perspective Shadow > Drop Shadow Blurry

layers > merge > merge down
Step 10
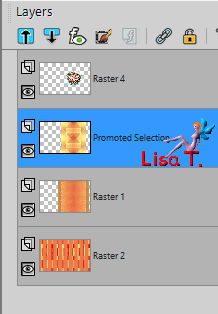
in the layers palette, « Promoted Selection » is the active layer

selections > load-save selection > from disk > selection #3
selections > modify > select selection borders

layers > new raster layer
flood fill tool

flood fill the selectionS with the BG color (right click)
selections > select none
effects > texture effects > blinds > color white

layers > merge > merge down
Step 11
selections > load-save selection > from disk > selection #4

selections > promote selection to layer
selections > modify > select selection borders

flood fill tool

flood fill the new layer with the BG color (right click)
selections > select none
layers > duplicate
image > mirror > mirror vertical (flip)
layers > merge > merge down
blend mode of the layer : Overlay - opacity : 50%


your work looks like this

Step 12
activate the layer « promoted selection »

selections > load-save selection > from disk > selection #3

effects > 3D effects > drop shadow >
-10 / -17 / 30 / 100 / black *** 10 / 17 / 30 / 100 / black
selections > select none
Step 13
in the materials palette, set color 4 as BG color
prepare a linear gradient

in the layers palette, activate the top layer (Raster 4)
layers > new raster layer
selections > load-save selection > from disk > selection #5

flood fill the selection with the gradient
selections > select none
effects > plugins > Alien Skin Eye Candy Impact > Perspective Shadow as before
Step 14
activate the background layer (Raster 2)
effects > plugins > Unlimited 2 > Buttons & Frames > Glass Frame 2

in the layers palette, activate « Raster 1 »
effects > 3D effects > drop shadow > 10 / -10 / 30 / 30 / black
layers > merge > merge all (flatten)
your work looks like this

Step 15
in the materials palette prepare a linear gradient > angle 90 - repeat 1 - check « invert »
image > add borders > check « symmetric » -->
5 pixels white
55 pixels with a contrasting color (for instance : red)

activate the magic wand tool

select the red border - flood fill the selection with the gradient
effects > plugins > AAA Frames > Foto Frame

selections > invert
effects > 3D effects > drop shadow > 0 / 0 / 60 / 25 / black
selections > select none
Step 16
copy / paste as new layer the tube « ama_deco_fond_vir.pspimage »
effects > image effects > offset > H : 16 / V : 0
Step 17
copy / paste as new layer the tube « ama_deco02_vir »
don’t move it
blend mode of the layer : Luminance (Legacy) / opacity : 75%
Step 18
copy / paste as new layer te tube CGS~HeartArrow » (heart and arrow)
effects > image effects > offset > H : 112 / V : 255
effects > 3D effects > drop shadow > 2 / -5 / 30 / 50 / black
(translator’s note : I din’t use this tube)
Step 19
copy / paste as new layer the tube « CAJ.SCR. KIT 2010 EL. 41 »
image > resize > uncheck « all layers » > 40%
effects > image effects > offset > H : 150 / V : -190
effects > 3D effects > drop shadow > 10 / -5 / 40 / 55 / black
opacity of the layer : 85%
Step 20
copy / paste as new layer the tube « ama_deco_etoiles » (stars)
effects > mage effects > offset > H : 30 / V : -212
adjust > sharpness > sharpen
layers > arrange > move down
Step 21
acitvate the top layer
copy / paste as new layer the tube « ama_texte »
move it as shown below

effects > plugins > Graphic Plus > Cross Shadow

effects > 3D effects > drop shadow > 0 / -1 / 20 / 1 / black
Step 22
copy / paste as new layer the tube « hyunah_png_render_by_mihvvn-d6a8k8a » (woman)
image > resize > 60%
effects > image effects > offset > H : -225 / V : 0
effects > 3D effects > drop shadow > -10 / -15 / 25 / 65 / black
Step 23
apply your watermark
layers > merge > merge visible
Step 24
activate the tube « coeurs_ama_vir »
if you want it to be color Silver > image > greyscale

copy / paste as enw layer
image > resize > 103%
effects < image effects > offset > H : 328 / V : 0
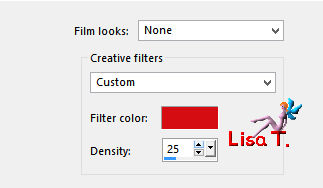
effects > photo effects > Film and Filters > color 2

Step 25
image > resize > check « all layers » > width : 950 pixels
activate the layer underneath (tag)
adjust > sharpness > sharpen
if you don’t want to animate your tag, merge all layers and save as... type .jpeg
if you want to animate it........ we go on !!!
Step 26
in the layers palette, activate the top layer
adjust > sharpness > sharpen more
adjust > add-remove noise > add noise

edit/copy special > copy merged
Step 27
open Jasc Animation Shop (AS)
edit > paste as new animation
Step 28
badk in PSP
edit > undo « add noise » - or click on the blue arrow

adjust > add-remove noise > add noise > 50%
edit > copy special > copy merged
Step 29
back in AS
edit > paste after current frame
Step 30
back in PSP
edit > undo « add noise »
adjust > add-remove noise > add noise > 25%
edit > copy special > copy merged
Step 31
back in AS
edit > paste after current frame
your tag is finished
save as... type .gif

Don't hesitate to write to Virginia if you have any trouble with her tutorial


Back to the board of Virginia’s tutorials


|