

the tube is one of mine
You will find the original tutorial here :

This tutorial is a personal creation.
Any resemblance with another one would be only pure coincidence.
It is stricly forbidden to modify tubes, to change their name or take off the matermarks
To present them on your sites or blog,
To share them in groups,
to make a bank of images, or to use them on lucrative purposes.

Thank you to respect Veroreves’s work and the tubers work.
Don’t hesitate to warn me if you have any trouble with this translation
and I’ll try to fix the problem as quickly as I can
I worked with PSP2020 Ultimate
you can follow this tutorial with another version of PSP, but the result might be slightly different
Supplies
you will need a character tube and a nice colored image (not provided)
choose an image with yellow tones among other colors
Veroreves creates her tubes with remove.bg

duplicate all the tubes and work with the copies to preserve originals
place the supplies provided into the dedicated folders of “« My Corel PSP » general folder
doubl
save your work often in case of problems with your psp
double-click on the preset to install
don’t hesitate to change blend modes and opacities of the layers to match your personal colors and tubes
HINTS and TIPS
TIP 1 -> if you don’t want to install a font -->
open it in a software as « Nexus Font » (or other font viewer software of you choice)
as long as both windows are opened (software and font), your font will be available in your PSP
TIP 2 -> from PSPX4, in the later versions of PSP the functions « Mirror » and « Flip » have been replaced by -->
« Mirror »has become --> image => mirror => mirror horizontal
« Flip » has become --> image => mirror => mirror vertical
Plugin needed
Kang
Alien Skin Xenofex 2
Toadies
Eye Candy 5 Nature
Use the pencil to mark your place
along the way
hold down left click to grab and move it
 |
1 – the Background
1
open your image
edit => copy
2
open a new image => transparent => 900 * 600 px
selections => select all
edit => paste into selection
selections => select none
3
layers => duplicate
4
effects => plugins => Unlimited 2 => Kang 4 => Bubblecross Waves

5
effects => edge effects => enhance
6
effects => geometric effects => Skew

2 - The Vertical Lines
1
Highlight bottom layer
layers => duplicate
layers => arrange => bring to top
2
effects => plugins => Unlimited 2 => Kang 3 => Mi Vida Cocaine

3
effects => plugins => Transparency => Eliminate Black
4
layers => duplicate
layers => merge => merge down
5
image => free rotate

6
edit => cut
7
enable the Selection tool / custom selection

selections => select none
8
layers => duplicate
image => mirror => mirror horizontal
image => mirror => mirror vertical
9
layers => merge => merge down
3 - The tablecloth
1
layers => new raster layer
enable the Selection tool / custom selection

2
copy / paste your image into selection
3
effects => 3D effects => drop shadow => 0 / 0 / 100 / 40 / black
selections => select none
4 - The plate
1
Highlight bottom layer
layers => arrange => bring to top
2
effects => geometric effects => Circle
tick « Transparent »
3
image => resize => untick « resize all layers » => 75%
4
set yellow as FG color and black as BG color
effects => plugins => Alien Skin => Xenofex 2 / Classic Mosaic

5
selections => select all / selections => float / selections => defloat
selections => modify = > select selection borders

6
effects => plugins => Unlimited 2 => Kang 3 => Liquid You Too

7
effects => plugins => Toadies => Sucking Toad Bevel III

8
effects => 3D effects => drop shadow => 0 / 0 / 60 / 20 / black
9
selections => select none
5 - The Lemons
1
copy / paste the lemons tube as new layer
2
image => free rotate

3
effects => plugins => Alien Skin Eye Candy 5 => Nature => Snow Drift => preset provided


4
effects => 3D effects => drop shadow => 0 / 0 / 60 / 20 / black
5
layers => merge => merge down
6
image => resize => untick « resize all layers » => 85%
7
effects => image effects => offset => H : -135 / V : 0 / tick « custom » and « transparent »
6 - The Text
1
copy / paste the text « citrons » tube as new layer
adjust => hue and saturation => Hue/saturation/lightness
modify Hue to match your colors
2
effects => plugins => Alien Skin Eye Candy 5 => Nature => Snow Drift => preset provided
3
effects => distortion effects => Wave

4
effects => image effects => offset => H : -390 / V : -25 / tick « custom » and « transparent »
5
effects => 3D effects => drop shadow => 0 / 0 / 60 / 20 / black
6
copy / paste the text « givrés » tube as new layer
adjust => hue and saturation => Hue/saturation/lightness
modify Hue to match your colors
7
effects => plugins => Alien Skin Eye Candy 5 => Nature => Snow Drift => preset provided
8
effects => distortion effects => Wave
9
effects => image effects => offset => H : 120 / V : 55 / tick « custom » and « transparent »
10
effects => 3D effects => drop shadow => 0 / 0 / 60 / 20 / black
7 - The Character
1
copy / paste the character tube as new layer
resize if necessary
place properly
effects => 3D effects => drop shadow => 0 / 0 / 60 / 20 / black
8 - The Frame
1
Highlight bottom layer
Edit => copy
layers => merge => merge all (flatten)
2
image => add borders => tick « symmetric » => 40 px / color of your choice
selections => select all
selections => modify => contract => 40 px
selections => invert
selections => modify => contract => 4 px
edit => paste into selection
3
selections => modify = > select selection borders

flood fill selection yellow
4
effects => 3D effects => INNER Bevel
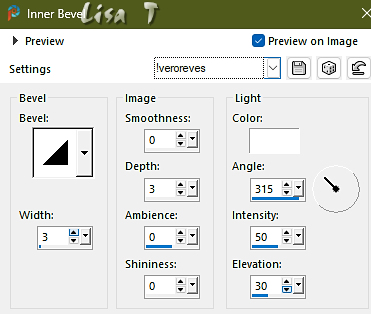
selections => select none
5
apply your watermark or signature
write your licence number if you used a licenced tube
layers => merge => merge all (flatten)
save your work as... type .jpeg
Another version with one of my tubes

Don't hesitate to write to me if you have any trouble with this tutorial
If you create a tag (using other tubes and colors than those provided) with this tutorial
and wish it to be shown, send it to me
It will be a real pleasure for me to add it to the gallery at the end of the tutorial

coming ▼ soon
back to the boards of Veroreves’s tutorials
20 tutorials on each board
board 9 =>
at the bottom of each board you will find arrows allowing you to navigate from one board to another


|