Maudeline

The original tutorial can be found HERE


Conditions of use of the material provided
It is forbidden to modifiy, change the name, take off the watermarks or alter the tubes.
It is forbidden to share them in groups or offer them on your site, blog or forum.
If you want to use them to create a tutorial, you must ask the permission to the authors.

Material
1 color palette
1 background image
1 mask
2 selections (copy / paste into the folder « selections » of « My PSP Files »

open the tubes and images, duplicate them and close the originals. Work with the copies
open the mask and minimize it to tray
face tube by Doucelyne

flower tube bu Graph Sabine Design

background by JHanna

mask and selections by Tine

Filters Used
- Adjust / Variations -
- PhotoEffex / Scanlines -
- AAA Filters / AAA Options -
- Texture / Texturizer -
- Nik Software / Color Efex Pro 3.0 Complete


Colors
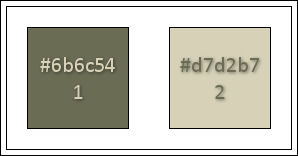
color 1 -> foreground color -> FG -> #6b6c54 --> left click
color 2 -> background color -> BG -> #d7d2b7 --> right click

according to the tubes and colors you use, there might be some differences with the tag presented
I use PSPX8, but this tutorial can be realized with another version

Use the pencil to follow the steps
left click to grab it
 |

Realization
1
open « JHanna_311 » background
window -> duplicate - close the original and work with the copy
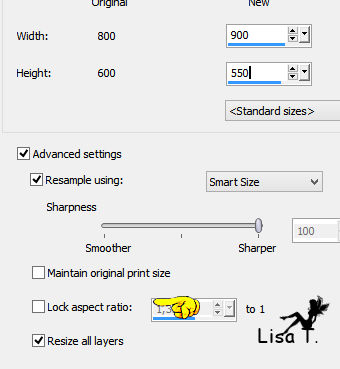
image -> resize -> uncheck «lock aspect ratio » -> 900 * 550 pixels

2
effects -> plugins -> Adjust -> Variations
click on « original »

click on « more yellow »

click on « lighter »

effects -> plugins -> Texture -> Texturizer / Sandstone / 75° - 2 - Bot.Left

3
layers -> new raster layer
flood fill with BG color
layers -> new mask layer -> from image -> check « invert mask data » -> load « creation.tine_masque138 »
layers -> merge -> merge group
effects -> 3D effects -> drop shadow -> 3 / -2 / 67 / 14 / FG color

adjust -> sharpness -> sharpen
4
selections -> load-save selection -> from disk -> « maudeline1_tine »
selections -> promote selection to layer
effects -> 3D effects -> drop shadow -> 3 / -2 / 67 / 14 / black
selections -> select none
effects -> image effects -> seamless tiling

5
selections -> load-save selection -> from disk -> « maudeline2_tine »
DELETE
selections -> select none
6
copy / paste as new layer « Graph-Sabine Design-Tubes 277 »
image -> resize

image -> mirror -> mirror horizontal
effects -> image effects -> offset

blend mode of the layer : Luminance (Legacy)
effects -> 3D effects -> drop shadow -> 3 / -2 / 67 / 14 / black
7
copy / paste as new layer « Doucelyne ©Bec Winnel (15) »
image -> resize 75%
image -> image effects -> offset -> -255 / 0 / custom / transparent
blend mode of the layer : Luminance - opacity : 80%
adjust -> sharpness -> high pass sharpen

8
image -> add borders -> check « symmetric » ->...
2 pixels color 1
3 pixels color 2
5 pixels color 1
edit -> copy
selections -> select all
image -> add borders -> check « symmetric » -> 35 pixels color 2
selections -> invert
edit -> paste into selection
9
effects -> plugins -> PhotoEffex / Scanlines / default settings / 1 / 2 / 20 / 10 / 0 / 0
effects -> plugins -> AAA Filters / AAA Options

selections -> select none
effects -> plugins -> Nik Software -> Color Efex Pro 3.0 Complete
tab « Stylizing » / Photo Stylizer / Varitone / 1 - 100%

selections -> select none

Your tag is finished.
Thank you for following it
Don’t forget to sign (to avoid plagiarism) and save file as… type JPEG

Don’t hesitate to send your creations to Tine

It will be her pleasure to show them in the gallery at the bottom of the tutorial page
Don’t forget to indicate her your name and the adress of your blog or site if you have one
If you want to receive Tine’s Newsletter, subscribe to her newsletter


My tag with my tubes

Back to the boards of Tine’s tutorials
Board 2  Board 3 Board 3 

|