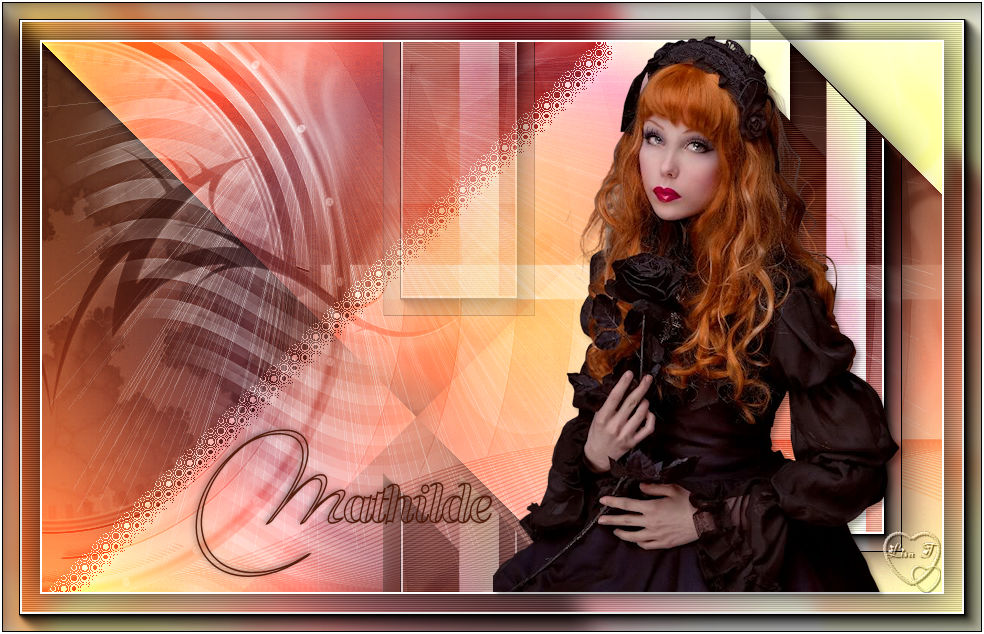
Mathilde
The original tutorial can be found HERE

Conditions of use of the material provided
It is forbidden to modifiy, change the name, take off the
watermarks or alter the tubes.
It is forbidden to share them in groups or offer them on
your site, blog or forum.
If you want to use them to create a tutorial, you must ask
the permission to the authors.

Material
2 tubes - 1 mask - 3 selections (place them into « Selections » folder
of Corel PSP Folder)
1 brush tip (import into PSP )

character tube provided created by Tatie

Filters Used
- DSB Flux / Linear Transmission -
- Carolaine and Sensibility / CS-Halloween2 -
- AAA Frames / Foto Frame -
Unlimited 2.0
- Tramages / Glass / Cirquelate / Holidays in Egypt -
- Simple / Left Right Wrap -

translator’s note
I use PSPX9 to create my tag and write my translation
but this tutorial can be realized with another version
according to the version of PSP you use, the results might
be slightly differents
don’t hesitate to change the blend modes of the layers
according to your tubes and colors
Colors
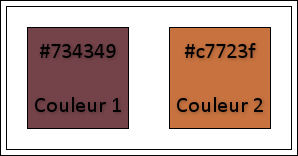
color 1 --> foreground color --> FG --> left click
--> #734349
color 2 --> background color --> BG --> right click
--> #c7723f
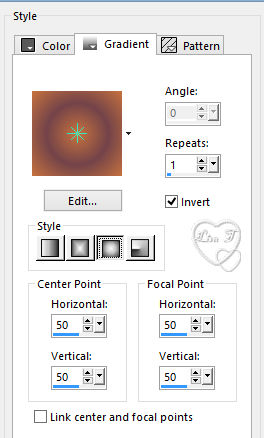
prepare a sunburst gradient
Use this pencil to follow the steps
hold down left click to grab it and move it

Realization
1
open a new transparent image 900 * 550 pixels
2
flood fill with the gradient
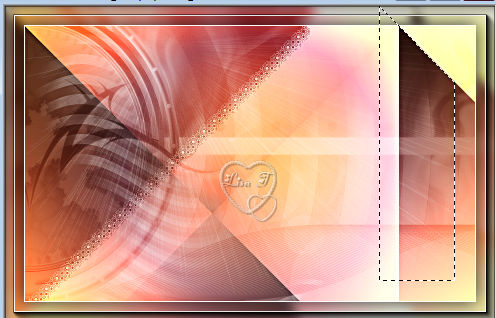
3
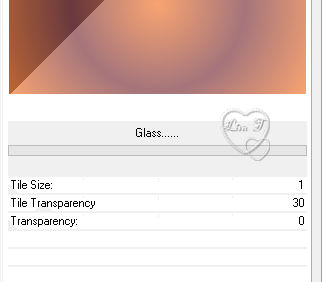
effects - plugins -> Unlimited 2 -> Tramages / Glass
4
effects - plugins -> Unlimited 2 -> Tramages / Cirquelate
/ 6
5
effects - plugins -> Unlimited 2 -> Tramages / Holidays
in Egypt / size 212
6
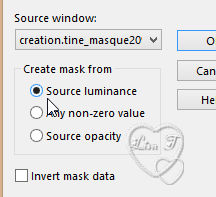
selections -> load-save selection -> from disk -> selection
#Mathilde_1
7
selections -> promote slection to layer
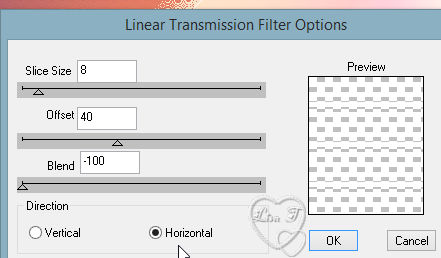
8
effects - plugins -> DSB Flux / Linear Transmission
9
effects -> image effects -> seamless tiling
10
edit -> cut
11
selections -> select none
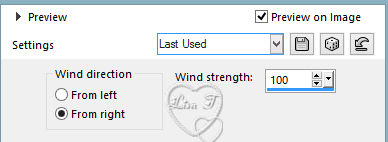
12
effects -> distortion effects -> wind
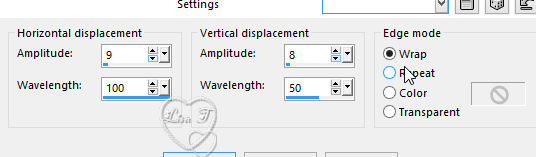
13
effects -> distortion effects -> wave
14
layers -> merge -> merge visible
15
layers - duplicate
16
layers -> new mask layer -> from image
17
layers - merge -> merge group
18
blend mode of the layer : Multiply
19
layers -> duplicate
20
layers - merge -> merge down
21
highlight bottom layer (merged)
22
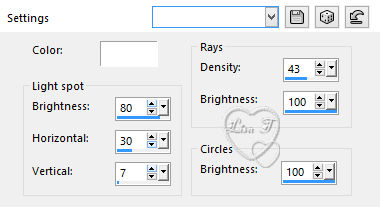
effects -> illumination effects -> sunburst / white
23
adjust -> sharpness -> unsharp mask
24
image -> add borders - check « symmetric » -> 2
pixels white
25
edit -> copy
26
selections -> select all
27
image -> add borders -> check « symmetric » -> 38
pixels / black
28
selections -> invert
29
edit -> paste into selection
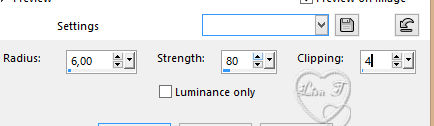
30
adjust -> blur -> gaussian blur / 10
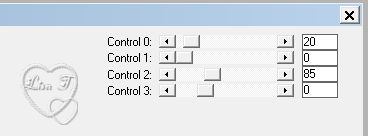
31
effects - plugins -> Carolaine & Sensibility / CS_Halloween2
32
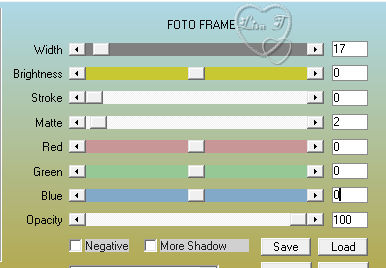
effects - plugins -> AAA Frames / Foto Frame
33
selections -> invert
34
effects -> 3D effects -> drop shadow -> 0 / 0
/ 80 / 50 / black
35
selections -> select none
36
open tube « Tatie_mu12 »
37
copy / paste as new layer
38
erase tuber’s watermark
39
image -> mirror -> mirror horizontal
40
effects -> image effects -> offset -> 205 / 11
/ check « custom » and « transparent »
41
effects -> 3D effects -> drop shadow -> 4 / 4
/ 30 / 7 / black
42
open tube « texte Mathilde »
43
copy / paste as new layer
44
place it where you like

if you want to change Text’s color, import the brushtip
provided
use FG color and apply by clicking once or twice (don’t
move your mouse if you click twice)
drop a shadow of your choice
45
highlight bottom layer
46
layers -> view -> current only
47
selections -> load-save selection -> from disk -> selection
#Mathilde_2
48
selections -> promote selection to layer
49
effects - plugins -> Unlimited 2 -> Simple / Left
Right Wrap
50
effects - plugins -> Carolaine & Sensibility -> CS_Hallloween2
as before
51
effects - plugins -> AAA Frames / Foto Frame as before
52
effects -> image effects -> seamless tiling -> corner
/ bidirectional / 25 / 25 / 100 / linear
53
effects -> 3D effects -> drop shadow -> 0 / 0
/ 80 / 50 / black
54
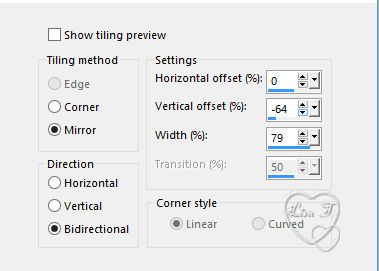
selections -> load-save selection -> from disk -> selection
#Mathilde_3
55
edit -> copy
56
selections -> select none
57
layers -> view -> all
58
image -> add borders -> 2 pixels white
Your tag is finished.
Thank you for following this tutorial
Don’t forget to sign (to avoid plagiarism) and save
file as… type JPEG
Don’t hesitate to send your creations
to Tine

It will be a real pleasure for her to show them in the
gallery at the bottom of the tutorial page
Don’t forget to indicate her your name and the adress
of your blog or site if you have one
If you want to receive Tine’s Newsletter, sign up
...

My tag with my tube

Back to the boards of Tine’s tutorials
Board 1  Board
2 Board
2  board
3 board
3

|