

The original tutorial can be found HERE

Conditions of use of the material provided
It is forbidden to modify, change the name, take off the
watermarks or alter the tubes.
It is forbidden to share them in groups or offer them on
your site, blog or forums.
If you want to use them to create a tutorial, you must
ask the permission to the authors.

Supplies
tubes - mask

place the mask(s) into the folder « masks » of
Corel PSP folder or open into PSP and minimze to tray (best
method)
duplicate the tubes and work with the copies to preserve
originals
don’t hesitate to change blend modes and opacities
of the layers according to the colors you chose
Hints and Tips
TIP 1 -> if you don’t
want to install a font -->
open it in a software as « Nexus Font » (or
other font viewer software of you choice)
as long as both windows are opened (software and font),
your font will be available in your PSP
TIP 2 -> from PSPX4,
in the later versions of PSP the functions « Mirror » and « Flip » have
been replaced by -->
« Mirror » --> mirror -> mirror horizontal
« Flip » --> mirror -> mirror vertical
Plugins
- 2manekenai(tm) / MezzoForce-Ice -
- AAA Frames / Foto Frame -
- Carolaine and Sensibility / CS-LDots -
U n l i m i t e d 2.0
- Simple / Blintz et Half Wrap -
- MuRa's Seamless / Get 1 Tile -

translator’s note
Tine used PSPX2 to create this tutorial and her tag
I used PSP2020 Ultimate to create my tags and write my
translations
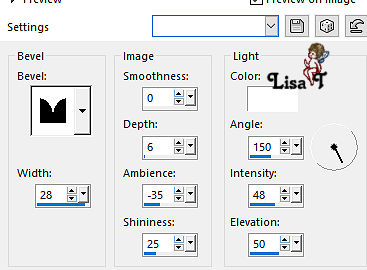
but this tutorial can be realized with any other version
according to the version of PSP you use, the results might
be slightly different
Use the pencil to mark your place
along the way
hold down left click to grab and move it
 |
Realization
1
open a new transparent image 875 * 575 px
2
selections => select all
3
copy / paste the flowers tube into selection
4
selections => select none
5
adjust => blur => radial blur

6
effects => plugins => 2manekenai(tm) => MezzoForce-Ice

Important Note
This plugin doesn’t work with recent versions
of PSP
so ! here is another way to obtain an almost similar
result
effects => plugins => Visual Manipulations => Brightness/Distortion
effects => Nik Software => Color
Efex Pro 3.0 Complete

adjust => Hue and Saturation

adjust => Smart Photo Fix

7
adjust => sharpness => high pass sharpen

8
effects => image effects => seamless tiling => default
settings

9
effects => plugins => Unlimited 2 => Simple => Blintz
10
effects => image effects => seamless tiling

11
adjust => sharpness => sharpen more
12
layers => duplicate
13
effects => plugins => Unlimited 2 => Mura’s
Seamless => Get 1 Tile

14
selections => select all / selections => float / selections
=> defloat
15
effects => plugins => AAA Frames => Foto Frame

16
selections => select all
17
effects => plugins => Unlimited 2 => Simple => Half
Wrap
18
effects => 3D effects => drop shadow => 0 / 0
/ 100 / 20 / black

19
layers => new raster layer
into the materials palette, place White as FG color
20
flood fill layer white
21
layers => new mask layer => from image

22
layers => merge => merge group
23
blend mode of the layer : Overlay / opacity : 78%
24
effects => 3D effects => drop shadow => 2 / 2
/ 60 / 0 / black
25
open « nature_fleurs5_tine_07.2019 »
26
image => resize => tick « resize all layers » => 575
px height

27
copy / paste as new layer on your tag
don’t move it
28
erase the watermark
29
adjust => sharpness => sharpen
30
effects => 3D effects => drop shadow => 4 / 4
/ 78 / 22 / black
31
highlight bottom layer
32
edit => copy
33
image => add borders => tick « symmetric » => 2
px white
34
selections => select all
keep selection active untill step 42
35
image => add borders => tick « symmetric » => 50
px white
36
selections => invert
37
edit / paste into selection
38
adjust => blur => gaussian blur / 15
39
effects => plugins => Carolaine and Sensibility => CS-LDots
=> default settings
40
effects => 3D effects => inner bevel
41
adjust => sharpness => high pass sharpen / 5 / 100
/ Overlay
42
selections => select none
43
open the text « texte_flowers_tine »
44
copy / paste as new layer
place qhere you like
Tine enabled the Pick tool to move the layer acurately
=> position X : 339 / position Y : 343
45
effects => 3D effects => drop shadow => 1 / 1
/ 50 / 5 / black
46
effects => 3D effects => drop shadow => 4 / -
2 / 50 / 5 / black
47
layers => merge => merge all (flatten)
apply your watermark or signature
write your licence number if you used a licenced tube
save your work as... type .jpeg
Your tag is finished.
My tag with my tube

Thank you for following this tutorial
Don’t forget to sign (to avoid plagiarism) and save
file as… type JPEG
Don’t hesitate to send your creations
to Tine

It will be a real pleasure for her to show them in the
gallery at the bottom of the tutorial page
Don’t forget to indicate her your name and the adress
of your blog or site if you have one
If you want to receive Tine’s Newsletter,
sign up ...

Back to the boards of Tine’s tutorials
Board 1 Board board
3 board 4 Board board
3 board 4

|