Fantasy

The original tutorial can be found HERE
I am member of TWInc
This tutorial is protected


Conditions of use of the material provided
It is forbidden to modifiy, change the name, take off the watermarks or alter the tubes.
It is forbidden to share them in groups or offer them on your site, blog or forum.
If you want to use them to create a tutorial, you must ask the permission of the authors.

Material
1 color palette - open it with PSP
1 tube - open it, duplicate it (Shift+D) close the original and work with the copy
1 mask - open it and minimize it
3 selections-copy them, and paste them into the folder “selections” of “My PSP Files”
1 font

Thank you to the tuber, JHanna
Filters Used

Colors
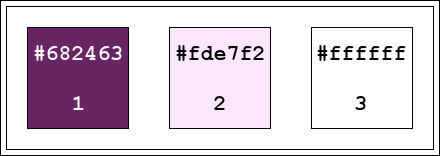
color 1 -> foreground color -> #682463
colors 2 -> background color -> #fde7f2
color 3 -> #ffffff (white)
use the dropper tool (E) to place the colors directly in the materials palette
color 1 : foreground color : left click
color 2 : background color : right click
Implementation
in the materials palette, prepare a linear gradient ( 135 / 1 )

Use the paint brush to follow the steps
left click to grab it
 |
Realization
Step 1
open a new transparent background layer -> 900 * 550 pixels
fill with the gradient
layers/new raster layer
selections/select all
Step 2
activate the tube “JHanna_149-1070509”
edit/copy - back to your work - edit/paste into selection
selections/select none
effects/image effects/seamless tiling/default settings
Step 3
layers/merge/merge visible
adjust/blur/radial blur

effects/edge effects/enhance
Step 4
layers/new raster layer
in the materials palette, set color 1 as foreground
fill the layer with color 1
layers/new mask layer/from image
find “creation.tine_masque127” / check “invert mask data”

layers/merge/merge group
Step 5
layers/new raster layer
selections/load-save selection/from disk/”tine.fantaisie1”

effects/3D effects/drop shadow

selections/select none
Step 6
layers/duplicate - image/mirror
layers/merge/merge down
layers/duplicate - image/flip
Step 7
layers/new raster layer
selections/load-save selection/from disk/”tine.fantaisie2”
effects/3D effects/drop shadow
selections/select none
Step 8
layers/duplicate - image/mirror
layers/merge/merge down
layers/duplicate - image/flip
Step 9
layers/new raster layer
selections/load-save selection/from disk/”tine.fantaisie3”
effects/3D effects/drop shadow
selections/select none
Step 10
layers/duplicate - image/mirror
layers/merge/merge down
layers/duplicate - image/flip
your layers palette looks like this

and your work looks like this

Step 11
image/add borders/check “symmetric”/ ->
2 pixels color 1
60 pixels color 2
in the materials palette, reset the gradient as foreground, check “invert”

Step 12
activate the magic wand tool

select the large border and fill the selection with the gradient
Step 13
selections/promote selection to layer
selections/invert
effects/3D effects/drop shadow
selections/select none
effects/distortion effects/punch/strength 100
effects/edge effects/enhance more
Step 14
in the layers palette, activate the bottom layer (the background)
activate the selection tool/custom selections

top 187 / left 0 / bottom 487 / right 1024

selections/promote selection to layer
selections/select none
Step 15
effects/plugins/Unlimited 2/Simple/Pizza Slice Mirror
effects/image effects/seamless tiling/default setings
effects/edge effects/enhance
effects/3D effects/drop shadow
Step 16
in the layers palette, activate the top layer (promoted selection)
activate the tube JHanna
edit/copy - back to your work - edit/paste as new layer
don’t move it
Step 17
image/add borders/check “symmetric” ->
1 pixel color 1
5 pixels color 3
1 pixels color 1
5 pixels color 3
1 pixels color 1
Step 18
in the materials palette, swap the foreground and the background using the double curved arrow
color 2 is now the foreground color, and the gradient has become the background color
acitvate the Text tool

write “Fantasy” (or another word)
layers/convert to raster layer
move it at your convenience
effects/3D effects/inner bevel

drop a shadow of your choice
layers/merge/merge all (flatten)
Your tag is now finished.
Thank you for having realized it
Don’t forget to sign and save file as… type JPEG
Don’t hesitate to send your creations to Tine

It will be her pleasure to show them in the gallery at the bottom of the tutorial page
Don’t forget to indicate her your name and the adress of your blog or site if you have one

If you want to be informed about Tine's new tutorials and work
subscribe to her newsletter

Back to the boards of Tine’s tutorials
Board 1  Board 2 Board 2

|