Easter

The original tutorial can be found HERE


Conditions of use of the material provided
It is forbidden to modifiy, change the name, take off the watermarks or alter the tubes.
It is forbidden to share them in groups or offer them on your site, blog or forum.
If you want to use them to create a tutorial, you must ask the permission to the authors.

Material
1 color palette - 10 tubes - 1 alpha layer

open all the tubes, duplicate them and close the originals. Work with the copies
Thank you to the tubers
the tubes are elements of a scrap kit by Belscrap
HERE ---> 

Filters Used
Mehdi/Wavy Lab 1.1
Mura’s Seamless/Emboss at Alpha (import into Unlimited 2)


Colors
color 1 -> foreground color -> #77529a --> left click
color 2 -> background color -> #fff0af --> right click
color 3 -> #f39dcc
color 4 -> #ffffff

I use PSPX7, but this tutorial can be realized with another version

Use the paintbrush to follow the steps
left click to grab it


Realization
Step 1
open the Alpha layer - Window/duplicate and work with the copy
this layer seems to be empty, but it contains 2 selections and 2 masks registered on the alpha channel
Step 2
effects/plugins/Mehdi/Wavy Lab 1.1

effects/distortion effects/polar coordinates

repeat polar coordinates with the same settings
effects/image effects/seamless tiling

Step 3
layers/new raster layer
set color 4 as foreground
flood fill with color 4
Step 4
layers/load mask from alpha channel --> mask « creations.tine_masque136 »

layers/merge/merge group
blend mode of the layer : soft light
effects/plugins/Unlimited 2/Mura’s Seamless/Emboss at Alpha

Step 5
layers/new raster layer
in the materials palette, set color 1 as foreground color and color 2 as foreground color
prepare a radial gradient

flood fill the layer with this gradient
Step 6
layers/load mask from alpha channel --> mask « creations.tine_masque135 »

layers/merge/merge group
Step 7
layers/new raster layer
selections/load selection from alpha channel/ « easter-1_tine »
set color 1 as foreground again
flood fill the selection with color 1
selections/select none
Step 8
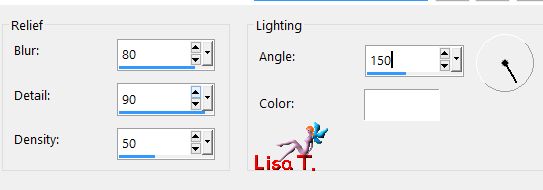
effects/texture effects/blinds

effects/geometric effects/spherize

effects/3D effects/drop shadow

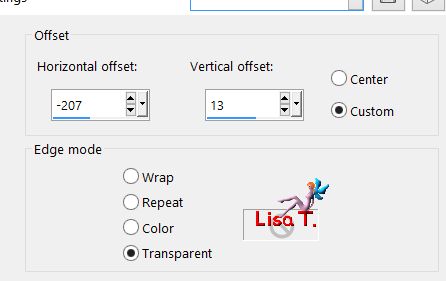
effects/image effects/offset

Step 9
layers/new raster layer
selections/load selection from alpha channel/ « easter-1_tine » again
flood fill the selection with color 2
selections/select none
Step selections/load selection from alpha channel/ « easter-1_tine »
Step 10
image/mirror/mirror vertical
effects/artistic effects/enamel

blen mode of the layer : Luminance (Legacy)
effects/3D effects/drop shadow/color 1

Step 11
layers/new raster layer
selections/load selection from alpha channel/ « easter-2_tine »
effects/3D effects/drop shadow/ 0 / 0 / 65 / 28 / black
selections/select none
Step 12
copy/paste as new layer the tube « Belscrap_Easter_El 31 » (panel)
effects/image effects/offset

Step 13
copy/paste as new layer the tube « Belscrap_Easter » (the girl)
effects/image effects/offset

Step 14
copy/paste as new layer the tube « Belscrap_Easter_El 50 » (« flower » simple purple egg)
effects/image effects/offset

Step 15
copy/paste as new layer the tube « Belscrap_Easter_El 49 » (« flower » simple green egg)
effects/image effects/offset

Step 16
copy/paste as new layer the tube « Belscrap_Easter_El 36 » (wheelbarrow)
effects/image effects/offset

Step 17
copy/paste as new layer the tube « Belscrap_Easter_El 2 » (cat)
effects/image effects/offset

layers/arrange/move down
Step 18
activate the top layer (Raster 8)
copy/paste as new layer the tube « Belscrap_Easter_El 28 » (duck)
effects/image effects/offset

Step 19
copy/paste as new layer the tube « Belscrap_Easter_El 4 Free » (3 eggs)
effects/image effects/offset

Step 20
copy/paste as new layer the tube « Belscrap_Easter_El 3 Free » (bird)
effects/image effects/offset

Step 21
copy/paste as new layer the tube « Belscrap_Easter_El 51 » (2 flowers together)
effects/image effects/offset

Step 22
close the eyes of the 6 bottom layers

activate any other layer
layers/merge/merge visible
effects/3D effects/drop shadow

open the eyes of all the layers
Step 23
image/add borders/check « symmetric » -->
2 pixels color 4
1 pixel color 1
30 pixels color 4
1 pixel color 1

Your tag is finished.
Thank you for following it
Don’t forget to sign (to avoid plagiarism) and save file as… type JPEG

Don’t hesitate to send your creations to Tine

It will be her pleasure to show them in the gallery at the bottom of the tutorial page
Don’t forget to indicate her your name and the adress of your blog or site if you have one

If you want to receive Tine’s Newsletter, subscribe to her nesletter


Back to the boards of Tine’s tutorials
Board 1  Board 2 Board 2 

|