
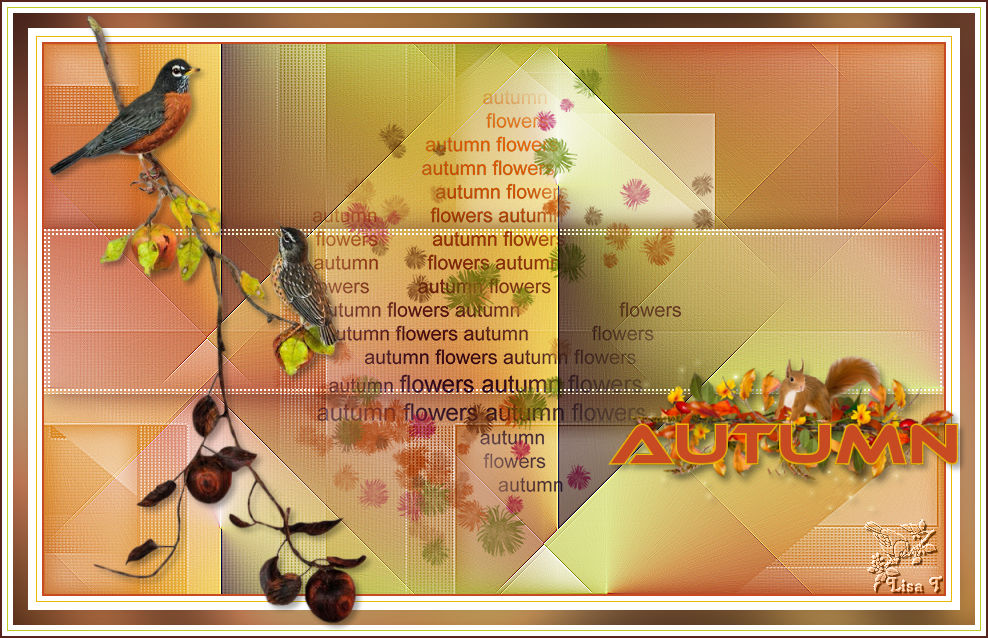
The original tutorial can be found
HERE

Conditions of use of the material provided
It is forbidden to modifiy, change the name, take
off the watermarks or alter the tubes.
It is forbidden to share them in groups or offer
them on your site, blog or forum.
If you want to use them to create a tutorial, you must
ask the permission to the authors.
 
Material
colors - tubes - gradient - mask

the tubes were created by Tine

the mask was created by Tine
the text tube was created by Louisel
open the mask and minimize to tray
duplicate the tubes and work with the copies
don’t hesitate to change the blend modes and the
opacities of the layers according to the colors you choose
 
Hints and Tips
TIP 1 -> if you don’t
want to install a font -->
open it in a software as « Nexus Font » (or
other font viewer software of you choice)
as long as both windows are opened (software and font),
your font will be available in your PSP
TIP 2 -> from PSPX4,
in the later versions of PSP the functions « Mirror » and « Flip » have
been replaced by -->
« Mirror » --> image => mirror => mirror
horizontal
« Flip » --> image => mirror => mirror vertical
 
Filters Used
Mehdi / Sorting Tiles
Unlimited 2
Graphic Plus

 
translator’s note
Tine used PSPX2 to create this tutorial and her tag
I used PSP2018 to create my tag and write my translation
but this tutorial can be realized with another version
according to the version of PSP you use, the results
might be slightly differents
don’t hesitate to change the blend modes of the layers
according to your tubes and colors
  
Use the pencil to follow the steps
hold down left click to grab it and move it
 |
  
Realization
1
open a new transparent image 900 * 550 px
2
place the gradient provided in the FG box into the materials
palette
set White as BG color

3
flood fill the layer with the gradient
4
effects => plugins => Mehdi / Sortiing Tiles

5
effects => image effects => seamless tiling

6
adjust => sharpness => high pass sharpen

7
effects => edge effects => enhance
8
enable selection tool => custom selection

9
copy / paste as new image
10
minimize this new image to tray for a later use
11
selections => select none
12
layers => new raster layer
13
flood fill white
14
layers => new mask layer => from image
load the mask « creation.tine_masque277
15
layers => duplicate
16
layers => merge => merge all (flatten)
17
adjust => sharpness => sharpen more
18
enable selection tool => custom selection
top => 185 / left => 0 / bottom => 380 / right
=> 900
19
selections => promote selection to layer
20
effects => plugins => Unlimited 2 / Forest AFS /
sqborder2
you can also apply [AFS IMPORT] / sqborder2 instead ;
with the same settings

21
effects => 3D effects => drop shadow / color 4

22
selections => select none
23
open the tube « louisel_automnefeerique122 »
24
copy / paste as new layer
25
enable the Pick tool with the following settings to move
the tube

hit the M key of your keyboard to disable the Tool
26
blend mode of the layer : Multiply
27
in the materials palette, set color 1 as FG color and color
2 as BG color
28
image => add borders => tick « symmetric » => ...
2 px color 2
5 px white
1 px color 1
8 px white
29
selections => select all
keep selection active untill step 37
30
image => add borders => tick « symmetric » => ...
15 px white
31
selections => invert
32
open the image minimized to tray in step 10
33
copy / paste into selection
34
adjust => blur => gaussian blur / 50
35
effects => plugins => Unlimited 2 => Graphic Plus
/ Cross Shadow / default settings
50 / 50 / 50 / 50 / 50 / 50 / 128 / 128
36
effects => 3D effects => cutout / color 4

37
selections => select none
38
image => add borders => tick « symmetric » => ...
8 px white
1 px color 3
5 px white
2 px color 4
39
open tha tube « animaux_oiseaux2 »
40
copy / paste as new layer
41
image => resize => untick « resize all
layers » / 80%

42
enable the Pick tool to move the tube : H => 48 / V =>
15
43
erase the watermark
44
effects => 3D effects => drop shadow => 4 / 4
/ 34 / 8 / black
45
open the Word Art
46
copy / paste as new layer
47
image => resize => untick « resize all layers » /
75%
48
place where you like
Tine chose this position with the Pick Tool ==> Horizonta :
608 / Vertical : 350
49
erase the watermark
50
effects => 3D effects => drop shadow => 4 / 4
/ 34 / 8 / black
51
layers => merge => merge all (flatten)
  
Your tag is finished.
Thank you for following this tutorial
Don’t forget to sign (to avoid plagiarism) and save
file as… type JPEG
 
My tag with a tube created by Animabelle . her tubes
=> HERE

Don’t hesitate to send your creations
to Tine

It will be a real pleasure for her to show them in the
gallery at the bottom of the tutorial page
Don’t forget to indicate her your name and the adress
of your blog or site if you have one
 
If you want to receive Tine’s Newsletter, sign
up ...

 
Back to the boards of Tine’s tutorials
Board 1 Board 2 Board 2 board 3 board 3 board 4 board 4

|