Tag Anna
I'm member of Tutorial Writers inc

Conditions of use of the elements and tubes provided
It is forbidden to modify,change the name, take off the watermark or alter the tubes.
It is forbidden to share them in groups, or to offer them on your site, blog or forum.
If you want to create a tutorial with one of them, you must ask the permission to the author.
original tutorial HERE

Filters used
Mura’s Meister
Flaming Pear version 112
Xero Porcelain
All filters : HERE
Material :

Material : 3 tubes and 2 masks.
The tubes are made by Anna

Tine doesn't know who created the masks.
The english translation is made with PSP12
Prepare your material
Open the tubes, duplicate them and close the originals.
Open the masks and reduce them.
use this paintbrush to follow the steps

|
Step 1
Foreground color : #5e727b
Background color : #ecda91
File/new raster -> 700 X 475 pixels, and fill with foreground color
Step 2
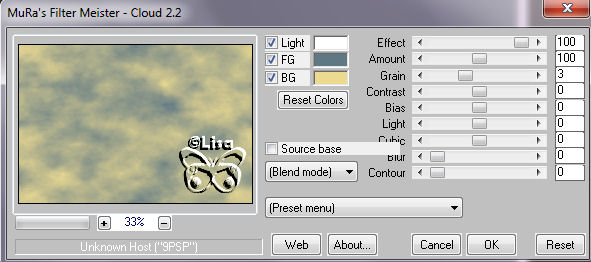
Effects/plugins -> Mura’s Meister -> Cloud
Layers/new raster layer
Flood fill tool -> fill with background color
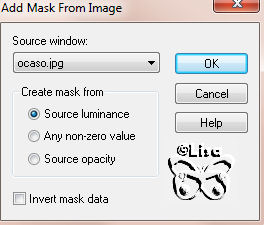
Layers/new mask layer/from image -> find mask “ocaso”
Layers/merge/merge all (flatten)
Step 3
Activate the tube “anna_lake-painting_18_06_10”
Edit/copy -> back to the tag -> Edit/paste as a new layer
Effects/image effects/offset
Horizontal offset : -20
Vertical effect : 43
Enable custom and transparent
Layers/properties/blend mode : overlay
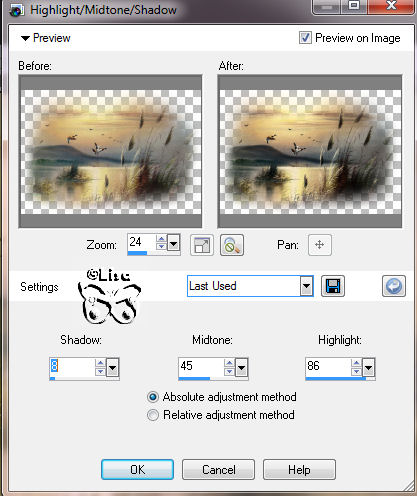
Adjust/brightness and contrast/high light, midtone, shadow
Step 4
Layers/merge/merge all (flatten)
effects/plugins/FlamingPear -> Flood

Window/duplicate -> put aside, you will use it later.
Step 5
Image/add borders/2 pixels/background color/enable symmetric
Image/add borders/50 pixels/foreground color/enable symmetric
Magic wand/select the blue border.
Step 6
Activate the image you put aside on step 4
Edit/copy -> back to the tag -> edit/paste into selection
Adjust/blur/gaussian blur -> radius : 15
Step 7
Keep selection active
Layers/new raster layer
Activate the mask “m26”
Edit/copy -> back to the tag -> Edit/paste into selection
Layers, properties -> blend mode : overlay
Effects/edge effects/enhance
Selections/select none
Layers/merge/merge all (flatten)
Step 8
Activate the tube “anna.br-still_life_by_alena-06-05-10”
Edit/copy -> back to the tag -> edit/paste as a new layer
Image/mirror
Effects/image effects/offset
Horizontal effect : -114
Vertical offset : -38
Enable custom and transparent
Step 9
Layers -> properties -> opacity : 50
Effects/3D effects/drop shadow
Vertical & horizontal : 5
Opacity : 45
Blur : 10
Black color
Redo dropshadow changing vertical and horizontal to : -1 and blur : 1
Step 10
Activate the tube of the woman
Edit/copy -> back to the tag -> edit/paste as a new layer
Effects/image effects/offset
Horizontal offset : 300
Vertical offset : 0
Enable Custom and transparent
Adjust/sharpness/sharpen
Step 11
Image/add borders/2 pixels/background color/enable symmetric
Effects/plugins/xero -> porcelain default numbers (50-128-128-0-0-255)

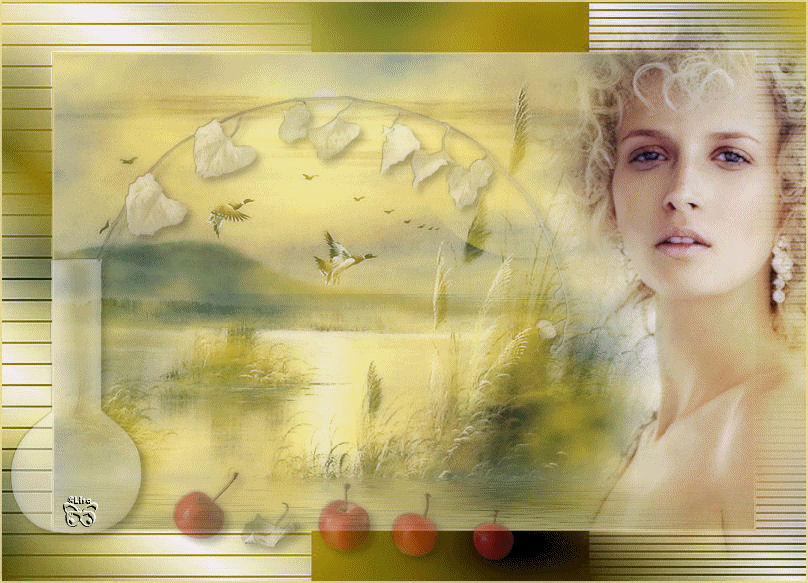
Your tag is now finished.
We hope you enjoyed doing it.
If you create a tag with this tutorial, Tine would be very glad to present it in her gallery
 her !! her !!
Don’t forget to sign, ans save file, type jpeg optimized
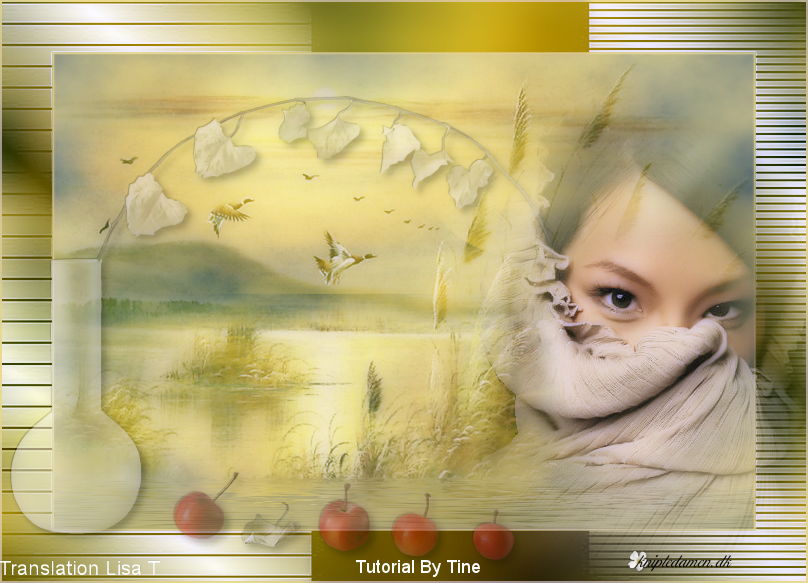
Here is my version of Tine's tutorial, using my tubes

Back to the home page

Gallery
created by ▼ Birte
back to the boards of Tine's tutorials
board 1   board 2 board 2

|
