Anja

The original tutorial can be found HERE

I am member of TWInc
This tutorial is protected

Conditions of use of the material provided
It is forbidden to modifiy, change the name, take off the watermarks or alter the tubes.
It is forbidden to share them in groups or offer them on your site, blog or forum.
If you want to use them to create a tutorial, you must ask the permission of the authors.
Material
1 colors palette
3 tubes/open them in PSP, duplicate them and close the originals
1 mask/open and minimize
3 brush tips/copy them in the special folder of “My PSP Files”
1 gradient/copy it in the special folder of “My PSP Files”
font used for the text : BickhamScriptFancy2
the tube of the woman as created by Gabry

the tube of the flower was created by Claudia Viza

the mask, the gradient, the “text” tube and the brushtips were created by Tine
Download material


Thank you to the tubers
Filters Used
Graphic Plus/must be imported in Ulimited 2
Mehdi
VanDerLee UnPlugged-X
Mura’s Meister
colors palette
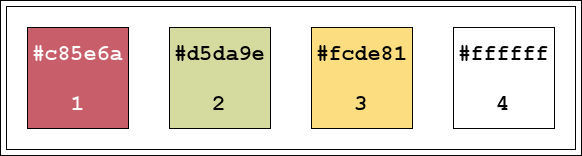
Use the dropper tool to prepare all colors in the materials palette
Preparation
set the gradient “degrade_anja” as foreground
prepare a sunburst gradient/repeats 0/uncheck “link center and focal points”
Center point : horizontal 25 / vertical : 100
focal point : horizontal 100 / vertical 100

Use the paint Brush to follow the steps
Left click to grab it

Realization
Step 1
file/new 900 X 555 pixels /gradient
uncheck box “transparent” and select the gradient (right click in the square and select the gradient)


Step 2
effects/plugins/Mehdi/Sorting Tiles

effects/edge effects/enhance more
layers/duplicate
Step 3
in the layers palette, activate Raster1
effects/plugins/VanDerLee/UnPlugged-X
Inerlace/Transparency 50/Multiply

Image/flip
Step 4
in the layers palette, activate “Copy of raster 1”
effects/plugins/Pura’s Meister/Pole Transform
CenterX --> 171 / Radius start --> 50

Step 5
effects/reflection effects/kaleidoscope

layers/properties/opacity on 35
Step 6
effects/distortion effects/wave

layers/merge/merge visible
Step 7
layers/new raster layer
in the materials palette, set color 4 as background
flood fill tool/paint the layer (right click)
Step 8
layers/new mask layer/from image
find “creation.tine_masque119

effects/plugins/Unlimited2/Graphic Plus/Embosslayers/merge/merge group
Step 9
activate the tube “Gabry-woman 434”
edit/copy – back on your work – edit/paste as a new layer
effects/image effects/offset/ -131 / -50

effects/3D effects/drop shadow/ 0 / 0 / 50 / 30 / black

Step 10
image/add borders/check “symmetric”
5 pixels color 4
2 pixels color 1
6 pixels color 4
2 pixels color 2
7 pixels color 4
2 pixels color 3
Step 11
image/add borders/uncheck box “symmetric”
top 30 – left 40 – right 40 - bottom 30 – color 4

image/add borders/check box “symmetric”/2pixels color 1
Step 12
activate the tube “claudiaviza-flores173”
edit/copy – back on your work – paste as a new layer
image/resize -->60% (uncheck “resize all layers”)
effects/image effects/offset/horizontzl : 385/vertical : - 155/check “custom” and “transparent”
adjust/sharpness/sharpen
effects/3D effects/drop shadow/ 0 / 0 / 50 / 30 / black
Step 13
layers/new raster layer
in the materials palette, set color 4 as foreground
activate the paint brush tool, and find the brush tip “tine-papillons”

apply where you like
press the left click once or more times if necessary
open a new raster layer each time you place a new tip
you can change the color of the foreground
you can change the size of the brush, change the rotation
you can drop a shadow . Tine chose the settings : 1 / 1 / 20 / 2 / black
you will find 2 other brush tips in the material provided
Step 14
activate the text tube “texte_anja”
copy and paste as a new layer
move it where you like
effects/3D effects/drop shadow/ -1 / -2 / 50 / 7 / black
layers/merge/merge all (flatten)

Your tag is now finished.
Thank you for having realized it
Don’t forget to sign and save file as… type JPEG
to be informed about Tine’s ne tutorials, join her newsletter

Don’t hesitate to send your creations to Tine

It will be her pleasure to show them in the gallery at the bottom of the tutorial page
Don’t forget to indicate her your name and the adress of your blog or site if you have one
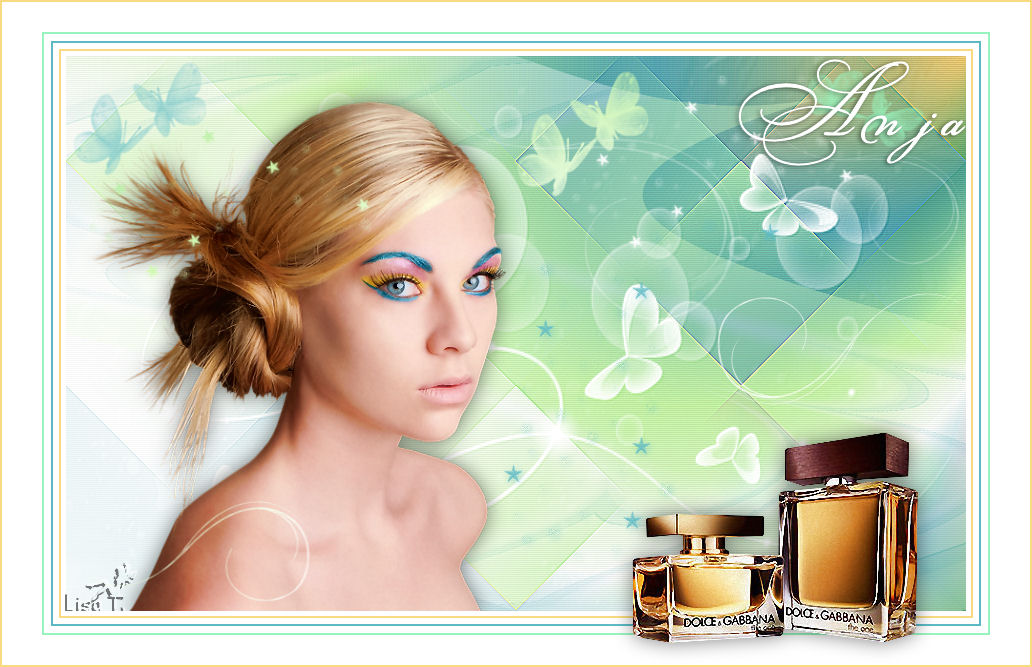
My try with my tubes
Back to the boards of Tine's tutorials
board 1   board 2 board 2 

|