

Conditions of use of the material provided
It is forbidden to modify, change the name, take off the
watermarks or alter the tubes.
It is forbidden to share them in groups or offer them on
your site, blog or forum.
If you want to use them to create a tutorial, you must
ask the permission of the authors.

Odette has the permission of the creators
to use their tubes, masks and decorations
Thank you to all of them.
Without their beautiful creations, no tutorials could be
written.

I use PSP2018 to create the tags of her
tutorials
but you can follow this tutorials with any other version
of PSP
according to the version you use, the result might be slightly
different

Matérial
3 images - 2 masks
- 2 tubes created by Colybrix - 1 tube created by Lisa
T

open all tubes
window/duplicate. Close the originals and work with the
copies to preserve the originals
don’t forget to erase tubers’ watermarks before
using them
open the mask(s) and minimize to tray (best method)
install all the plugins needed
install gradients, patterns, selections .... into the dedicated
folders into PSP general folder

Hints and Tips
TIP 1 -> if you don’t
want to install a font -->
open it in a software as « Nexus Font » (or
other font viewer software of you choice)
as long as the software’s window is opened, your
font will be available in PSP.
TIP 2 -> from PSPX4,
in the later versions of PSP the functions « Mirror » and « Flip » have
been replaced by -->
« Mirror » --> image => mirror => mirror
horizontal
« Flip » --> image => mirror => mirror
vertical

Plugins
Unlimited 2 ==> Kang / Krusty’s volI 1.0 / Kang
3 / Special effects 1
prepare 2 colors (dark and light) matching your tubes
 
Use the pencil to follow the steps
hold down left click to grab and move it
 |
 
Realization
1
open a new transparent image 900 * 600 px
selections => select all
2
copy / paste the landscape image into selection
selections => select none
3
effects => image effects => seamless tiling => default
settings
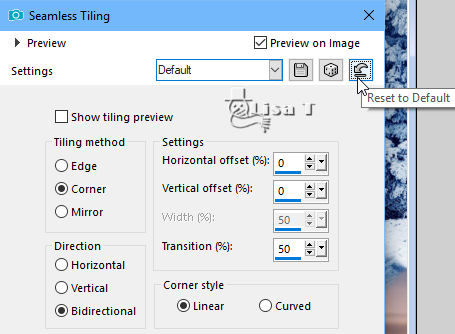
4
adjust => sharpness => sharpen
layers => duplicate
5
image => mirror => mirror horizontal
blend mode of the layer : dissolve - opacity
of the layer : 50%
adjust => sharpness => sharpen
6
layers => new raster layer
selections => select all
copy / paste « flocons » into selection
selections => select none
7
layers => new mask layer => from image => select
mask « 2014122 »
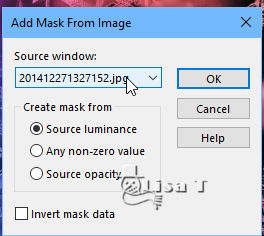
layers => duplicate
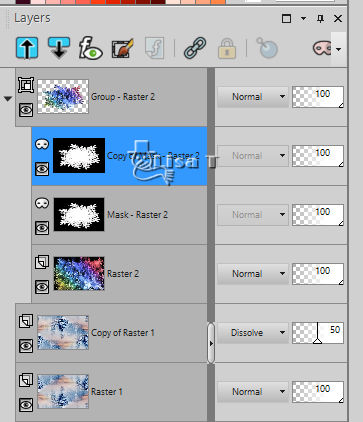
layers => merge => merge group
8
effects => image effects => seamless tiling => default
settings

9
effects => edge effects => enhance more
blend mode of the layer : soft light
10
highlight layer below
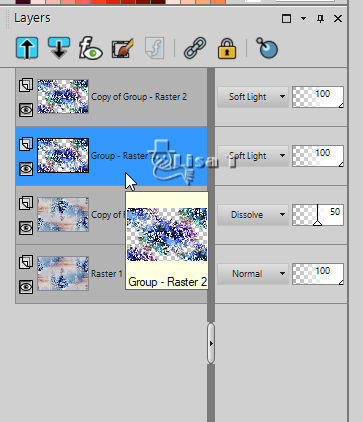
11
effects => plugins => Unlimited 2 => Krusty’s
FX volI 1.0 => Radial Texturizer
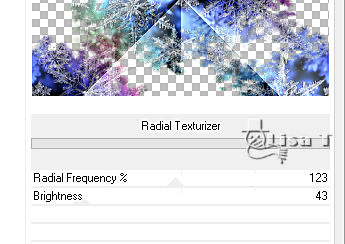
adjust => sharpness => sharpen
12
highlight top layer
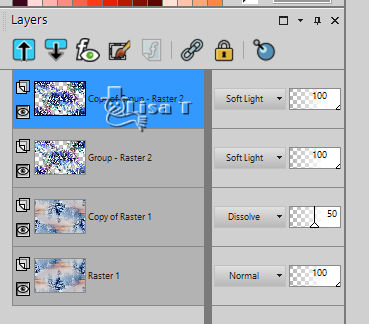
effects => plugins => Unlimited 2 => Krusty’s
FX volI 1.0 => Radial Texturizer / same settings as
before

adjust => sharpness => sharpen
13
layers => new raster layer
selections => select all
14
copy / paste « pere noel » into selection
selections => select none
15
layers => new mask layer => from image => select
mask «20/20»
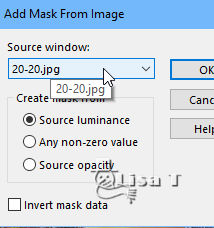
layers => merge => merge group
blend mode of the layer : hard light
adjust => sharpness => sharpen
objects => align => top and left

17
effects => image effects => seamless tiling => default
settings

18
layers => merge => merge visible
19
image => add borders => 2 px dark color
20
layers => promote background layer
21
image => resize => untick « resize all
layers » => 85%
22
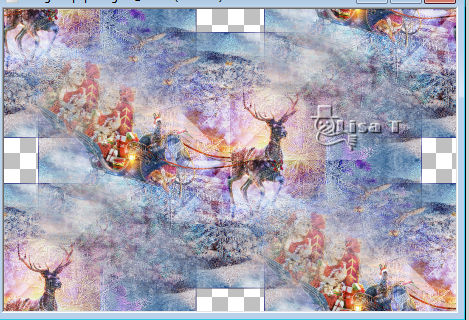
effects => image effects => seamless tiling => default
settings

you can see 4 « empty » rectangles
23
IMPORTANT => layers => merge => merge all
(flatten)
the 4 empy rectangles are now white
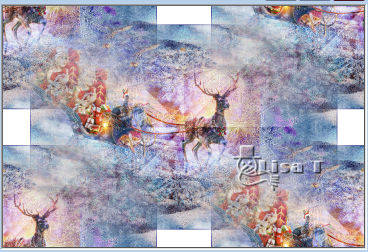
23
enable the magic wand tool / tolerance and feather :
0 / mode : add
selection the 4 white rectangles
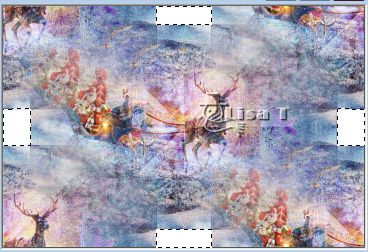
24
effects => plugins => Unlimited 2 => Kang 3 => Liquid
You Too / default settings
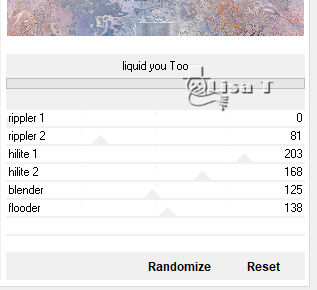
your work looks like this
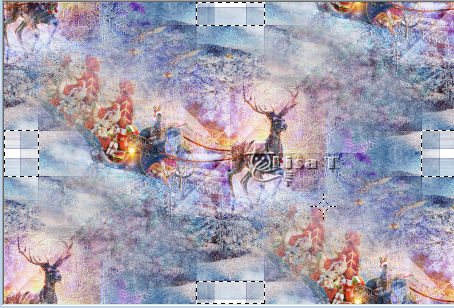
keep selection active
25
effects => 3D effects => Buttonize / dark color
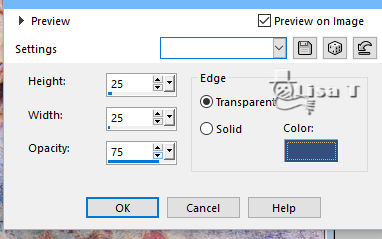
repeat this effect once more with new
settings
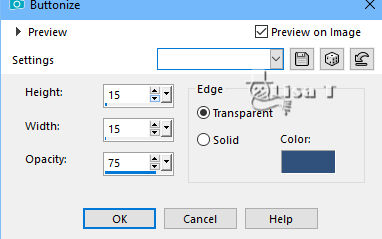
keep selection still active
26
adjust => sharpness => sharpen more
selections => select none
27
image => add borders => ...
2 px dark color
3 px light color
20 px dark color
28
select the large border white the magic wand tool
29
effects => plugins => Unlimited 2 => Special effects
1 => Square Bumps
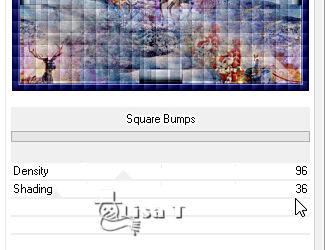
30
effects => edge effects => enhance more
selections => select none
31
copy / paste as new layer the character tube
image => resize => untick « resize all layers » => 80%
move right (see final result)
32
adjust => sharpness => sharpen
33
effects => 3D effects => drop shadow => -10 /
10 / 60 / 30 / black
34
copy / paste as new layer the balls tube
image => resize => untick « resize all layers » => 50%
image => resize => untick « resize all layers » => 60%
35
adjust => sharpness => sharpen
move properly
36
adjust => sharpness => unsharp mask
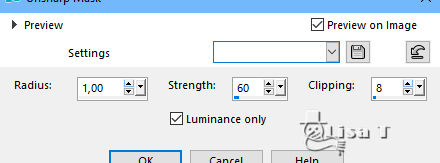
37
effects => 3D effects => drop shadow => -10 /
10 / 60 / 30 / black
38
copy / paste as enw layer the small characters tube
image => resize => untick « resize all layers » => 30%
move at the top (see final result)
39
erase the top end of the strings
40
adjust => sharpness => unsharp mask (same settings
as before)
41
effects => 3D effects => drop shadow => -5 / 5
/ 60 / 10 / black
42
layers => duplicate move a little further, hanging
on the frame (see final result)
43
layer s=> merge => merge visible
44
adjust => sharpness => unsharp mask

apply your signature or watermark
merge all and save as... type .jpeg
 
your tag is finished
Thank you for following this tutorial

if you have any problem,
or to show her your creations,
Don’t hesitate to write to Sylvie

It will be a real pleasure for her to present them at the
end of this tutorial

Back to the boards of Sylvie’s tutorials
board 1 
Home page ==> 

|