

click on french flag to find the original tutorial
Conditions of use of the material provided
It is forbidden to modify, change the name, take
off the watermarks or alter the tubes.
It is forbidden to share them in groups or offer them on
your site, blog or forum.
If you want to use them to create a tutorial, you must
ask the permission of the authors.

Odette has the permission of the creators to use their
tubes, masks and decorations
Thank you to all of them.
Without their beautiful creations, no tutorials could be
written.
I use PSP2018 to create the tags of her tutorials
but you can follow this tutorials with any other version
of PSP
according to the version you use, the result might be slightly
different
Matérial
1 image - 2 tubes by Cibi and Colybrix : Thank you
- 1 masi (sg-queen of hearts)

open all tubes
window/duplicate. Close the originals and work with the
copies to preserve the originals
don’t forget to erase tubers’ watermarks before
using them
open the mask and minimize it to tray
install all plugins needed
Hints and Tips
TIP 1 -> if you don’t
want to install a font -->
open it in a software as « Nexus Font » (or
other font viewer software of you choice)
as long as the software’s window is opened, your
font will be available in PSP.
TIP 2 -> from PSPX4,
in the later versions of PSP the functions « Mirror » and « Flip » have
been replaced by -->
« Mirror » --> image -> mirror -> mirror
horizontal
« Flip » --> image -> mirror -> mirror
vertical
Plugins
Funhouse/Loom
Funhouse/Sierpenski's Mirror
Funhouse/Xaggerate
Xenofex 2/Constellation
Use the pencil to follow the steps
hold down left click to grab it and move it
 |
Realization
1
open a new transparent raster layer 850 * 700 pixels
2
copy / paste image into seleciton
selections -> select none
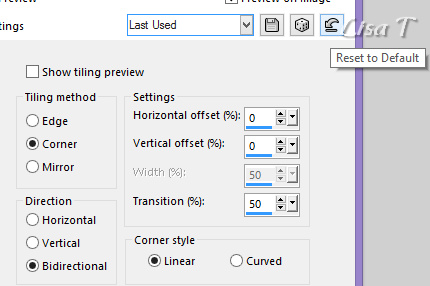
3
effects -> seamless tiling -> default settings
4
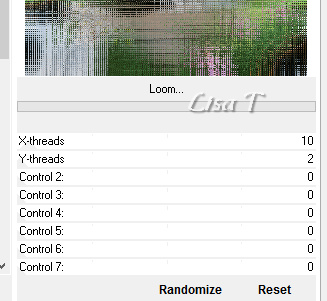
effects -> plugins
->
Unlimited 2 / Funhouse / Loom / default settings
5
adjust -> sharpness -> sharpen
6
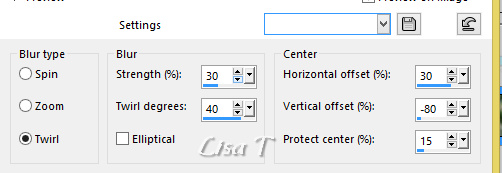
adjust -> blur -> radial blur
7
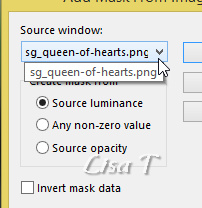
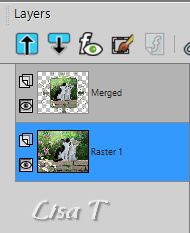
laerys -> new mask layer -> from image
layers -> merge -> merge group
8
enable the magic wand tool

and select inside the frame
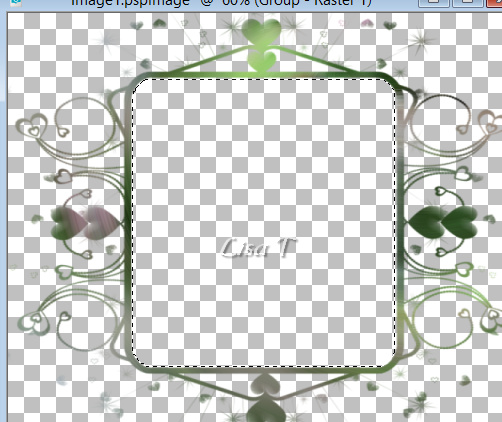
9
selections -> modify -> expand -> 5 pixels
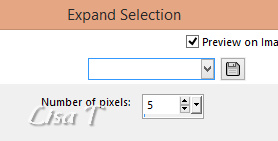
keep selection active
10
paste the image as new layer
image -> resize -> untick « resize
all layers » -> 65%
move the image as shwon
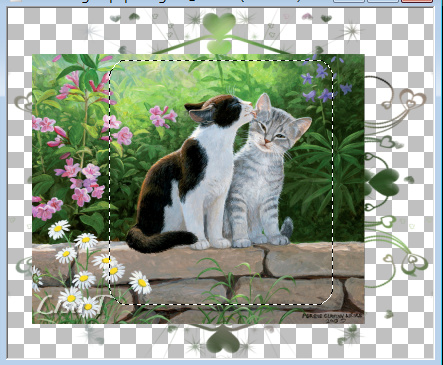
selections -> invert DELETE on your keyboard
selections -> select none
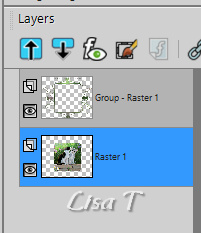
11
layers -> move -> move down
12
adjust -> sharpness -> unsharp mask
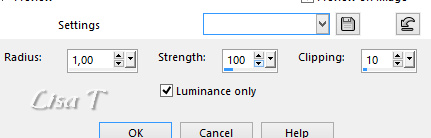
layers -> mereg -> merge visible
13
layers -> new raster layer
selections -> select all
copy / paste the image into selection
selections -> select none
14
layers -> move -> move down
15
adjust -> blur -> gaussian blur / 30
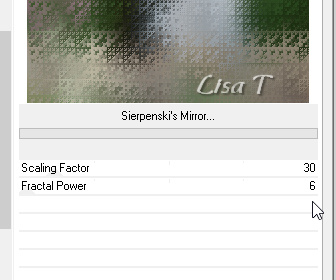
16
effects -> plugins -> Unlimited 2 -> Sierpenski’s
Mirror
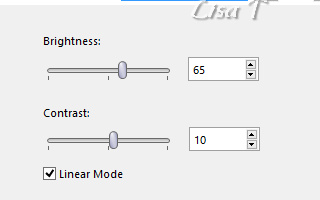
17
adjust -> brightness aned contrast -> brightness/contrast
18
adjust -> sharpness -> sharpen more
highlight top layer
19
effects -> 3D effects -> drop shadow -> 0 / 0
/ 50 / 1 / black
20
copy / paste Cibi’s tube
don’t move it
effects -> seamless tiling -> default settings
21
enable the selection tool / rectangle and select the image
in the middle
just keeping the four ones in the corners
22
adjust -> sharpness -> sharpen
layers -> merge -> merge all (flatten)
23
image -> add borders -> tick « symmetric » -> 1
pixel black
edit -> copy
image -> add borders -> tick « symmetric » -> 30
pixels white
24
select the large borders with magic wand tol
edit -> paste into selection
25
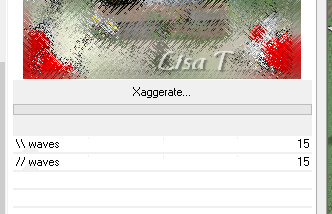
adjust -> blur -> radial blur same settings as before
effects -> plugins -> Unlimited 2 -> Funhouse
/ Xaggerate
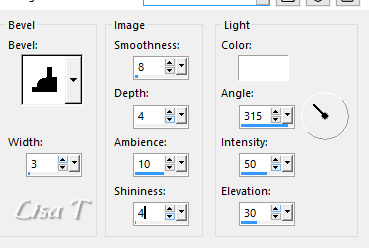
26
effects -> 3D effects -> inner bevel -> bevel
6
27
effects -> plugins -> AAA Frames -> Foto Frame

selections -> select none
28
choose a nice Font and write your text
apply your watermark and merge all (flatten)
set your tag aside
29
creating and using the picture tube
open Colybrix’s tube
erase the watermark
image -> resize -> untick « resize all layers » -> 30%
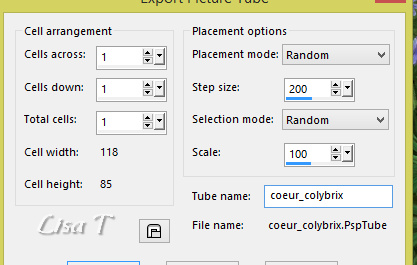
30
file -> export -> picture tube -> give a name
to your new picture tube
31
highlight your tag
layers -> new raster layer
enable the Picture Tube tool
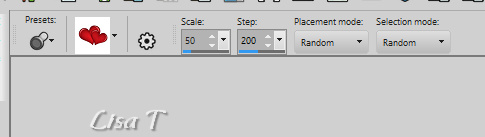
draw small hearts from place to place
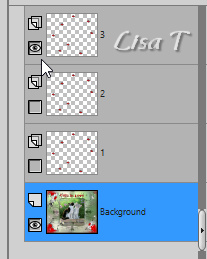
32
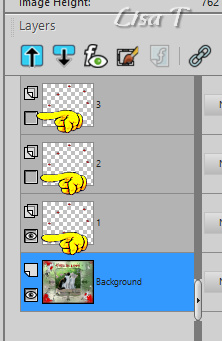
layers -> duplicate TWICE
rename these 3 layers « 1 » « 2 » « 3 » from
bottom to top
33
highlight « 1 »
effects -> plugins -> Xenofex 2 / Constellation
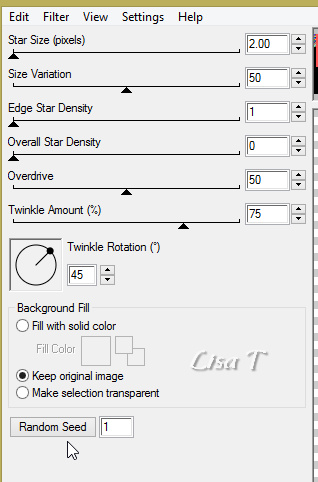
34
highlight « 2 »
effects -> plugins -> Xenofex 2 / Constellation
click on « random seed » at the bottom
35
highlight « 3 »
effects -> plugins -> Xenofex 2 / Constellation
click on « random seed » at the bottom
36
The Animation
close the eyes of « 2 » and « 3 »
edit -> copy special -> copy merged
open Animation Shop (AS) and paste as new animation
37
back into PSP
close the eye of « 1 » open the eye
of « 2 »

edit -> copy special -> copy merged
open Animation Shop (AS) and paste after current frame
38
close the eye of « 2 » open the eye of « 3 »
edit -> copy special -> copy merged
open Animation Shop (AS) and paste after current frame
view the animation to make sure everything is all right
file -> save as... type .gif
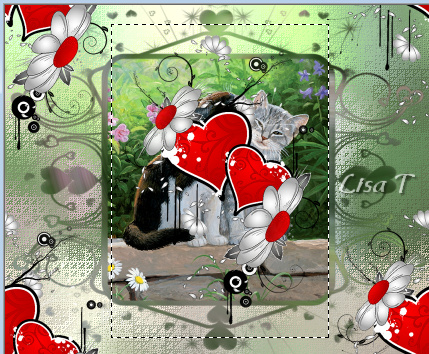
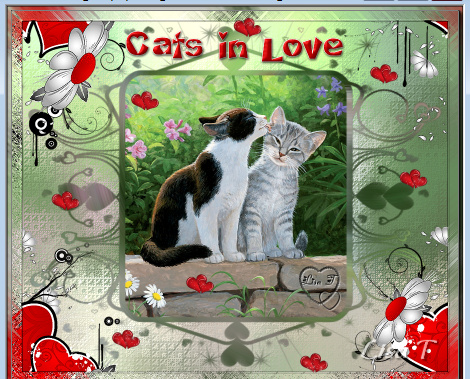
your tag is finished
Thank you for following this tutorial
My tag with another image (google image) and other
colours

Creatd by Waltraud Waltraud
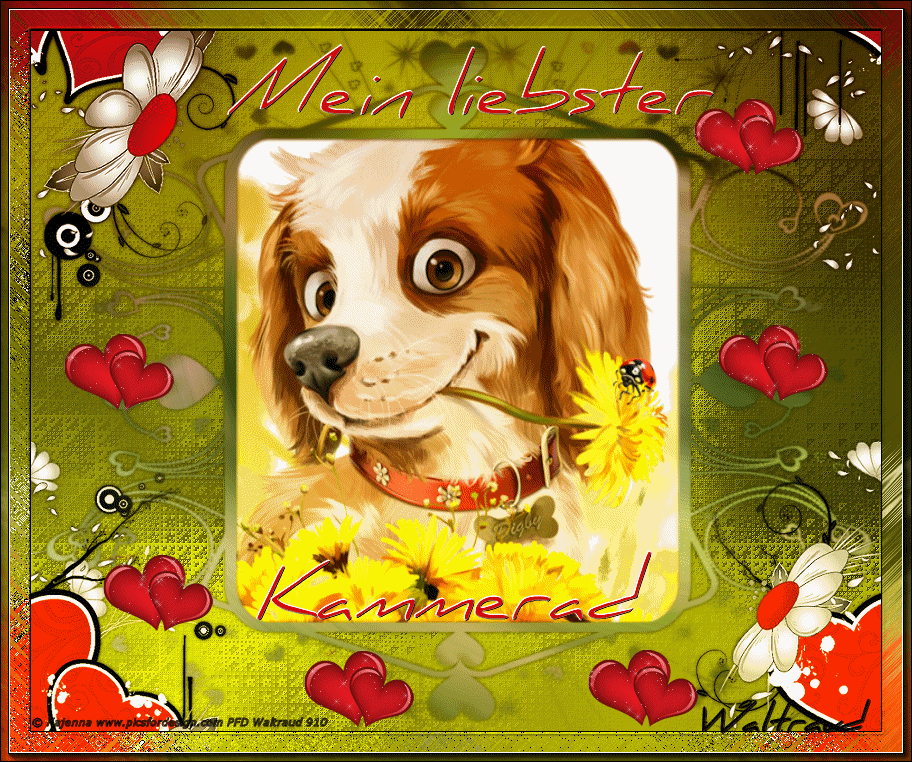
créated by Sue

if you have any problem,
or to show me your creations,
Don’t hesitate to write to me

It will be a real pleasure for me to present them at the
end of this tutorial
Back to the boards of Sylvie’s tutorials
board 1 

|