

click on french flag to find the original tutorial

 
Conditions of use of the material provided
It is forbidden to modify, change the name, take
off the watermarks or alter the tubes.
It is forbidden to share them in groups or offer them on
your site, blog or forum.
If you want to use them to create a tutorial, you must
ask the permission of the authors.

Odette has the permission of the creators to use their
tubes, masks and decorations
Thank you to all of them.
Without their beautiful creations, no tutorials could be
written.

I use PSP2018 to create the tags of her tutorials
but you can follow this tutorials with any other version
of PSP
according to the version you use, the result might be slightly
different

Matérial
tubes by Jacotte and Cibi - heart frame by
Redefined Designs

open all tubes
window/duplicate. Close the originals and work with the
copies to preserve the originals
don’t forget to erase tubers’ watermarks before
using them
open the mask(s) and minimize it(them) to tray
install all plugins needed
install gradients, patterns.... into the dedicated folders
into PSP general folder

Hints and Tips
TIP 1 -> if you don’t
want to install a font -->
open it in a software as « Nexus Font » (or
other font viewer software of you choice)
as long as the software’s window is opened, your
font will be available in PSP.
TIP 2 -> from PSPX4,
in the later versions of PSP the functions « Mirror » and « Flip » have
been replaced by -->
« Mirror » --> image -> mirror -> mirror
horizontal
« Flip » --> image -> mirror -> mirror
vertical

Plugins
VM Distortion/Circulator II
VM Natural/Sparkle
AAA Frame/Foto Frame
 
use the pencil to follow the steps
hold down Left click to grab it and move it

 
Realization
1
open a new transparent image 900 * 750 pixels
2
copy / paste the Heart Frame (don’t forget to erase
the watermarks) as new layer
3
effects -> image effects -> seamless tiling
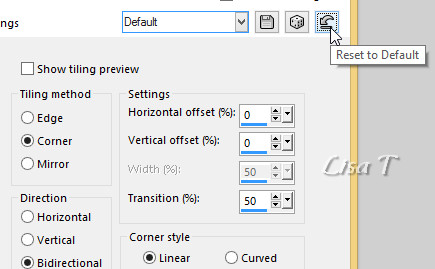
4
adjust -> sharpness -> sharpen more
5
effects -> plugins -> Unlimited 2 -> VM Distortion
/ Circulator II / default settings
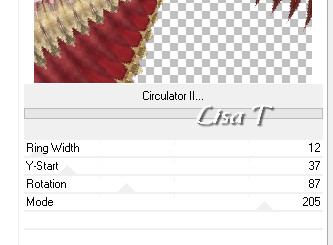
6
layers -> duplicate
image -> mirror -> mirror vertical
7
layers -> merge all (flatten)
your work looks like this
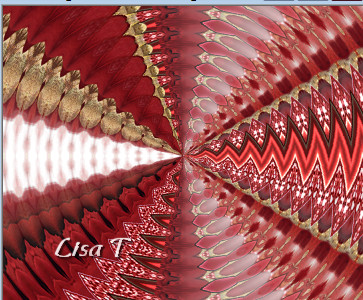
8
copy / paste again the heart frame as new layer
9
image -> resize -> untick « resize all
layers » -> 115%
10
effects -> 3D effects -> drop shadow -> 0 / 0
/ 60 / 5 / black
11
adjust -> sharpness -> sharpen more
12
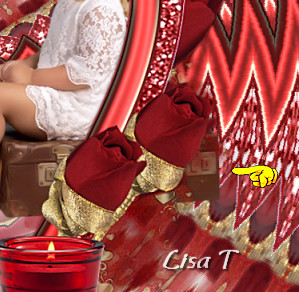
copy / paste Jacotte’s tube as new layer
image -> resize -> untick « resize all layers » -> 105%
13
erase the watermark
arrange this layer under the « Heart Frame » layer
move it properly (see final result) then erase the exceeding
piece of the suitcase
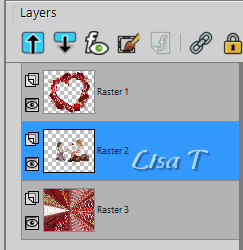 
14
adjust -> sharpness -> unsharp mask -> 2 / 2 /
60
15
effects -> 3D effects -> drop shadow -> 8 / -8
/ 30 / 20 / black
16
highlight Background layer
17
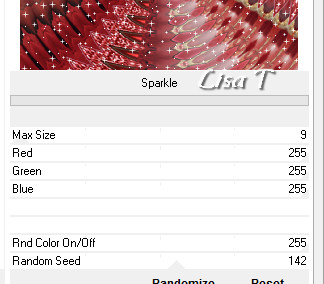
effects -> plugins -> Unlimited 2 -> VM Natural
/ parkle
18
adjust -> sharpness -> sharpen more
19
background layer is highlighted
20
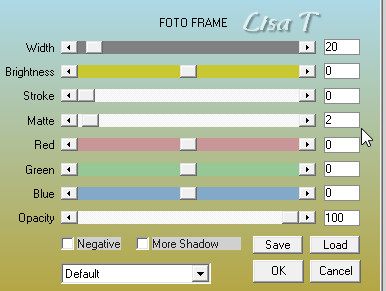
effect -> plugins -> AAA Frame -> Foto Frame
21
highlight top layer
copy paste Cibi’s tube as new layer
22
mirror -> mirror horizontal
image -> resize -> untick « resize all layers » -> 90%
move it to the left
rename this layer « hearts 1 »
arrange this layer under the tube of the children
23
layers -> duplicate
image -> mirror -> mirror horizontal
layers -> merge -> merge down
24
layers -> duplicate
rename this layer « hearts 2 »
highlight « hearts 1 »
25
adjust -> add-remove noise -> add noise -> 35
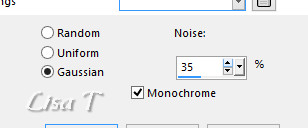
on « hearts 2 » add n oise too -> 45
26
apply your watermak
Animation
27
close the eye of « hearts 2 »
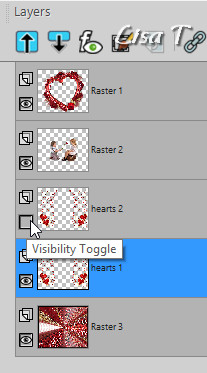
edit -> copy special -> copy merged
open Animation Shop -> paste as new animation
back into PSP
28
open the eye of « hearts 2 » and
close the eye of « hearts 1 »
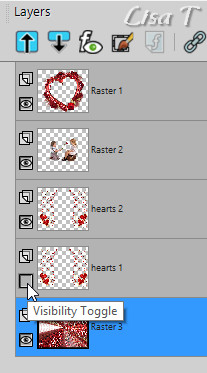
edit -> copy special -> copy merged
into Animation Shop -> paste after current frame
29
file -> save as... type .gif
 
your tag is finished
Thank you for following this tutorial

if you have any problem,
or to show her your creations,
Don’t hesitate to write to Sylvie

It will be a real pleasure for her to present them at the
end of this tutorial

Back to the boards of Sylvie’s tutorials
board 1 

|