Tutorial 85

You will find the original tutorial Here
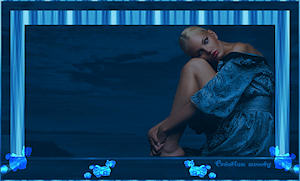

Sweety received the permission of the tubers to use their tubes.
You can find the banners of these tubers in the left column of her blog, under the heading "autorisations"

some of the tubes Sweety uses were received in sharing groups
or found on the web
if one of them is your property, please let us know
a link to your site will be added
they are provided as « single-use » for this tutorial
you are not allowed to share or used them for another purpose.
This tutorial is a personal creation,
any resemblance with another one would be pure coincidence
you are not allowed to share it or present it on your site, blog or forum
without the permission of Sweety

Thank you to the tubers for their great job
they make our creations possible

translator’s note : This translation is my property,
it is strictly forbidden to copy or distribute it on the Net
Thanks to Sweety for her kind permission
Sweety works with pSP 12, I work with PSP18, but it is possible to use another version.
I never use tubes without the tuber‘s signature !! they are ALWAYS stolen tubes
Please respect the tuber ‘s work, and do like me. Thank you !
have fun

Material
1 color palette - 7 selections (copy / paste into the folder « selecitons » of My PSP Files)
1 preset Glass (double click on it to install it)
you will need a character tube, a landscape tube and a decoration tube whic are not provided
the character tube used to create this tutorial is Colybrix’s property


Filters
Mehdi : (Wavy lab 1.1) – Simple: (Zoom Out And Flip) –
L en K landksiteofwonders : (L en K’s Zitah) -
Alien Skyn Eyes Candy 5 Impact: (Glass) –
AAA Frames: (foto frame) - MuRa’S Meister: (perspective tiling) –
Filters unlimited 2.0: &<Background Designer IV> : (@Night Shadow)

Thank you to Tine for her permission to use her filters page


Colors
choose FG and BG colors matching your main tube
Sweety used these colors
foreground color -> color 1 -> FG color -> #5a2c2e (dark color)
background color -> color 2 -> BG color -> #9e494e (light color)
color 3 -> #e4a27f (contrasting color, matching 1 & 2)

you will need about 1 hour to create your tag (not counting the time to choose your tubes)

Use the pencil to follow the steps
left click to grab it


Realization
Step1
open a new transparent raster layer 900 * 600 pixels
effects -> plugins -> Mehdi -> Wavy Lab 1.1
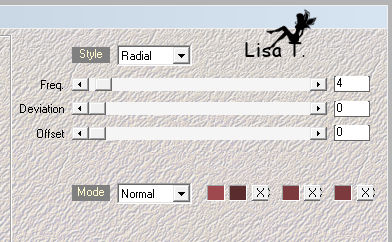
effects -> distortion effects -> pixelate
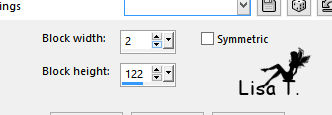
effects -> plugins -> Simple / Zoom Out And Flip
Step 2
selections -> load-save selection -> from disk -> selection 1
DELETE
layers -> new raster layer
layers -> arrange -> send to bottom
copy / paste into selection the landscape tube
adjust -> sharpness -> sharpen
selections -> invert
effects -> 3D effects -> drop shadow -> 0 / 0 / 100 / 10 / black
selections -> select none
Step 3
activate Raster 1
selection tool -> custom selection
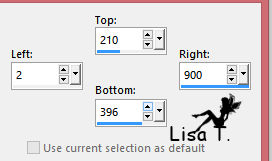
effects -> 3D effects -> drop shadow as before (don’t change the settings)
selections -> modify -> contract / 20
drop shadow again (same settings)
layers -> new raster layer
copy / paste into selection the landscape image
effects -> art media effects -> brush strokes

Step 4
your work and your layers palette look like this
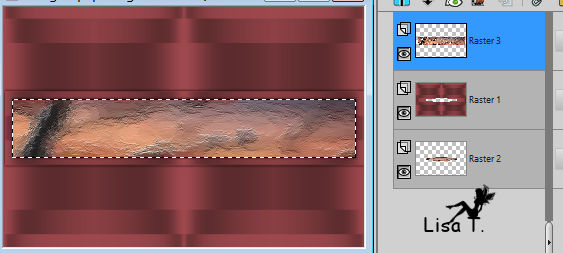
Raster 3 is the active layer
selections -> load-save selection -> from disk -> selection 1
DELETE
selection tool -> custom selection as before
selections -> modify -> contract / 40
DELETE
activate Raster 1
selections -> promote selection to layer
layers -> arrange -> move up
effects -> 3D effects -> drop shadow as before
keep the selection active
Step 5
effects -> plugins -> L en K’s / Zitah
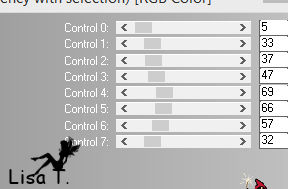
adjust -> sgarpness -> sharpen
selections -> select none
your work and your layers palette look like this
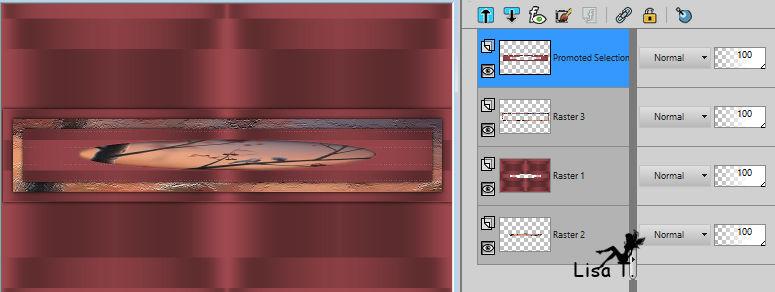
« Promoted selection » is the active layer
layers -> merge -> merge down (3 times)
Step 6
selections -> load-save selection -> from disk -> selection 2
effects -> 3D effects -> drop shadow as before
effects -> distortion effects -> wave

the selection is floating
selections -> promote selection to layer
effects -> 3D effects -> drop shadow as before
selections -> select none
with the right arrow of the keyboard, holding down the shift key, move the layer to the right (one strike only)

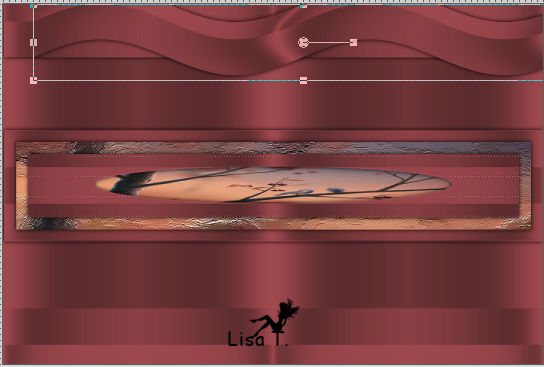
activate the Pick tool, stretch the layer slightly to the left
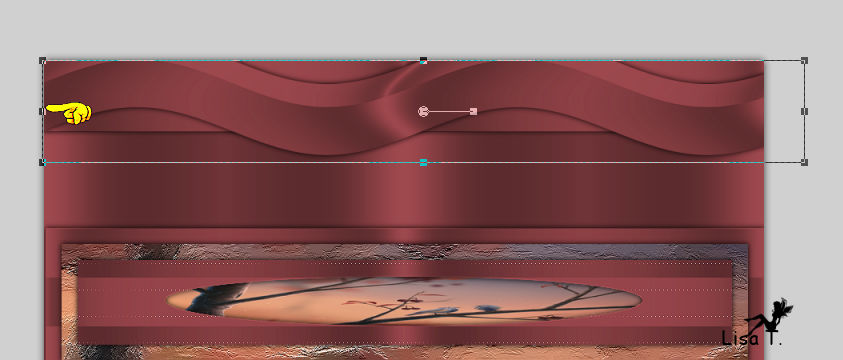
disable the tool (M)
Step 7
your work and your layer palette look like this

« Promoted Selection » is the active layer
layers -> duplicate
image -> mirror -> mirror vertical
image -> mirror -> mirror horizontal
layers -> mege -> merge down
activate « Raster 2 »
selections -> load-save selection -> from disk -> selection 3
effects -> 3D effects -> drop shadow as before
selections -> select none
selections -> load-save selection -> from disk -> selection 4
effects -> plugins -> L en K’s / Zitah

adjust -> sharpness -> sharpen
selections -> select none
Step 8
« Raster 2 » is the active layer
selection tool -> custom selection

selections -> promote selection to layer
effects -> plugins -> AAA Frames / Foto Frame
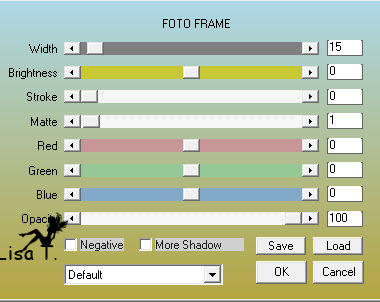
selections -> modify -> contract / 15
selections -> invert
effects -> plugins -> L en K’s / Zitah as in step 5
selections -> invert
copy / paste into selection the landscape tube
effects -> plugins -> Alien Skin Eye Candy 5 Impact / Glass
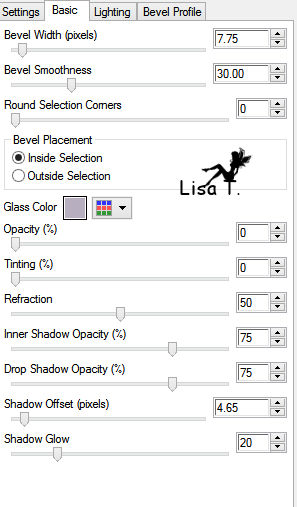
selections -> select none
Step 9
effects -> plugins -> Mura’s Meister / Perspective Tiling
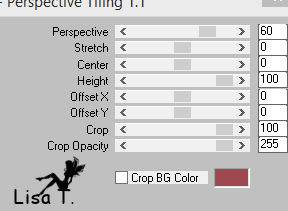
selections -> load-save selection -> from disk -> selection 5
DELETE
selections -> select none
opacity of the layer : 50%
layers -> duplicate - image -> mirror -> mirror vertical
layers -> merge -> merge down
Step 10
your work and your layers palette look like this

selections -> load-save selection -> from disk -> selection 6
layers -> new raster layer
copy / paste into selection the landscape tube
effects -> plugins -> Alien Skin Eye Candy 5 Impact / Glass (as before)
selections -> select none
layers -> duplicate - image -> mirror -> mirror horizontal
layers -> merge -> merge down
Step 11
image -> add borders -> 2 pixels color 3
edit / COPY
image -> add borders with color 1

selection tool -> custom selection

edit/ paste into selection
effects -> geometric effects -> perspective horizontal
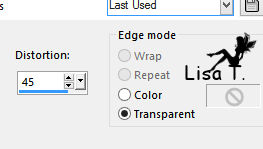
the selection is floating
selections -> defloat
selection tool -> custom selection

selections -> promote selection to layer
selections -> select none
layers -> duplicate - image -> mirror -> mirror horizontal
layers -> merge -> merge down
Step 12
view -> rulers - activate the Pick tool / mode Scale
stretch the layer upwards to 510/515 pixels
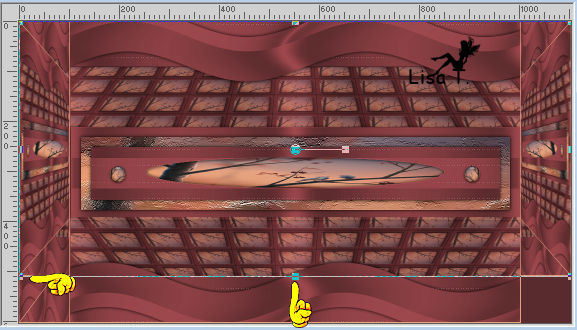
disable the tool (M) and the rulers
activate the bottom layer -> right click on it : promote background layer
with the selection tool (rectangle) select the colored square bottom right

selections -> promote selection to layer
selections -> select none
layers -> duplicate - image -> mirror -> mirror horizontal
layers -> merge -> merge down Twice
Step 13
your work and your layers palette look like this
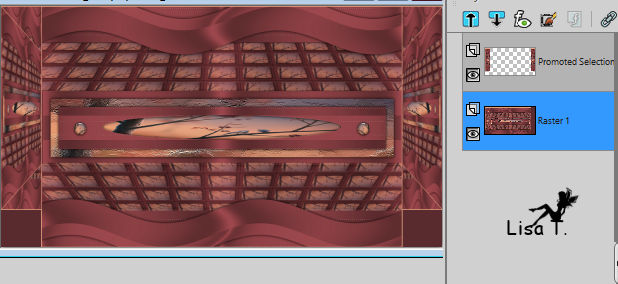
« Raster 1 » is the active layer
selection tool -> custom selection
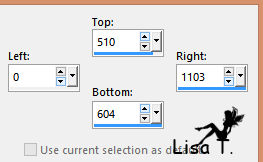
effects -> plugins -> Mura’s Meister / Perspective Tiling
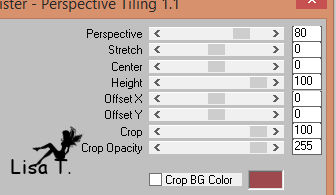
selections -> promote selection to layer
selections -> select none
view -> rulers and activate the Pick tool
stretch the layer up to 390

disable the tool and the rulers
selections -> load-save selection -> from disk -> selection 7
effects -> plugins -> Unlimited 2 -> &<Background Designer IV> / @Night Shadow
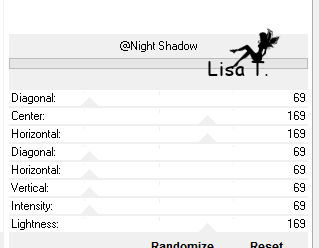
selections -> select none
effects -> 3D effects -> drop shadow as before
Step 14
copy / paste as new layer the character tube
resize if necessary (Sweety resized to 80%)
layers -> arrange -> bring to top
drop a shadow of your choice
move it where you like
copy / paste as new layer the decoration tube
move it opposite to the character
drop a shadow of your choice
image -> add borders -> 2 pixels color 3
selections -> select all
image -> add borders -> « symmetric » -> 40 pixels (any color)
selections -> invert
copy / paste into selection the landscape tube
effects -> art media effects -< brush strokes as before

layers -> new raster layer
effects -> 3D effects -> cutout
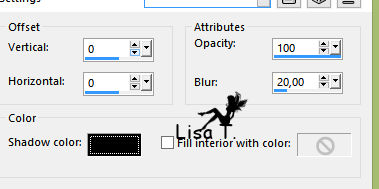
selections -> select none
Step 15
image -> add borders -> 2 pixels color 3
layers -> promote background layer
layers -> duplicate
image -> resize -> uncheck « all layers » -> 90%
activate the bottom layer (Raster 1)
adjust -> blur -> radial blur
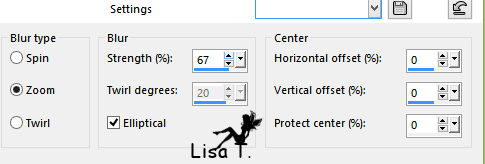
effects -> plugins -> Unlimited 2 -> &<Background Designer IV> @Night Shadow as before
Final step
image -> add borders -> 2 pixels color 3
apply your watermark
resize to 950 pixels width
save as... type .jpeg

your tag is finished
Thank you to have realized it

To write to Sweety

don't hesitate to send her your creations
Sweety will be very happy to see them and present thme in her gallery


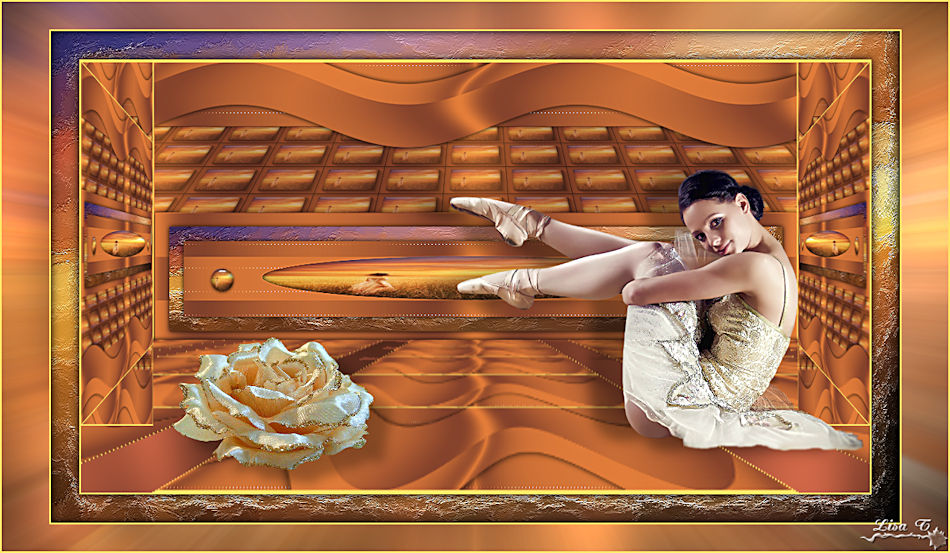
my version with my tubes
Back to the board of Sweety’s tutorials
board 2  board 3 board 3 

|