Tutorial 81

You will find the original tutorial Here
Sweety received the permission of the tubers to use their tubes.
You can find the banners of these tubers in the left column of her blog, under the heading "autorisations"

some of the tubes Sweety uses were received in sharing groups
or found on the web
if one of them is your property, please let us know
a link to your site will be added
they are provided as « single-use » for this tutorial
you are not allowed to share or used them for another purpose.
This tutorial is a personal creation,
any resemblance with another one would be pure coincidence
you are not allowed to share it or present it on your site, blog or forum
without the permission of Sweety

Thank you to the tubers for their great job
they make our creations possible

translator’s note : This translation is my property,
it is strictly forbidden to copy or distribute it on the Net
Thanks to Sweety for her kind permission
Sweety works with pSP 12, I work with PSP18, but it is possible to use another version.
have fun

Material
wallpapers found HERE
1 landscape image (not provided)
Selections (copy/paste into the folder « selections » of My PSP Files)
1 color Palette - 2 « persos » decorations
1 Xmas character (not provided)
Sweety used a tube by Tocha (« Tocha 23680 » received in sharing groups and not provided)
1 WA « Noel Kalino » (not provided)


Filters
Simple : (4 Way Average- Diamonds- Pizza Slice Mirror) - AP 01 (Innovations): (Lines silverlining)
AAAFrames : (FotoFrame- FrameWorks) - Flaming Pear : (Flexify 2) – VMToolbox : (Zoom Blur)

Thank you to Tine for her permission to use her filters page


Colors
foreground color -> color 1 -> #8b0000
background color -> color 2 -> #fcd588
OR
FG color -> color 1 -> #4f64ac
BG color -> color 2 -> #7999e1
you will need about 1 hour to create your tag (not counting the time to choose your tubes)

Use the pencil to follow the steps
left click to grab it


Realization
Step1
open a new transparent raster layer 900 * 600 pixels
selections > select all
copy / paste into selection your first image (you can find one on the link given in the material)
selections > select none
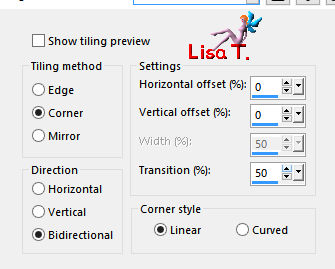
effects > image effects > seamless tiling
adjust > blur > radial blur

layers > duplicate – image > mirror > mirror horizontal
opacity of the layer : 50%
layers > merge > merge down
Step 2
effects > plugins > Simple > 4 Way Average
selection tool > custom selection

selections > promote selection to layer
copy / paste into selection your first image
selecitons > select none
optional -> (if you want to skip this part, go directly to step 3)
layers > duplicate – image > mirror > mirror orizontal – opacity of the layer : 50%
layers > merge > merge down
Step 3
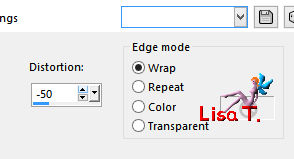
effects > distortion effects >wave

layers > duplicate – image > mirror > mirror vertical
layers > merge > merge down
effects > image effects > seamless tiling as in step 1
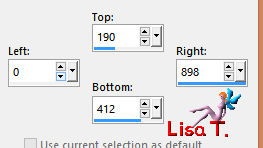
selection tool > custom selection
DELETE (hit the delete kay of your keyboard)
selections > select none
Step 4
selections > load-save selection > from disk > selection 1
activate the bottom layer (raster 1)
effects > plugins > AP 01 Innovations > LInes Silverlining

selections > invert
effects > 3D effects > drop shadow > 0 / 0 / 100 / 30 / black
selections > select none
Step 5
selections > load-save selection > from disk > selection 2
selections > promote selection to layer
copy / paste into selection the second image (best to choose a landscape)
effects > plugins > AAA Frames > FotoFrame

selections > select none
layers > duplicate
effects > plugins > Flamin Pear > Flexify 2

image > mirror > mirror horizontal
layers > arrange > move down
selections > load-save selection > from disk > selection 1
DELETE
selections > select none
Step 6
your work and your layers palette look like this

« copy of promoted selection 1 » is the active layer
layers > new raster layer
layers > arrange > move down
selections > load-save selection > from disk > selection 3
copy / paste into selection the second image
selections > modify > contract > 20
selections > invert
effects > 3D efefcts > drop shadow > 0 / 0 / 100 / 50 / black
selections > select none
Step 7
layers > new raster layer
layers > arrange > move down
selections > select all
copy / paste into selection the second image
selections > load-save selection > from disk > selection 4
selections > promote selection to layer
selections > select none
acitvate « raster 3 »
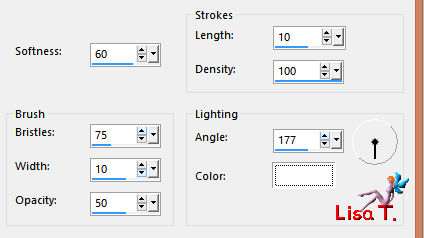
effects > art media effects > brush stokes
Step 8
your work and your layers palette look like this

« raster 3 » is the active layer
opacity of the layer : 40% (or other, according to your colors)
you can change the blend mode if you wish (make tests !!)
activate « promoted selection 2 »
effects > distortion effects > wave as in step 3
effects > image effects > offset > H : -4 / V : -31 (check « custom » and « transparent »)
layers > duplicate – image > mirror > mirror horizontal
layers > merge > merge down
effects >3 D effects > drop shadow > 0 / 0 / 60 / 10 / FG color or black
layers > duplicate
image > mirror > mirror vertical
layers > merge > merge down
copy / paste as new layer the decoration tube 1
colorize it or set the blend mode on « Luminance (Legacy) » (or other)
Step 9
your work and your layers palette look like this

« raster 4 » is the active layer
acitvate « promoted selection 1 » (second from the top)
copy / paste as new layer the decoration tube 2
lower the opacity as you like
activate « raster 3 » (second from the bottom)
copy / paste as new image
set aside for a later use
Step 10
image > add borders > 2 pixels color 1
right click on this background in the layers paeltte, -> promote background layer
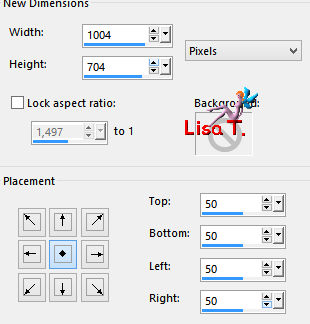
image > canvas size
layers > duplicate
layers > arragne > move down
effects > plugins > Simple > Diamonds
effects > plugins > Simple > Pizza Slice Mirror
selection tool > custom selection

DELETE
selections > select none
layers > duplicate – image > mirror > mirror horizontal
layers > merge > merge down
effects > 3D effects > drop shadow > 5 / 5 / 100 / 50 / black * -5 / -5 / 100 / 50 / black
Step 11
layers > new raster layer
layers > arrange > send to bottom
selections > select all
copy / paste into selection the image set aside in step 9
selections > select none
image > add borders > 2 pixels color 1
Step 12
layers > duplicate
image > resize > 90% > uncheck « all layers »
effects > geometric effects > perspective vertical
effects > image effects > offset > H : 0 / V : -81
view -> rulers – activate the Pick tool
lower the layer to 655 pixels
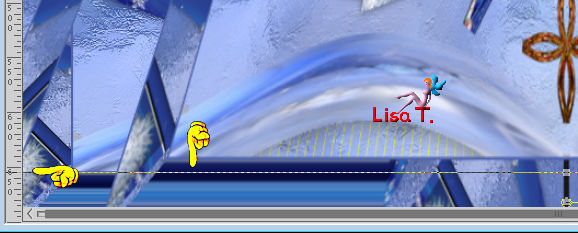
disable the rulers and the tool
Step 13
selections > select all
selections > float – selections > defloat
selections > modify > select selection borders

layers > new raster layer
flood fill the selection with color 2 (match mode : none)
selections > select none
layers > merge > merge visible
Step 14
selections > select all
image > add borders > 40 pixels (any color)
edit > COPY
effects > 3D effects > drop shadow > 0 / 0 / 60 / 30 / black
selections > invert
edit > paste into selection
effects > plugins > VM Toolbox > Zoom Blur

effects > plugins > AAA Frames > FrameWorks
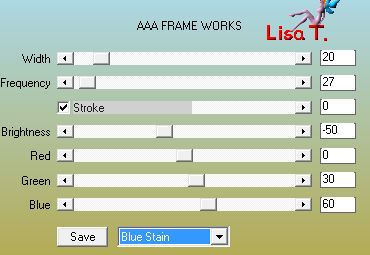
selections > select none
Step 15
selections > select all
selections > modify > contract > 20 pixels
selections > invert
selections > promote selection to layer
activate the top layer (raster 1)
selections > select all
selections > modify > contract > 40 pixels
selections > promote selectionto layer
selections > select none
your work looks like this
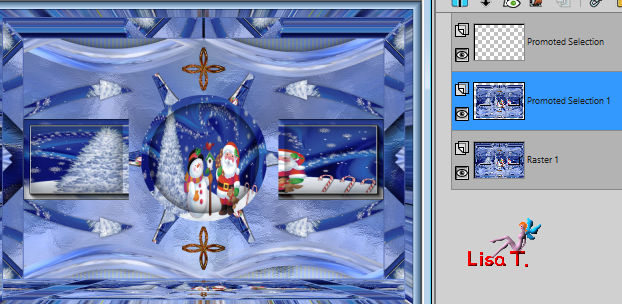
Step 16
« promoted seleciton 1 » is tha active layer
effects > image effects > offset > H : 0 / V : 21
activate the Pick Tool and stretch the layer to the right and to the left
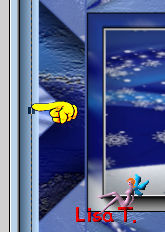 
copy / paste as new layer the character tube – resize if necessary and place it where you like
drop a shadow of your choice
Final Step
add decoration to your likings
apply your watermark – layers > merge > merge all (flatten)
file > save as... type jpeg

your tag is finished
Thank you to have realized it

To write to Sweety


don't hesitate to send your creations to Sweety
she will be very glad to see them, and present them on the gallery


Back to the board of Sweety’s tutorials
board 1  board 2 board 2 

|