Tutorial 79

You will find the original tutorial Here


Sweety received the permission of the tubers to use their tubes.
You can find the banners of these tubers in the left column of her blog, under the heading "autorisations"

some of the tubes Sweety uses were received in sharing groups
or found on the web
if one of them is your property, please let us know
a link to your site will be added
they are provided as « single-use » for this tutorial
you are not allowed to share or used them for another purpose.
This tutorial is a personal creation,
any resemblance with another one would be pure coincidence
you are not allowed to share it or present it on your site, blog or forum
without the permission of Sweety

Thank you to the tubers for their great job
they make our creations possible

translator’s note : This translation is my property,
it is strictly forbidden to copy or distribute it on the Net
Thanks to Sweety for her kind permission
Sweety works with pSP 12, I work with PSP18, but it is possible to use another version.
have fun

Material
1-1 color palette – 7- selections (copy/paste into the folder « selection » of My PSP Files) –
1 – APDistort –
1 - image abstract-surrealism-imagination. (google image, not provided) –
1 - Image Fantasy –forest. (google image, not provided) –
3- tubes decoration persos- 1- preset extrude :
(Double click on the preset to install it)
1-character tube « tubtatie-dfgu45re68u » (not provided)
1-decoration « calguisbirdautumn26092012 » (not provided)


Filters
Simple: (Pizza Slice Mirror - Half Wrap) - APDistort: (Distort WavyCity )
(provided. if you don’t see it among your plugins, try to rename the effects)
Alien Skin Eye Candy 5 Impact : (Glass-Extrude) - MuRa’s Meister : (perspective tiling)
Graphics plus : (cross shadow) -

Thank you to Tine for her permission to use her filters page


Colors
foreground color -> color 1 -> #42693a
background color -> color 2 -> # d0f871
color 3 -> # f8cb2f

you will need about 1 hour to create your tag (not counting the time to choose your tubes)
you must have a good knowledge of PSP to follow this tutorial

Use the pencil to follow the steps
left click to grab it


Realization
Step1
choose an abstract image, and choose a dark color as FG color, and a light color as BG color
choose a third color matching with these 2 colors
choose a landscape image
open a new transparent raster layer 900 * 600 pixels
selections > select all
copy /paste into selection the fractal image
selections > select none
effects > image effects > seamless tiling

adjust > blur > radial blur

Step 2
layers > duplicate
effects > plugins > Simple > Pizza Slice Mirror
layers > duplicate - image > mirror > mirror horizontal
opacity of the layer : 50%
layers > merge > merge down
selections > load selection from disk > selection 1
selections > promote selection to layer
selections > select none
Step 3
effects > plugins > AP Distort > Distort > Wavy City

selections > load selection from disk > selection 2
DELETE
keep the selection active
activate the abstract image > effects > image effects > seamless tiling

edit > copy – back to your work > layers > new raster layer > paste into selection
layers > arrange > move down
selections > invert
effects > 3D effects > drop shadow > 0 / 0 / 100 / 5 / black > uncheck « shadow on new layer »
selections > select none
Step 4
copy / paste as new layer the decoration tube « perso 1 »
layers > arrange > move down – don’t move it
colorize or change the blend mode according to your tubes and colors
copy / paste as new layer the decoration tube « perso 2 »
layers > arrange > bring to top
don’t move it
layers > merge > merge down 3 times
effects > 3D effects > drop shadow > 0 / 0 / 60 / 10 / black
your tag and layers palette look like this

« raster 3 » is the active layer
activate « copy of raster 1 »
selections > load selection from disk > selection 4
selections > modify > contract > 10 pixels
selections > invert
DELETE
selections > invert
layers > new raster layer
copy/ paste into selection the landscape image
effects > artistic effects > enamel

blend mode : overlay – opacity : 57% +/-
keep the selection active
Step 6
selections > modify > select selection borders

layers > new raster layer
flood fill the selection with color 3 (match mode of the flood fill tool : none)
selections > load selection from disk > selection 5
layers > new raster layer
layers > arrange > move down 3 times
copy / paste into selection the landscape image
change the blend mode if necessary
Step 7
selections > modify > contract > 20 pixels
selections > invert
effects > 3D effects > drop shadow > 5 /5 / 60 / 5 / black > uncheck « shadow on new layer »
selections > invert
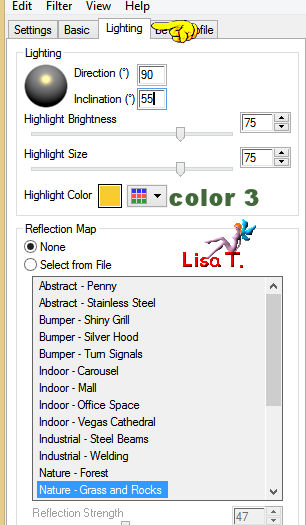
effects > plugins > Alien Skin Eye Candy 5 Impact > Glass
  
selections > select none
Step 8
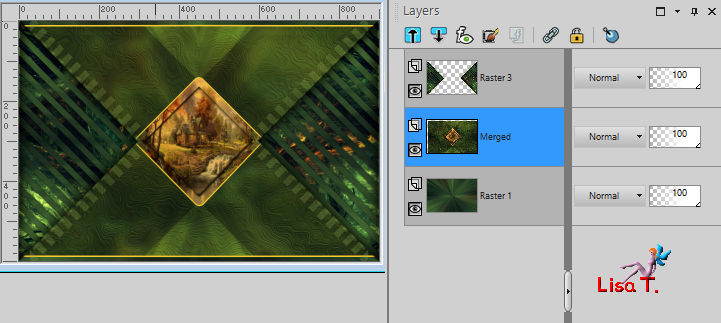
your tag and your layers palette look like this

« raster 5 » is the active layer
activate « raster 4 »
selections > load selection from disk > selection 6
layers > new raster layer
copy / paste into selection the decoration tube « déco 3 »
blend mode : dodge (or other of your choice) – opacity between 90% and 100%
selections > select none
close the visibility of « raster 3 » and « raster 1 »
activate any othe layer > layers merge visible
open the visibility of « raster 3 » and « raster 1 »
your work looks like this

Step 9
the middle layer is the active layer (merged)
selections > load selection from disk > selection 3
selections > invert
effects > 3D effects > drop shadow > 0 / 0 / 100 / 50 / black
selections > invert
layers > new raster layer
copy / paste into selection the abstract image
opacity between 50% and 55%
selections > select none
layers > merge > merge down
Step 10
activate « raster 3 » (top layer)
effects > 3D effects > drop shadow > 0 / 0 / 60 / 10 / FG color
layers > merge > merge down
copy / paste as new image and set aside for a later use
back to your work
image > add borders

select the white borders with the magic wand tool (tolerance 0)

effects > plugins > Simple > Half Wrap
selections > promote selection to layer
selections > select none
Step 11
selections > select all
layers > new raster layer
copy /paste into selection the image set aside in step 10 (don’t close it, you’ll need it again)
selections > select none
effecst > plugins > Mura’s Meister > Perspectve Tiling

layers > arrange > move down
selections > select all
selections > float – selections > defloat
Step 12
activate « promoted selection »
selections > promote selection to layer
activate « promoted selection » again
DELETE
activate the bottom layer (the Background) right click on it and choose « promote background layer »
DELETE
selections > select none
activate the top layer (promoted selection 1)
selections > select all
selections > float – selections > defloat
copy / paste into selection the abstract image
selections > select none
Step 13
« promoted selection » is the active layer
in the materials palette, make sure color 2 is the background color
effects > plugins > AP Distort > Distort > WavyCity

selections > load selection from disk > selection 7
effects > 3D effects > drop shadow > 5 / 5 / 50 / 5 / color 1
effects > 3D effects > drop shadow > -5 / -5 / 50 / 5 / color 1
selections > select none
effects > plugins > Alien Skin Eye Candy 5 Impact > Extrude
in the tab « settings » choose the preset provided » - here are the settings

activate the Pick tool, and move it as shown below

effects > 3D effects > drop shadow > 0 / 0 / 50 / 5 / black
image > add borders > 3 pixels color 3 (check « symmetric »)
Step 14
selections > select all
imagez > add borders (regardless of the color)

selections > invert
copy / paste into selection the image set aside in step 10
effects > 3D effects > drop shadow > 0 / 0 / 50 / 5 / black
selections > select none
Step 15
image > add borders

selections > select all
image > add borders > 30 pixels > color 1 (check « symmetric »)
selections > invert
effects > plugins > AP Distort > Distort Cutting Edges

selections > promote selection to layer
activate the background layer
flood fill the selection with color 1
effects > plugins > Graphic plus > Cross Shadow

selections > select none
Step 16
activate the top layer
selections > load selection from disk > selection 8
DELETE
selections > select none
layers > duplicate – image > mirror > mirror vertical – image > mirror > mirror horizontal
layers > merge > merge down
effects > 3D effects > drop shadow > 0 / 0 / 60 / 10 / black
activate the Pick Tool and stretch the layer slightly to the right and left

disable the tool (key « M »)
The decoration
copy / paste as new layer the character tube, place it where you like
resize if necessary
effects > 3D effects > drop shadow > 0 / 0 / 60 / 10 / black
layers > arrange > move down (under the frame)
activate the top layer
copy / paste as new layer a decoration tube (or more, as you like)
effects > 3D effects > drop shadow > 0 / 0 / 60 / 10 / black
image > add borders > 2 pixels color 3
Final step
apply your watermark
layers > merge > merge all (flatten)
image > resize --> width : 950 pixels
adjust > sharpness > sharpen
file > save as... type jpeg

your tag is finished

To write to Sweety


don't hesitate to send your creations to Sweety
it will be her pleasure to present it in the gallery of this tutorial

my tag with my tubes

Back to the board of Sweety’s tutorials
board 1  board 2 board 2 

|