Tutorial 56

You will find the original tutorial Here

Sweety received the permission of the tubers to use their tubes.
You can find the banners of these tubers in the left column of her blog, under the heading "autorisations"
some of the tubes Sweety uses were received in sharing groups
or found on the web
if one of them is your property, please let us know
a link to your site will be added
they are provided as « single-use » for this tutorial
you are not allowed to share or used them for another purpose.
This tutorial is a personal creation,
any resemblance with another one would be pure coincidence
you are not allowed to share it or present it on your site, blog or forum
without the permission of Sweety
Thank you to the tubers for their great job
they make our creations possible
translator’s note : This translation is my property,
it is strictly forbidden to copy or distribute it on the Net
Thanks to Sweety for her kind permission
Sweety work with pSP 12, I work with PSP17, but it is possible to use another version.
have fun
Material
9 selections - 1 image (google image) - 2 presets (double click on them to install them automatically)
1 texture (copy/paste into the special folder « Textures » of my « PSP Files »)
1 tube by Calguis (not provided) - 3 decoration tubes + 1 Word Art tube
1 character tube by Kordouane3D (not provided)
Open the tubes, duplicate them and work with the copies
copy the selections and paste them into the folder « Selections » of « My PSP Files »

Filters
Mehdi - Mystic Nights - Simple - Alien Skin Eye Candy 5 Impact - AAA Frames - Graphic Plus - Toadies
Mura’s Meister - Nik Color Efex Pro
Thank you to Tine for her permission to use her filters


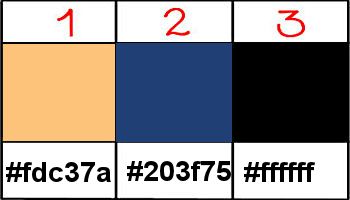
Colors
foreground color -> color 1 -> #fdc37a
background color -> color 2 -> #203f75
color 3 ->#ffffff
you will need about 1 hour to create your tag (not counting the time to chooseyour tubes)
medium difficulty
Use the pencil to follow the steps
left click to grab it
 |
Realization
Step1
open a new transparent raster layer 900 * 600 pixels
effects/plugins/Mehdi/Wavy Lab 1.1
adjust/blur/gaussian blur/30
effects/plugins/Mystic Nights/Frosted Glass/50
effects/plugins/Simple/Pizza Slice Mirror
Step 2
selection tool/rectangle/custom selection/ top : 0 / left : 448 / bottom : 600 / right : 900
hit the delete key of your keyboard
selections/select all
layers/duplicate - image/mirror/horizontal mirror - image/mirror/vertical mirror
your tag and your layers palette look like this
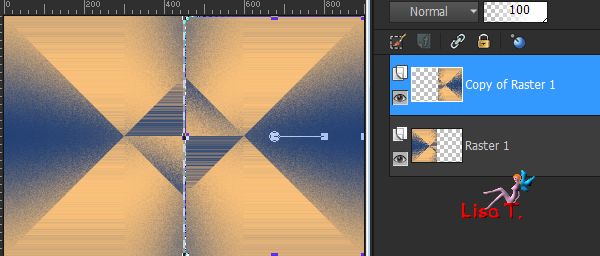
view/rulers - activate the Pick Tool and stretch to the left
activate the bottom layer (Raster 1) and stretch to the right
the 2 layers but touch one another
disable the rulers and the tool
activate the top layer (copy of raster 1)
layers/merge/merge down
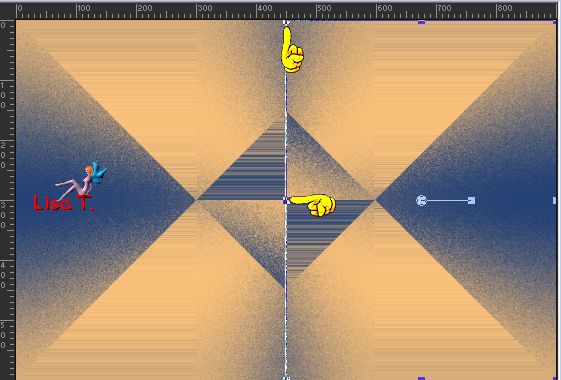
Step 3
selections/load-save selection/from disk/selection # 1/promote selection to layer
selections/select none
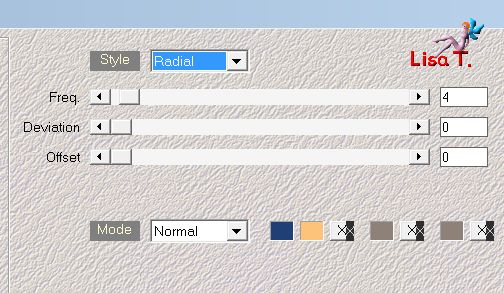
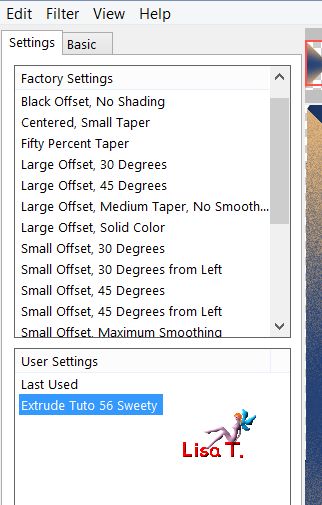
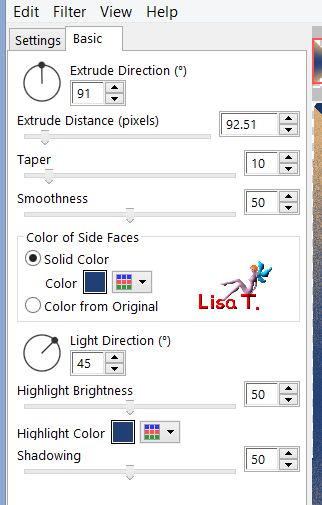
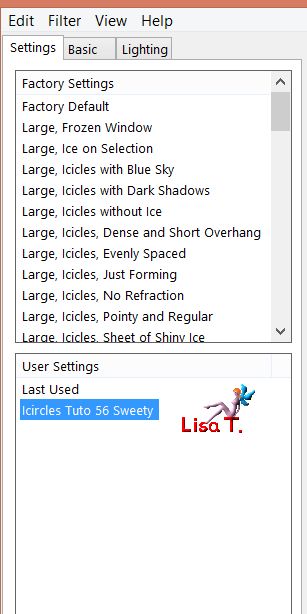
effects/plugins/Alien Skin Eye Candy 5 Impact/Extrude/preset Tuto 56 Sweety
selections/load-save selection/from disk/selection # 2
effects/plugins/Mehdi/Wavy Lab 1.1/same settings as in step 1
selections/select none
Step 4
layers/new raster layer
selections/load-save selection/from disk/selection # 3
copy/paste the image of the landscape into selection
layers/arrange/move down
selections/load-save selection/from disk/selection # 4/promote selection to layer
activate « Raster 2 » and hit the delete key of your keyboard
activate « Promoted Selection 1 »
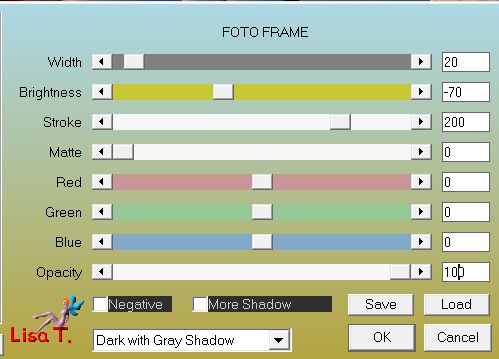
effects/plugins/AAA Frames/Foto Frame
opacity of the layer : 75% (according to your landscape)
selections/modify/contract/20
selections/invert
selections/promote selection to layer
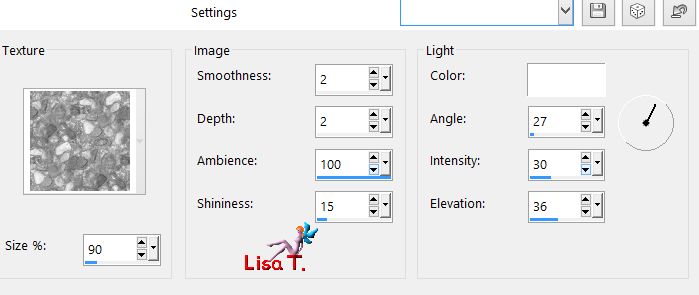
effects/texture effects/Texture
choose the texture provided « dallage en pierre »
layers/merge/merge down
selections/select none
Step 5
your tag and your layers palette look like this
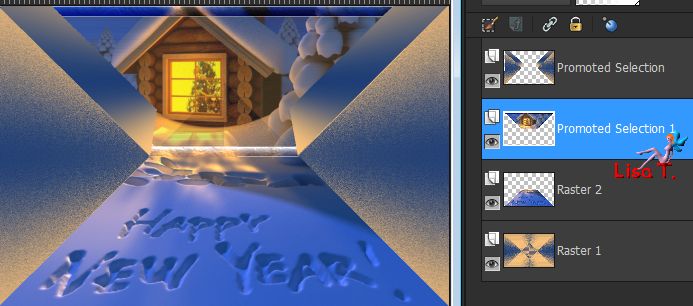
« Promoted Selection 1 » is the active layer
selections/load-save selection/from disk/selection # 5
hit the delete key of your keyboard, keep the selection active
layers/new raster layer
copy/paste the tube « calguismistedhousechristmal3121 » (or another one) into selection
image/resize/uncheck « resize all layers »/110%
layers/arrange/move down
selections/select none
activate the layer below (Raster 2)
opacity of the layer : 85 % (according to your image)
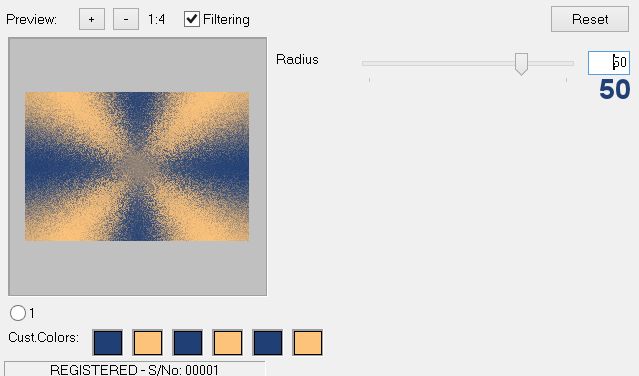
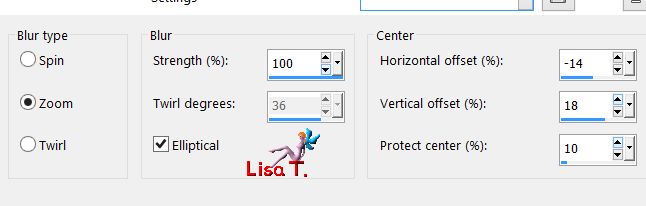
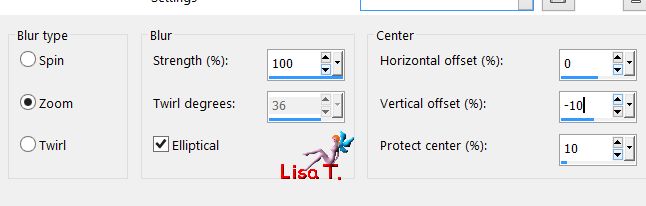
activate the bottom layer (raster 1) : adjust/blur/radial blur
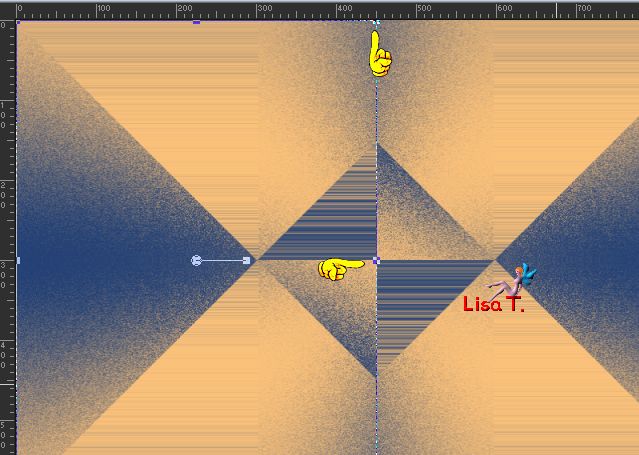
Step 6
activate the top layer (Promoted selection)
selections/load-save selection/from disk/selection # 2/promote selection to layer
copy/paste the image of the landscape into selection, keep the selection active
adjust/blur/radial blur
effects/edge effects/enhance more
layers/merge/merge down
selections/select none
Step 7
top layer is the active layer
selections/load-save selection/from disk/selection # 1
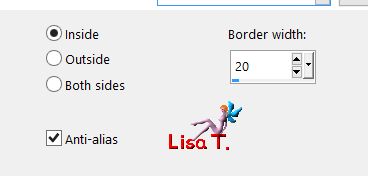
selections/modify/select selection borders
layers/new raster layer
copy/paste the image of the landscape into selection
selections/select none
layers/duplicate - layers/arrange/move down
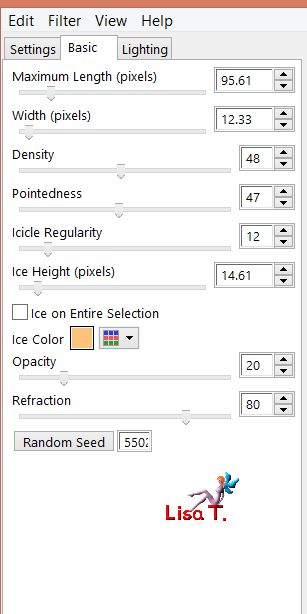
effects/plugins/Alien Skin Eye Candy 5 Impact/Nature/Icicles/preset tuto 56 Sweety
blend mode of the layer : dodge (or other)
Step 8
your tag and your layers palette look like this
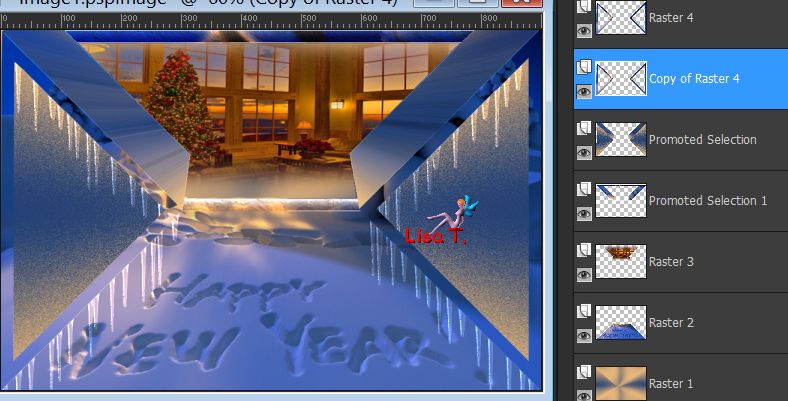
« copy of raster 4 » is the active layer
activate « Raster 4 » just above
selections/load-save selection/from disk/selection # 6
copy/paste the tube « calguismistedhousechristmal3121 » (or your tube) as new layer
selections/invert and hit the delete key of your keyboard
layers/arrange/move down twice
opacity : 30% (more or less)
selections/select none
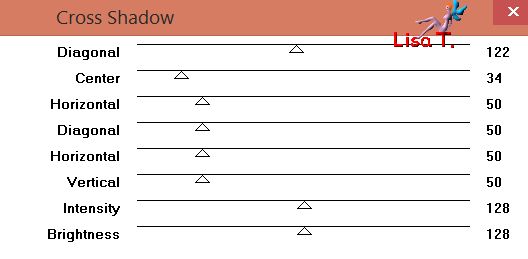
effects/plugins/Graphic Plus/Cross Shadow
copy/paste de decoration perso 1 as new layer - don’t move it
Step 9
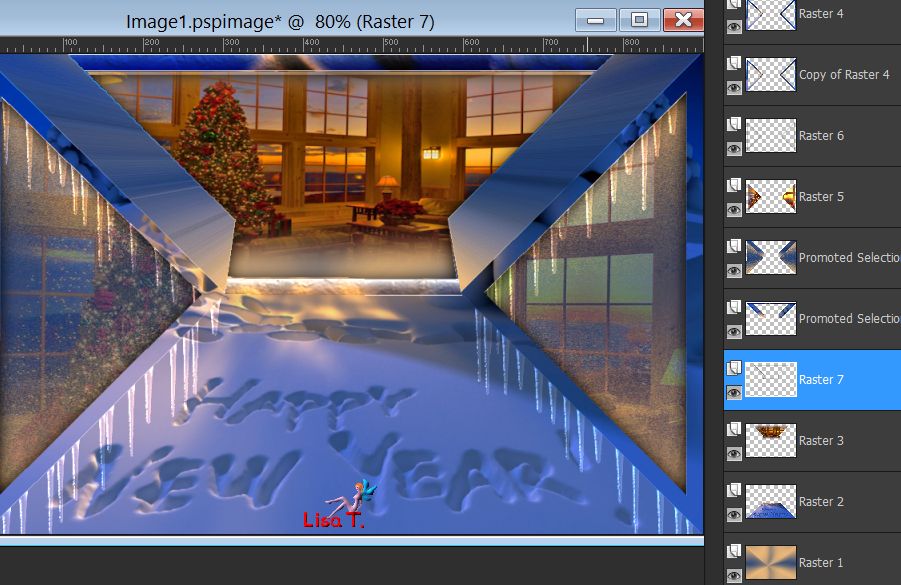
your tag and your layers palette look like this
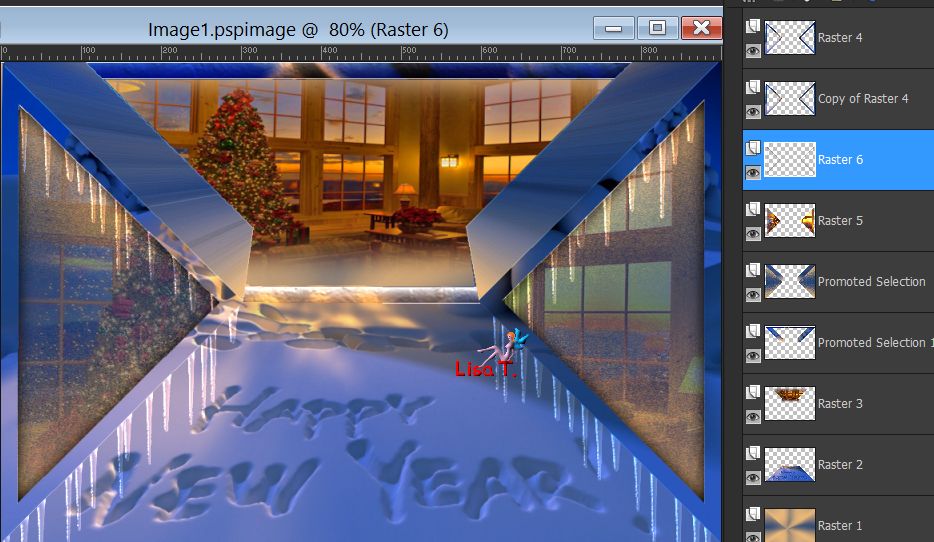
Raster 6 is the active layer
copy/paste the decoration perso 2 as new layer
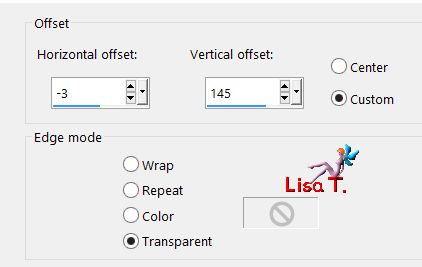
effects/image effects/offset/ H : -3 / V : 145 / check « custom » and « transparent »
layers/arrange/move down 4 times
your tag and your layers palette look like this now
Step 10
activate the bottom layer (Raster 1)
selections/load-save selection/from disk/selection # 7
effects/texture effects/Textures/ « dallage en pierre »
effects/edge effects/enhance
selections/select none
image/add borders/2 pixels color 2
layers/promote background layer
edit/COPY
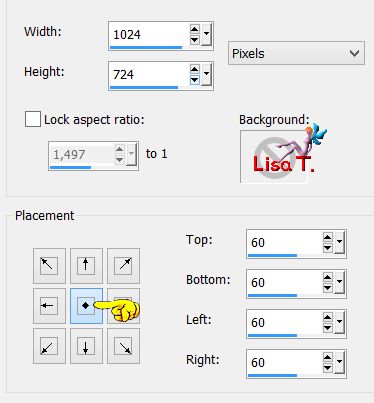
image/canvas size
layers/new raster layer
selections/select all
edit/paste into selection (image in the clipboard)
selections/select none
layers/arrange/move down
Step 11
keep « Raster 2 » active
effects/plugins/Toadies/Weaver/default settings

layers/duplicate - image/mirror/horizontal mirror
opacy of the layer : 50%
layers/merge/merge down
selections/load-save selection/from disk/selection # 8
selections/promote selection to layer
effects/plugins/Mura’s Meister/Perspective Tiling/default settings

selections/select none
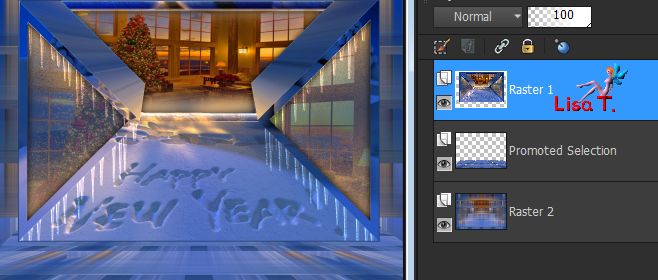
activate the top layer (Raster 1)
effects/image effects/offset/ H : 0 / V : 60
your tag and your layers palette look like this
Step 12
keep this layer active (Raster 1)
acivate the Pick Tol (K)
stretch to the right and to the left
your tag looks like this

disable the Pick Tool (M)
effects/3D effects/drop shadow/ 1 / 1 / 60 / 1 / black
selection tool/rectangle/custom selection/ top : 0 / left : 0 / bottom : 604 / right : 29
layers/new raster layer/
copy/paste the decoration tube perso 3 into selection
layers/arrange/move down twice
selections/select none
layers/duplicate - image/mirror/horizontal mirror
layers/merge/merge down
Step 13
selection tool/rectangle/custom selection/ top : 603 / left : 0 / bottom : 723 / right : 1024
layers/new raster layer and move down
activate the decoration tube perso 3
image/free rotate/left/90°/uncheck the two bottom boxes
image/mirror/vertical mirror
edit/copy - back to your work and paste into selection
selections/select none
image/add borders/2 pixels color 2
Step 14 - Decoration
copy/paste the character tube as new layer
Sweety used a 3D tube by Kordouane and resized it to 90%
move it where you like
to make the background match the character, Sweeety applied Nik Color Efex Pro

but this step is optional
translator’s note : I didn’t use this plugin, as I chose to keep all images as they are
effects/3D effects/drop shadow/ 1 / 1 / 60 / 1 / black
copy/paste the Word Art tube (or write your own text) as new layer
effects/image effects/if you use Sweety’s Text)/ H : 0 / V : -305
blend mode : Dodge (or other), or colorize according to your own colors
selections/select none
layers/duplicate - image/mirror/horizontal mirror
Final Step
apply your signature
image/add borders/2 pixels color 2
layers/merge/merge all (flatten)
image/resize : width : 950 pixels
save as... type jpeg
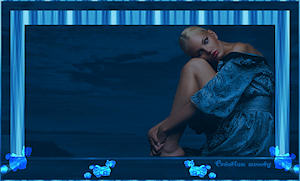
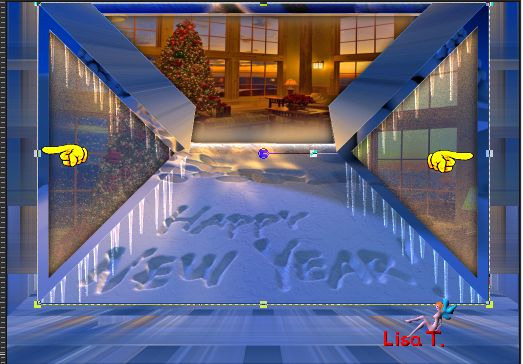
your tag is finished
Thank you to have realized it
To write to Sweety

if you create a tag with this tutorial, Sweety would be very happy to see it
and to present it here

Back to the board of Sweety’s tutorials
board 1  board 2 board 2

|