Tutorial 52

You will find the original tutorial Here


Sweety received the permission of the tubers to use their tubes.
You can find the banners of these tubers in the left column of her blog, under the heading "autorisations"
some of the tubes Sweety uses were received in sharing groups
or found on the web
if one of them is your property, please let us know
a link to your site will be added
they are provided as « single-use » for this tutorial
you are not allowed to share or used them for another purpose.
This tutorial is a personal creation,
any resemblance with another one would be pure coincidence
you are not allowed to share it or present it on your site, blog or forum
without the permission of Sweety
Thank you to the tubers for their great job
they make our creations possible
translator’s note : This translation is my property,
it is strictly forbidden to copy or distribute it on the Net
Thanks to Sweety for her kind permission
I work with PSP17, but it is possible to use another version.
have fun
Material
7 selections
1 mask (copy/paste into the folder Masks of My PSP Files)
1 image landscape (google image) - 2 decoration tubes
1 character by Kordouane (not provided)
1 decoration tube by Calguis (not provided)
1 decroation tube by KTS (not provided)
Open the tubes, duplicate them and work with the copies
copy the selections and paste them into the folder « Selections » of « My PSP Files »

Filters
Simple - AP01 [Innovations] (if you don’t have it, ask Sweety)
Unlimited 2 - Mura’s Meister - Filter Factory Gallery G
Thank you to Tine for her permission to use her filters


Colors
foreground color -> color 1 -> #715aaa
background color -> color 2 -> #f7c0d7
color 3 ->#fdb69b

you will need about 1 hour to create your tag (not counting the time to choose your tubes)
Use the pencil to follow the steps
left click to grab it
 |
Realization
Step1
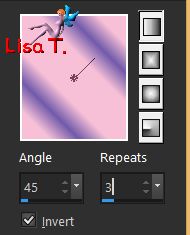
open a new transparent raster layer 900 * 600 pixels
fill with a linear gradient 45/3
adjust/blur/gaussian blur/20
effects/plugins/Siple/Diamonds
Step 2
selections/load selection from disk/selection 1
selections/promote selection to layer
selections/select none
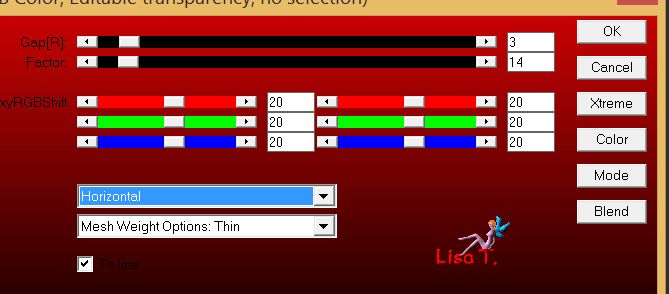
effects/plugins/AP01[Innovations]/Distort - ShiftMesh
activate the selection tool/rectangle/cutom seleciton
top 136 / left 648 / bottom 477 / right 900
hit the delete key of your keyboard
selections/select none
layers/duplicate - image/mirror/horizontal mirror
layers/merge/merge down
layers/duplicate - image/mirror/vertical mirror
opcaity 50%
layers/merge/merge down
adjust/sharpness/sharpen
effects/3D effects/drop shadow/ 0 / 0 / 60 / 10 / black
Step 3
activate Raster 1 (background layer)
selections/load selection from disk/selection 2
selections/promote selection to layer
selections/select none
effects/plugins/AP 01[Innovations]/Distort-ShiftMesh as before in step 2
layers/duplicate - image/mirror/horizontal mirror
layers/merge/merge down
effects/3D effects/drop shadow/ 0 / 0 / 60 / 10 / black
Step 4
activate the top layer (Promoted Selection)
copy/paste as new layer the tue « deco perso 1 »
don’t move it
selections/load selection from disk/selection 3
layers/new raster layer, and fill the selection with color 1
selections/select none
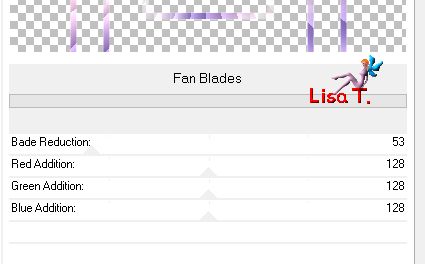
effects/plugins/&<BKG Designers sf10 II>/Fan Blades
Step 5
selections/load selection from disk/selection 3
copy/paste as new layer the image of the landscape (or another one)
selections/invert, hit the delete key of your keyboard
opacity between 50% and 60% (it depends on your image)
layers/merge/merge down
effects/3D effects/drop shadow/ 8 / 8 / 30 / 10 / black and -8 / -8 / 30 / 10 / black
adjust/sharpness/sharpen
layers/arrange/move down
selections/select none
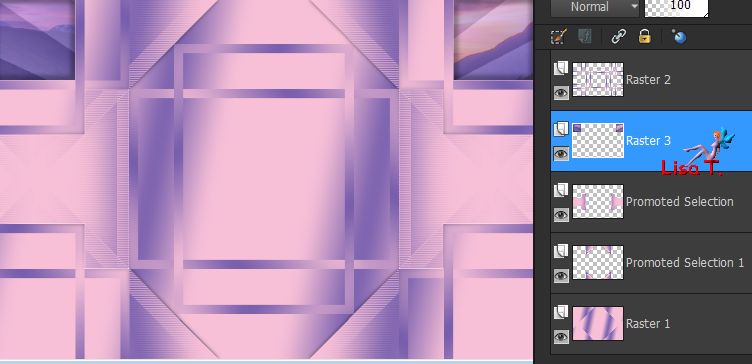
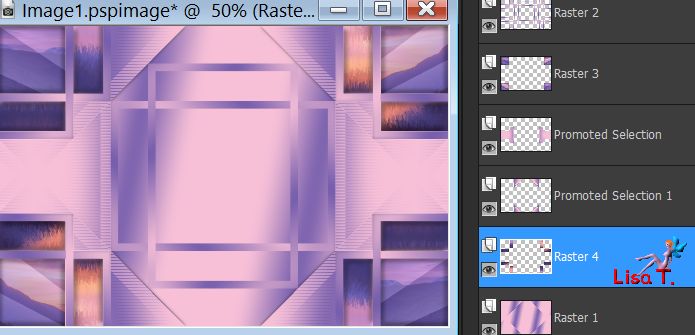
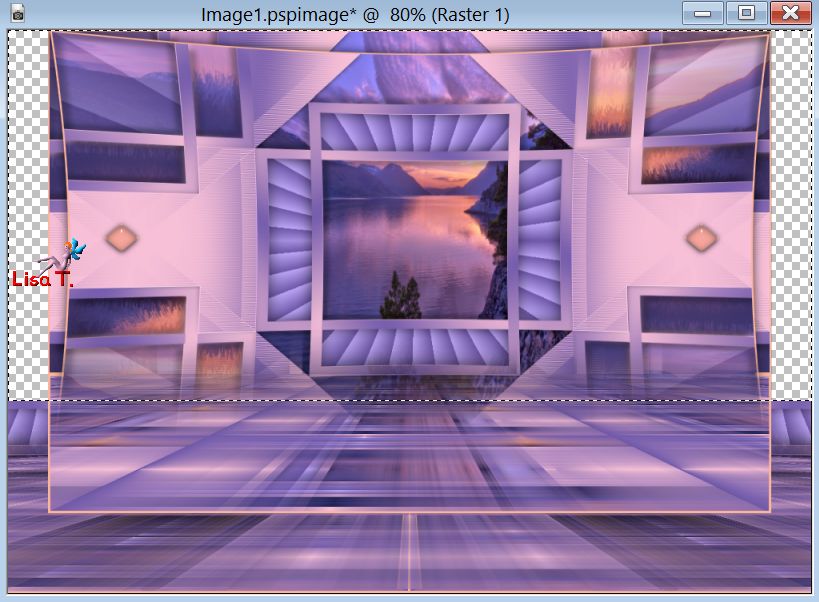
your tag and your layers palette look like this
Step 6
raster 3 is the active layer
layers/duplicate
effects/image effects/offset 0 / -465
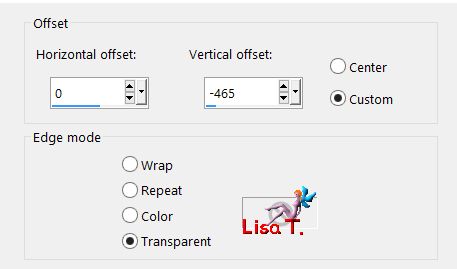
optional : if you wish, you can do --> image/mirror/horizontal mirror
Sweety did that on her tag
layers/merge/merge down
Step 7
activate the bottom layer (Raser 1)
selections/load selection from disk/selection 4
copy/paste as new layer the image of the landscape (or another one)
selections/invert, and hit the delete key of your keyboard
selections/invert
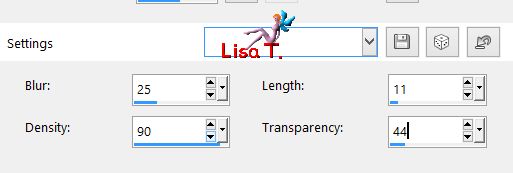
effects/texture effect/fur
selections/select none
layers/duplicate - image/mirror/vertical mirror - image/mirror/horizontal mirror
selections/load selection from disk/selection 5
effects/3D effects/drop shadow 8 / 8 / 30 / 10 / black & -8 / -8 / 30 / 10 / black
selections/select none
layers/merge/merge down
Step 8
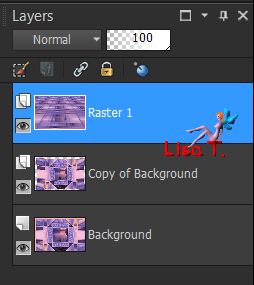
your layers palette looks like this
selections/load selection from disk/selection 6
layers/new raster layer and fill the selection with color 1
effects/plugins/Unlimited 2/&<BKG Designers sf10 II>/Fan Blades as in step 4
selections/invert
effects/3D effects/drop shadow 0 / 0 / 60 / 30 / black
selections/select none
Step 9
layers/new raster layer
selections/load selection from disk/selection 7
copy/paste into selection the image of the landscape
layers/arrange/move down twice
sele ctions/invert
effcts/3D effects/drop shadow 8 / 8 / 30 / 10 / black & -8 / -8 / 30 / 10 / black
selections/select none
Step 10
image/add borders/2 pixels/color 3
edit/copy - layers/duplicate
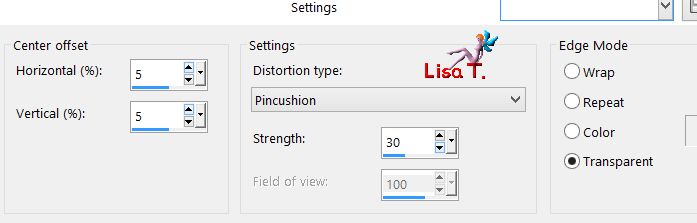
effects/distortion effects/lens distortion
edit/paste as new layer
selections/select all - selections/modify/contract/2 pixels
selections/invert and fill the selection with color 1
selections/select none
effects/plugins/Mehdi/Weaver
effects/plugins/Mura’s Meister/Perspective Tiling
Step 11
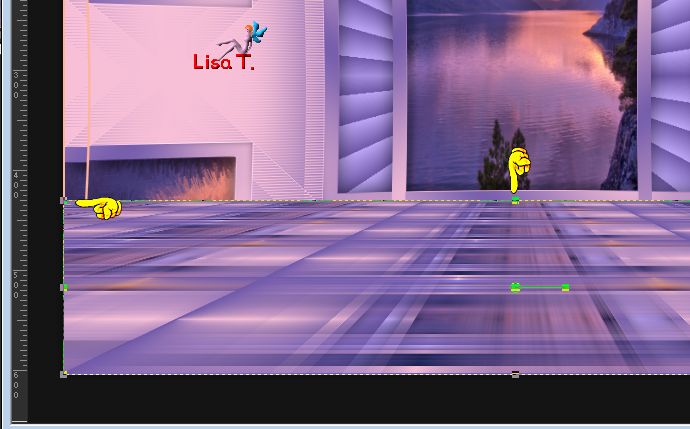
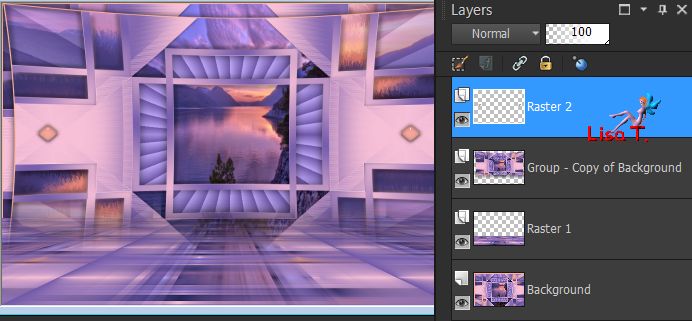
your layers palette looks like this
Raster 1 is the active layer
view/rulers and activate the Pick tool
send the central top handle down to 430
layers/arrange/move down
Step 12
activate the top layer (copy of background)
bring the central bottom handle up to 520
disable the rulers and the pick tool
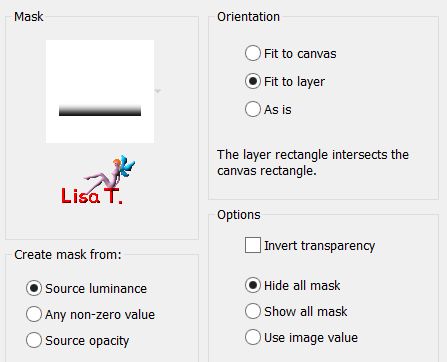
layers/load mask from disk --> Mask fade suave
layers/duplicate - layers/merge/merge group
effects/3D effects/drop shadow/ 0 / 0 / 75 / 20 / black
Step 13
copy/paste as new layer the tube « deco perso 2 »
effects/image effects/offset -> 3 / 40
effects/3D effects/drop shadow/ 0 / 0 / 60 / 10 / black
your tag and your layers palette look like this
activate Raster 1 (second from the bottom)
selections/select all
selections/float - selections/defloat
selections/modify/select selection borders

layers/new raster layer & fill the selection with color 3
selections/select none
Step 14
Raster 3 is the active layer
selection tool/rectangle/custom selection
top 416 / left 20 / bottom 450 / right 884 & hit the delete key of your keyboard
selections/select none
layers/merge/merge all (flatten)
layers/promote background layer
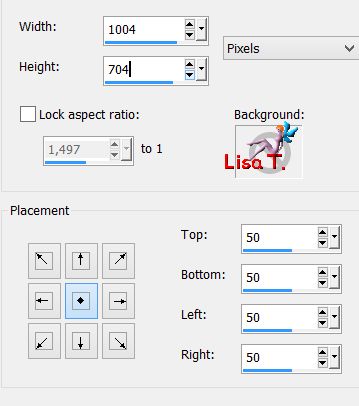
image/canvas size
Step 15
layers/duplicate
effects/image effects/offset --> 0 / 50
activate the background layer (Raster 1)
effects/image effects/offset/ -450 / -50
layers/duplicate - image/mirror/horizontal mirror
layers/merge/merge down
selection tool/rectangle/custom selection/ top 80 / left 0 / bottom 463 / right 1004
hit the delete key of your keyboard
selections/select none
selection tool/rectangle/custom selection/ top 533 / left 0 / bottom 699 / right 1004
effects/plugins/Mehdi/Weaver as in step 10
effects/plugins/Mura’s Meister/Perspective tiling as in step 10
selections/select none
Step 16
Raster 1 is the active layer
with the magic wand tool (defautl settings), click on the transparent area
lauers/new raster layer
layers/arrange/send to bottom
copy/paste into selection the landscape image
selections/select none
activate the layer above (Raster 1)
effects/3D effects/drop shadow/ 0 / 0 / 100 / 50 / black
Step 17
activate the top layer (Copy of Raster 1)
layers/arrange/move down
effects/3D effects/drop shadow/ 0 / 0 / 100 / 50 / black
activate the bottom layer (Raster 2)
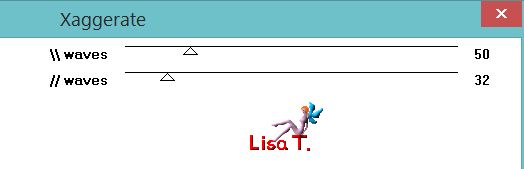
efects/plugins/Fileter Factory Gallery G/Xaggerate
image/add borders/2 pixels/color 3
Step 18
selections/select all
image/add borders/
20 pixels with a contrasting color
selections/invert
copy/paste into selection the landscape image
effectsplugins/Filter Fctory Gallery G/Xaggerate as in step 17
selections/invert
effects/3D effects/drop shadow/ 0 / 0 / 75 / 20 / black
selections/select none
Decoration
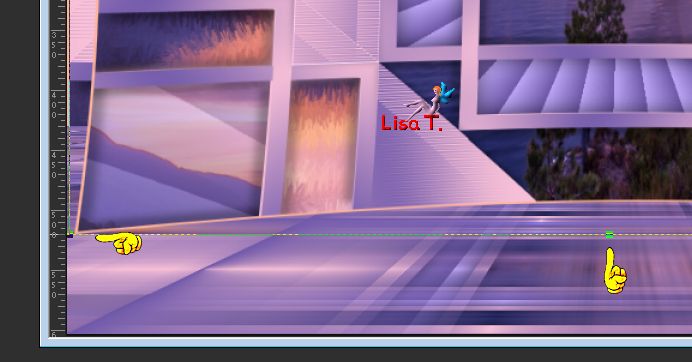
copy/paste as new layer the character tube, and resize eventually. Move it where you like
drop a shadow of your choice (Sweety chose these settings --> 0 / 0 / 50 / 25 / black)
copy/paste as new layer the decoration of your choice, resize it if necessary
drop a shadow of your choice (Sweety chose these settings --> 0 / 0 / 50 / 25 / black)
add new elements if you want
image/add borders/2 pixels/color 3
Final step
apply your signature
layers/merge/merge all (flatten)
image/resize/width : 950 pixels
file/save as.. type jpeg
your tag is finished
Thank you to have realized it
To write to Sweety

Don't hesitate to send your creations to Sweety
she wil be very glad to see them and to present them in the gallery

Back to the boards of Sweety’s tutorials
board 1  board 2 board 2

|