Tutorial 50

You will find the original tutorial Here

lien

Sweety received the permission of the tubers to use their tubes.
You can find the banners of these tubers in the left column of her blog, under the heading "autorisations"

some of the tubes Sweety uses were received in sharing groups
or found on the web
if one of them is your property, please let us know
a link to your site will be added
they are provided as « single-use » for this tutorial
you are not allowed to share or used them for another purpose.
This tutorial is a personal creation,
any resemblance with another one would be pure coincidence
you are not allowed to share it or present it on your site, blog or forum
without the permission of Sweety

Thank you to the tubers for their great job
they make our creations possible

translator's note : This translation is my property,
it is strictly forbidden to copy or distribute it on the Net
Thanks to Sweety for her kind permission
I work with PSP17, but it is possible to use another version.

have fun

Material
8 selection (copy/paste into the folder « selection » of « My PSP Files »)
1 face tube by Graph-Sabine Design-Tubes Misted04 (not provided)
1 background image (google image)
1 character tube by ACR_Altair_Render2 (not provided)
1 decoration tube by KTs_B5932 (not provided)
Open the tubes, duplicate them and work with the copies


Filters
Mehdi - Kiwi’s Oelfilter - Alien Skin Eye Candy 5 Impact - Graphic Plus
Thank you to Tine for her permission to use her filters


Colors
foreground color -> color 1 -> #7974c4
background color -> color 2 -> #ebf7e3
color 3 ->#000000
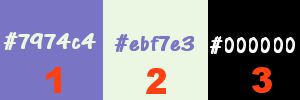
choose your own colors (dark and light) in the misted face of your choice)
you will need 20/25 minutes to complete this tutorial (not counting the time to find the tubes)

Use the pencil to follow the steps
left click to grab it
 |

Realization
Step1
open a new transparent raster layer 900 ** 550 pixels
fill with color 1
selections/select all
layers/new raster layer
copy/paste into selection the misted face
selections/select none
effects/image effects/seamless tiling/default settings
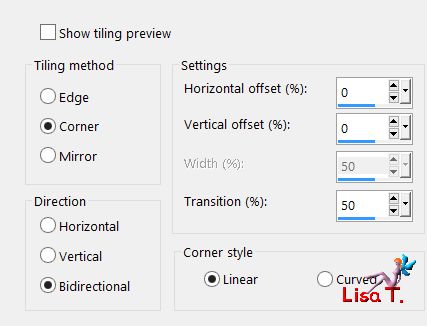
adjust/blur/radial blur

layers/merge/merge down
Step 2
selections/select all
selections/modify/contract/5 pixels
selections/invert
selections/promote selection to layer
effects/plugins/Mehdi/Vibrations 1.1
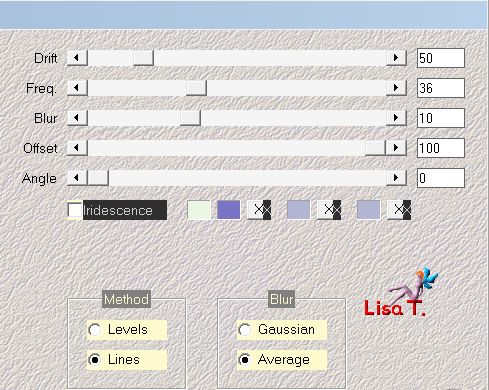
selections/select none
Step 3
layers/duplicate
effects/geometrci effects/circle
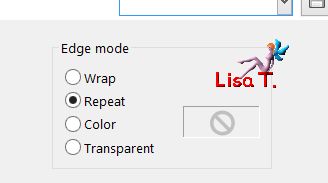
selections/load selection from disk/selection 1
hit the delete key of your keyboard
selections/select none
selections/load selection from disk/selection 2
selecrions/promote selection to layer
activate the layer below (copy of promoted)
hit the delete key of your keyboard
selections/select none
Step 4
your layers palette looks like this
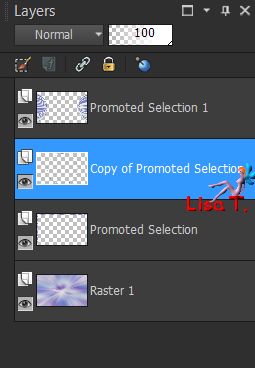
Copy of promoted selection is the active layer
rename this layer « circle »
** duplicate it - image/resize/uncheck « resize all layers »/85% **
redo the action from ** to ** 2 more times
your layers palette look like this
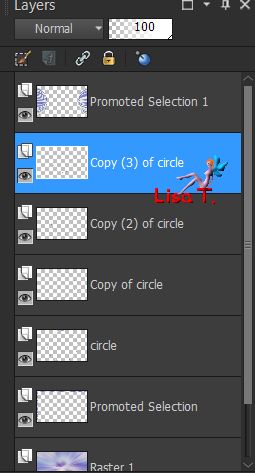
layers/merge/merge down 3 times
layers/arragne/move down
Step 5
activate the top layer (promoted selection 1)
layers/arrange/move down twice
selections/load selection from disk/selection 3
hit the delete key of your keyboard
selections/select all
selections/float - selections/defloat
selections/modify/contract/10 pixels
hit the delete key of your keyboard
selections/select none
effects/geometric effects/perspective horizontal
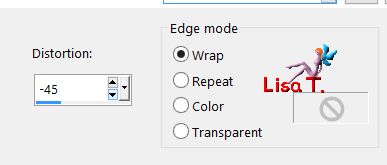
selections/ rectangle/custom selection
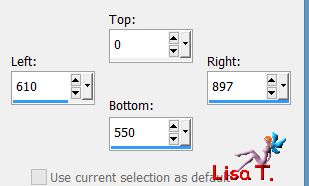
hit the delete key of your kayboard
selections/select none
layers/duplicate - image/mirror/horizontal mirror
layers/merge/merge doqn
Step 6
your tag and your layers palette look like this
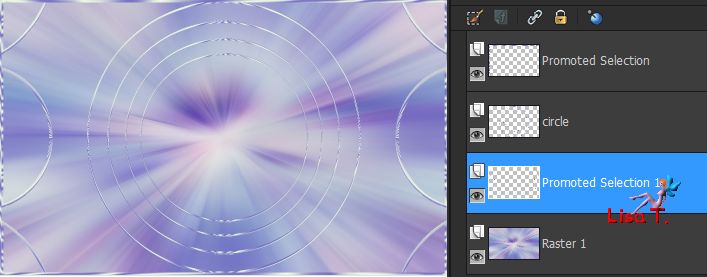
« Promoted selection 1 » is the active layer
layers/duplicate
activate the layer above (Circle) and merge down
activate the layer « promoted selection 1 »
effects/plugins/Mura’s Meister/Perspective Tiling/color 1
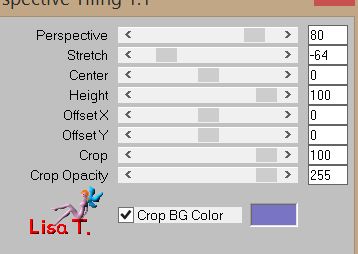
view/rulers and activate the Pick tool (key K of your keyboard)
place the pointer on the Center cursor of the top and bring it down to 350
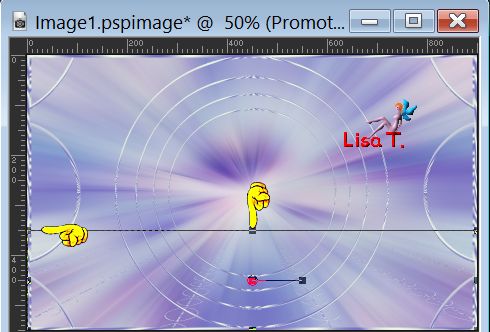
activate the layer above (copy of promoted selection 1)
place the pointer on the Center cursor of the bottom and bring it up to 350
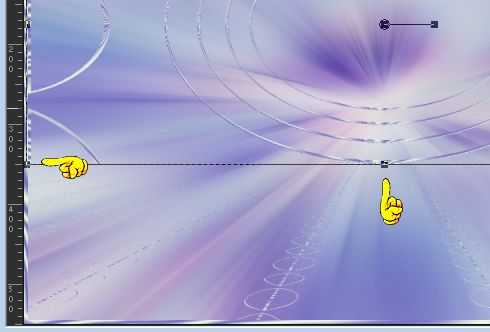
disable the rulers and the pick tool
Step 7
selection tool/rectangle/custom selection
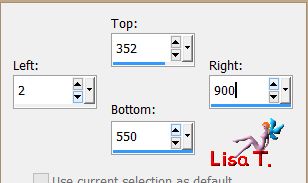
activate the the bottom layer (Raster 1)
selections/promote selection to layer
selections/select none
effects/plugins/Mehdi/Vibrations 1.1
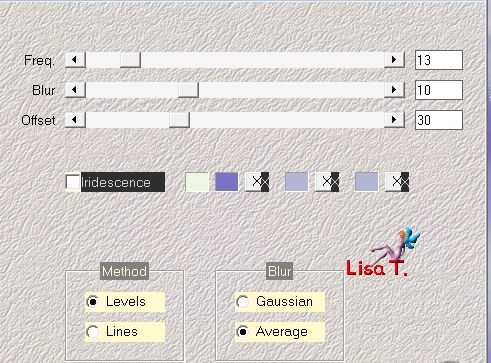
selections/select all - selections/float - selections/defloat
selections/modify/contract/10 pixels
selections/invert
hit the delete key of your keyboard
selections/select none
activate the Pick Tool, and stretch to the right, left and bottom so far as to touch the edges

disable the Pick Tool
Step 8
your tag and your layers palette look like this
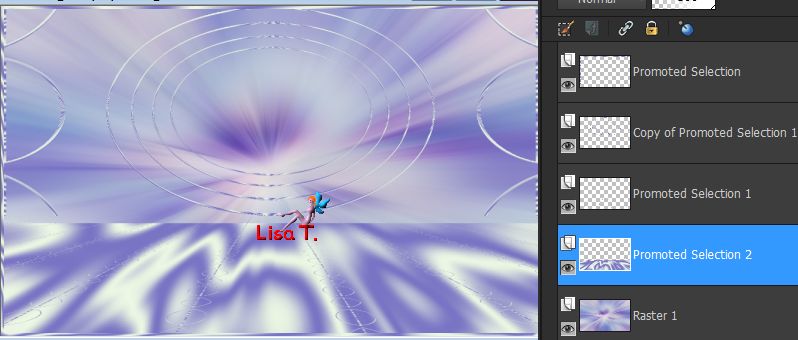
« Promoted selection 2 » is the active layer
effects/texture effects/blinds/color 1

maybe you will find this layer is slightly offset. If so, activate the ruler and the Pick tool
and readjust on 350 (then you can disable the rulers and the Pick Tool)
activate the layer above (promoted selection 1)
bland mode on « overlay » (or other)
effects/3D effects/drop shadow/ 5 / 5 / 50 / 25 / black *** -5 / -5 / 50 / 25 / black
layers/merge/merge down
effects/3D effects/drop shadow/ -1 / -1 / 50 / 25 / black
Step 9
activate the layer avbove (copy of promoted selection 1)
selections/load selection from disk/selection 4
effects/3D effects/cutout/color 1/ 5 / 5 / 50 / 25 / black
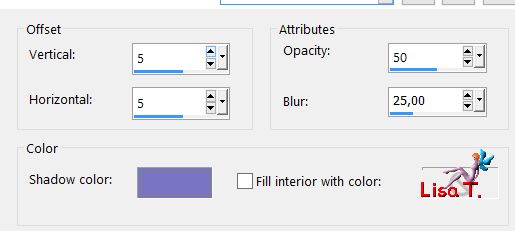
again, cutout effect -->-5 / -5 / 50 / 25 / color 1
layers/merge/merge down
blend mode : « dissolve »
layers/merge/merge down
selecitons/invert
effects/3D effects/drop shadow/ 5 / 5 / 50 / 25 / black
selections/select none
Step 10
« Copy of promoted selection 1 » is the active layer
selections/load selection from disk/selection 5
effects/3D effects/cutout as in step 9
copy/paste as new layer the misted face
Sweety resized to 55% (uncheck « resize all layers »)
move it properly inside the selection
selections/invert
hit the delete key of your keyboard
effects/3D effects/drop shadow/ 5 / 5 / 50 / 25 / black ** -5 / -5 / 50 / 25 / black
opacity between 50% and 60%
selections/select none
layers/arrange/move down
Step 11
activate the layer above (copy of promoted selection 1)
selections/load selection from disk/selection 6
hit the delete key of your keyboard
selections/select none
selections/load selection from disk/selection 7
selections/promote selection to layer
acitvate the layer below (Copy of promoted selection 1)
hit the delete key of your keyboard
selecitons/select none
Step 12
your tag and your layers palette look like this
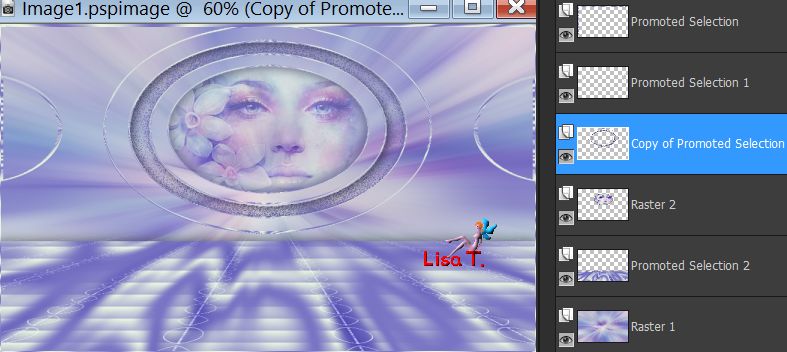
« Copy of promoted selection 1 » is the active layer
activate the layer above (Promoted selection 1)
view/rulers and Pick tool activated
bring it up to the edge and down to 350 pixels
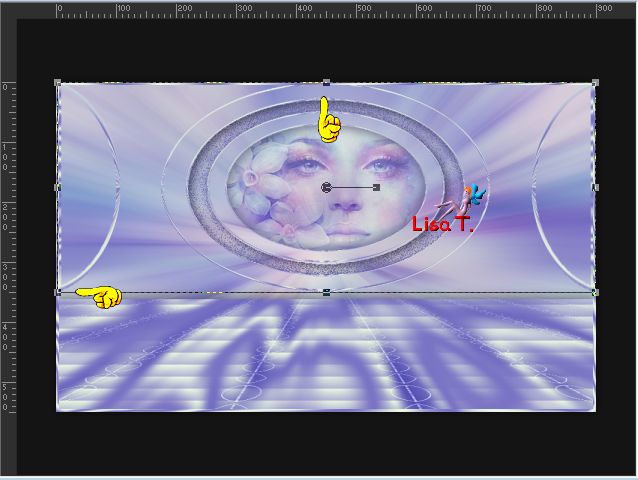
disable the rulers and the Pick Tool
effects/reflection effects/feedback

Step 13
selections/load selection from disk/selection 8
hit the delete key of your keyboard
selections/load selection from disk/selection 4
hit the delete key of your keyboard
selections/load selection from disk/selection 5
hit the delete key of your keyboard
selections/select none
effects/3D effects/drop shadow/color 1
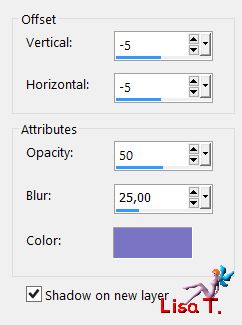
bland mode : multiply
Step 14
activate the bottom layer (Raster 1)
selections/load selection from disk/selection 8
selections/promote selection to layer
effects/plugins/Mehdi/Vibrations 1.1
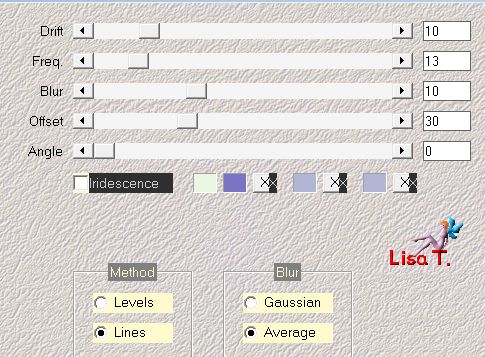
effects/plugins/Kiwi’s Oelfilter/Zig-Zack/default settings
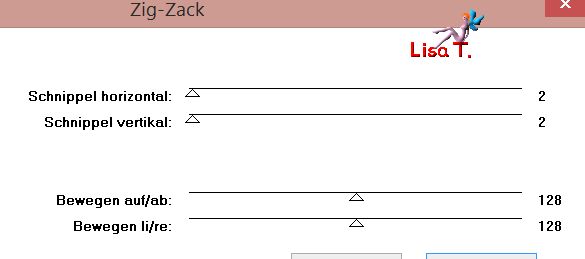
adjust/sharpness/sharpen
selections/select none
Step 15
your tag and your layers palette look like this
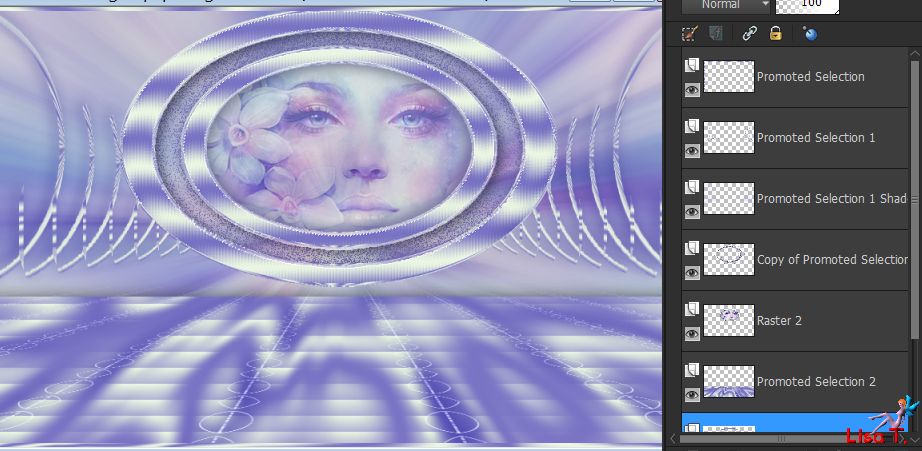
« Promoted selection 3 » is the active layer (second from the bottom)
activate the 5th layer from the bottom (copy of promoted seleciton 1)
layers/merge/merge down
layers/arrange/move down
layers/merge/merge down
layers/arrange/move up 3 times
your layers palette look like this now
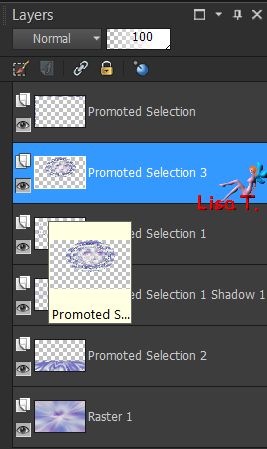
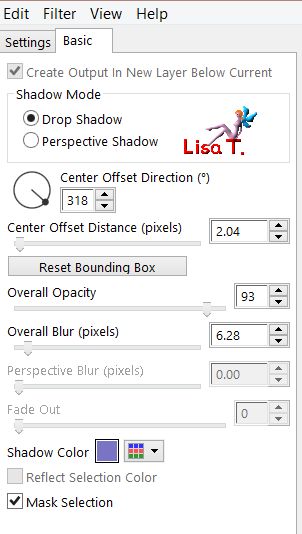
effects/plugins/Alien Skin Eye Candy 5 Impact/Perspective Shadow
settings tab : drop shadow lowest
basic tab : shadow color 1
Step 16
activate the bottom layer (Raster 1)
selections/select all
layers/new raster layer
copy/paste into selection the background image (Sweety used « 1ce6891b »)
selections/select none
activate the top layer (Promoted selection)
copy/paste as new image, and set aside for a later use
back to your work, selections/select all
image/add borders/check « symmetric »/15 pixels/color 1
effects/3D effects/drop shadow/uncheck « shadow on new layer » / 0 / 0 / 100 / 10 / black
keep the selection active
Step 17
selections/invert
effects/plugins/Graphic Plus/Cross Shadow
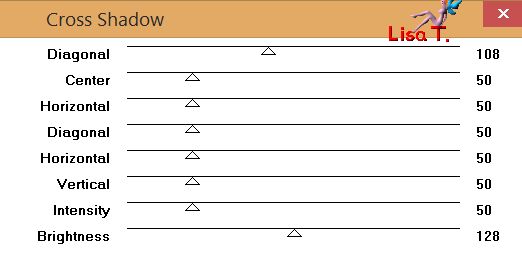
selections/select all
layers/new raster layer
copy/paste into selection the image set aside in step 16
selections/select all
image/add borders/check « symmetric »/40 pixels/color 1
selections/invert
copy/paste into selection the background image
selections/invert
effects/3D effects/drop shadow/ 0 / 0 / 100 / 10 / black
selections/select all/layers/new raster layer
copy/paste into selection the image set aside in step 16
selections/modify/contract/5 pixels
selections/invert
effects/3D effects/crop shadow/ 0 / 0 / 100 / 10 / black
selections/select none
Step 18
layers/merge/merge all (flatten)
layers/duplicate
image/resize/uncheck « resize all layers »/90%
effects/geometric/spherize
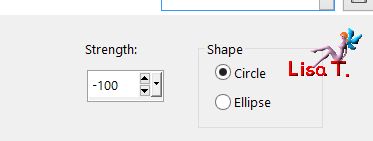
your tag looks like this
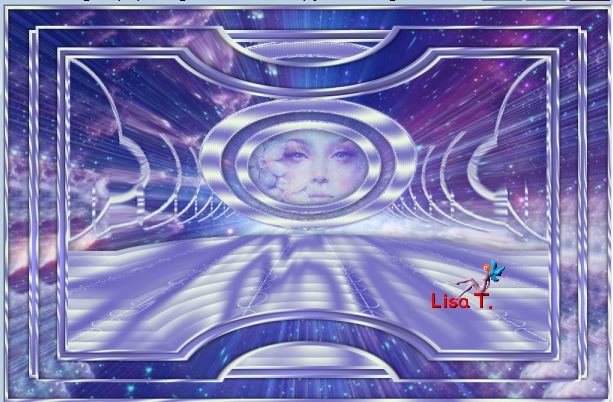
activate the Pick tool and stretch to the left and to the right, bring down the top line and bring up the bottom line
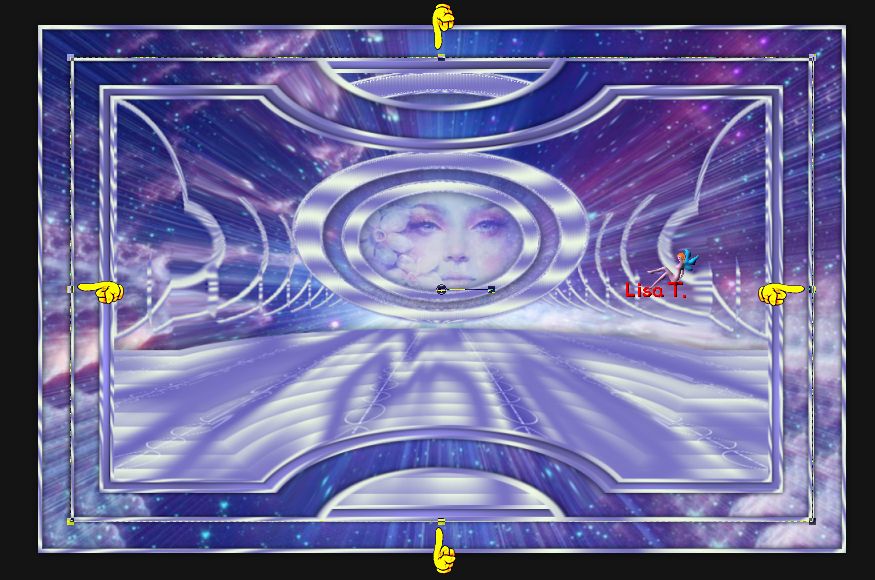
your tag looks like this
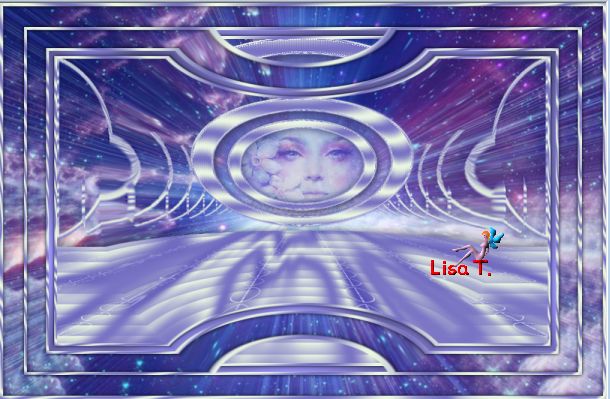
disable the Pick Tool
effects/3D effects/drop shadow/ 0 / 0 / 100 / 10 / black
The decoration
copy/paste the character as new layer
resize eventually and move it where you like
drop a shadow of your choice (Sweety used the settings : 0 / 0 / 100 / 10 / black)
copy/paste as ne layer a decoration tube of your choice and move it where you like
effects/3D effects/drop shadow/ 0 / 0 / 100 / 10 / black
copy/paste as new layer the text tube (or another one of your choice)
Sweety duplicated the text tube and dropped a shadow 0 / 0 / 100 / 10 / color 2
(Translator’s note : I used the Pick Tool, mode perspective, to give a 3D effect to the text)
blend mode of your choice (I used « darken »)
layers/arrange/move down
Final Step
Apply your signature
layers/merge/merge all (flatten)
image/resize/width 950 pixels
file/save as… type jpeg

your tag is finished
Thank you to have realized it

To write to Sweety


Don’t hesitate to send your tag to Sweety, she will be very glad to see it
and to present it in the gallery


My tag with my tubes

Back to the board of Sweety’s tutorials
board 1  board 2 board 2 

|