Tutorial 44

You will find the original tutorial Here
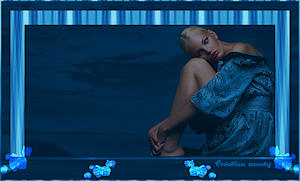
lien

I am member of TWInc
this translation is protected


Sweety received the permission of the tubers to use their tubes.
You can find the banners of these tubers in the left column of her blog, under the heading "autorisations"

some of the tubes Sweety uses were received in sharing groups
or found on the web
if one of them is your property, please let us know
a link to your site will be added
they are provided as « single-use » for this tutorial
you are not allowed to share or used them for another purpose.
This tutorial is a personal creation,
any resemblance with another one would be pure coincidence
you are not allowed to share it or present it on your site, blog or forum
without the permission of Sweety

Thank you to the tubers for their great job
they make our creations possible

note of the translator : This translation is my property,
it is strictly forbidden to copy or distribute it on the Net
Thanks to Sweety for her kind permission
I work with PSP12, but it is possible to use another version.

have fun

Material
6 selections
1 texture « Corel_15_049 »
1 image « landscape » (google image)
1 decoration tube by Sweety
1 tube (character-not provided- found on the web-no signature.
If you are the tuber, please let Sweety know)
1 tube (flower-by La Bruji-received in a sharing group-not provided)
1 tube (animal-not provided-found on the web-no signature
If you are the tuber, please let Sweety know)
Open the tubes, duplicate them and work with the copies
copy the selections and paste them into the folder « Selections » of « My PSP Files »
copy the texture and paste it into the folder « texture » of « MyPSP Files »


Filters
Cybia Screenworks (if you don’t have this plugin, ask Sweety, she will send it to you)
Toadies/Weaver
AAA Frmaes/Foto Frame
VAnderlee/UnPlugged X
Simple/Blintz
Flaming Pear/Flood
Alien Skin Eye Candy 5 Impact/Perspective Shadow
Thank you to Tine for her permission to use her filters


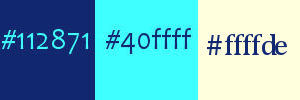
Colors
foreground color -> color 1 -> #112771
background color -> color 2 -> #4cfcff
color 3 ->#ffffde

Use the pencil to follow the steps
left click to grab it
 |

Realization
Step1
open a new transparent raster layer 900 * 600 pixels
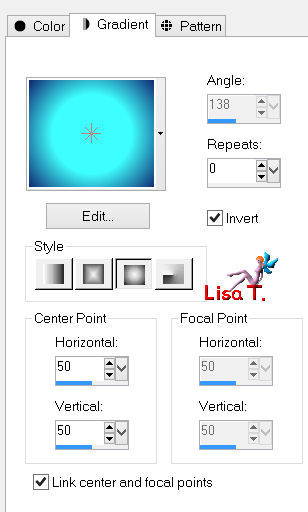
in the materials palette, prepare a sunburst gradient/repeats : 0 / H & V : 50
Step 2
layers/duplicate
image/resize/uncheck « resize all layers »/85%
effects/image effects/seamless tiling
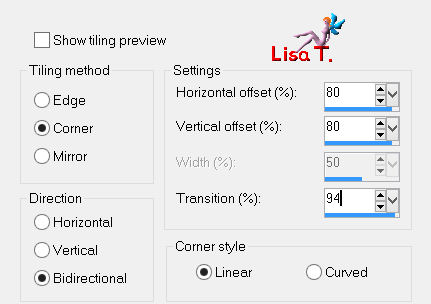
layers/duplicate - image/mirror - image/flip
in the layers palette, set the opacity on 50%
layers/merge/merge down
Step 3
effects/distortion effects/wave

layers/duplicate - image/mirror
in the layers palette, set the opacity on 50%
layers/merge/merge down
layers/duplicate - image/mirror - image/flip
in the layers palette, set the opacity on 50%
layers/merge/merge down
Step 4
in the layers palette, activate the background layer (Raster 1)
selections/load selection from disk/selection 1
selections/promote selection to layer
layers/arrange/bring to top
selections/select none
effects/plugins/Cybia/Sceenworks/Point Array/mode 0

layers/duplicate - image/mirror
layers/merge/merge down
selections/load selection from disk/selection 2
effects/3D effects/drop shadow/ 1 / 1 / 60 / 10 / black
again, drop shadow/ -1 / -1 / 60 / 10 / black
selections/select none
Step 5
in the layers palette, activate the background layer (Raster 1)
selections/load selection from disk/selection 3
selections/promote selection to layer
layers/arrange/bring to top
selections/select none
effects/plugins/Toadies/Weaver/ 59 / 48 / 222

selections/load selection from disk/selection 4
edit/clear/delete
selections/select none
layers/duplicate - image/mirror
layers/merge/merge down
Step 6
selections/load selection from disk/selection 5
in the layers palette, activate the layer below (Copy of Raster 1)
edit/clear/delete
layers/new raster layer
layers/arrange/move down
activate the image of the landscape (or another one of your choice)
edit/copy - back to your work - edit/paste into selection
effects/plugins/AAA Frames/Fot Frame
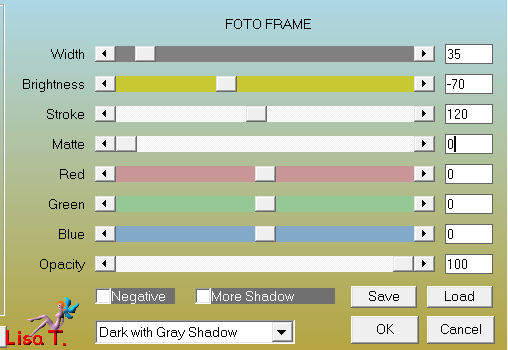
selections/load selection from disk/selection 6
edit/copy - back to your work - edit/paste as new layer
selections/invert
edit/clear/delete
layers/merge/merge down
selections/select none
Step 7
your tag and your layers palette look like this
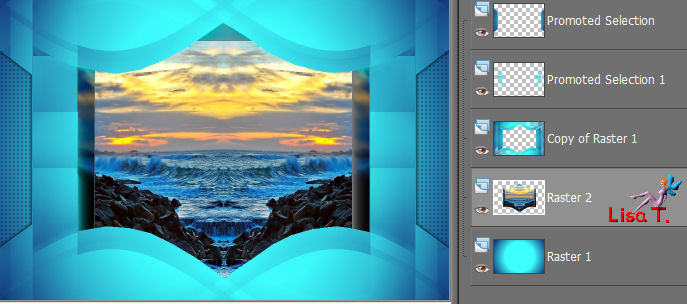
and Raster 2 (the landscape) is the active layer
activate the layer above (copy of Raster 1)
selections/load selection from disk/selection 5
selections/invert
effects/3D effects/drop shadow/ 30 / -2 / 60 / 20 / black
again dorp shadow/ 30 / 2 / 60 / 20 / black
selections/invert
effects/plugins/Vanderlee/UnPlugged-X
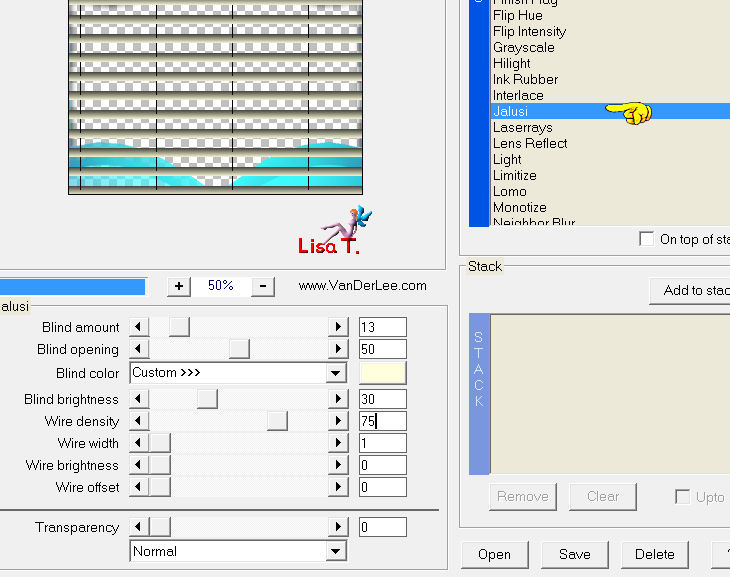
selections/invert
effects/3D effects/drop shadow/ 3 / 3 / 60 / 10 / black
again drop shadow/ -3 / -3 / 60 / 10 / black
keep the selection active
Step 8
effects/edge effects/enhance (or enhance more, as you like)
effects/texture effects/texture/Corel_15_049 (provided)
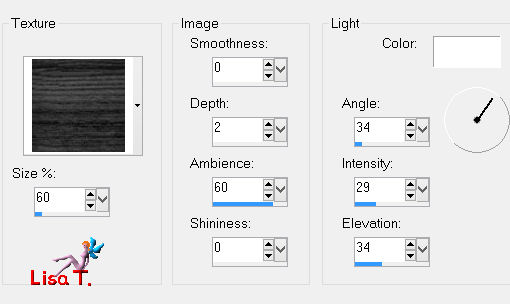
selections/select none
Step 9
edit/copy-special/copy merged
edit/paste as new layer
layers/arrange/bring to top
effects/plugins/Mura’s Meister/Perspective Tiling
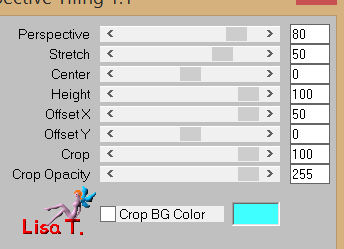
view/rulers and activate the Pick Tool/mode scale
place the cursor on the top centre « handle » and pull it down to 450
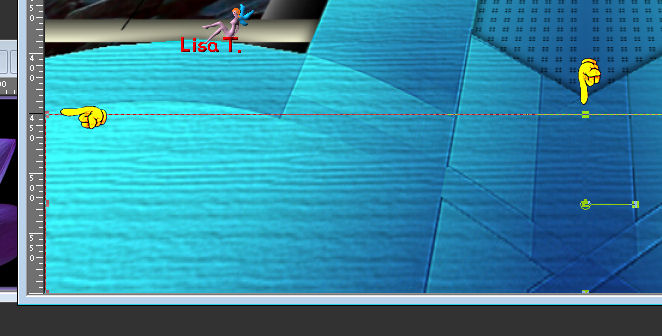
disable the rulers and the tool (M)
Step 10
Raster 3 (the ground) is the active layer
layers/duplicate
image/resize/uncheck « resize all layers »/90%
effects/plugins/Simple/Blintz
layers/duplicate - image/mirror/opacity on 50%
layers/merge/merge down
activate the selection tool/rectangle/custom selection
top : 570 / left : 120 / bottom : 600 / right : 780
in the layers palette, activate the bottom layer (Raster 1)
selections/promote selection to layer
layers/arrange/bring to top
effects/plugins/Cybia/ScreenWork/Point Array/mode : 0

layers/merge/merge down twice
selections/select none
effects/3D effects/drop shadow/ 3 / 3 / 60 / 10 / black & -3 / -3 / 60 / 10 / black
Step 11
in the layers palette, close the visibility toggle of this layer and of the bottom layer (Raster 1)
activate any other layer
layers/merge/merge visible
your tag and your layers palette look like this
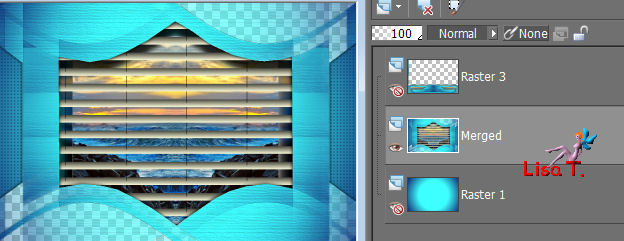
open the visibility toggles of all layers
keep the middle layer active (merged)
effects/distortions effects/lens distortion

activate the selection tool (S)/rectangle/custom selection
top : 44 / left : 81 / bottom : 557 / right : 143
edit/clear/delete
selections/select none
move it like this
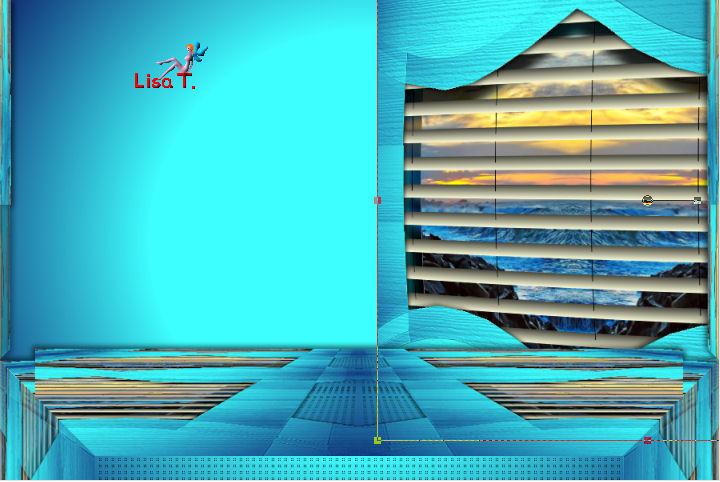
Step 12
layers/duplicate - image/mirror
layers/merge/merge down
in the layers palette, activate the bottom layer (Raster 1)
layers/new raster layer - selections/select all
acitivate the image of the landscape
edit/copy - back to your work - edit/paste into selection
selections/select none
effects/art media effects/brush strokes
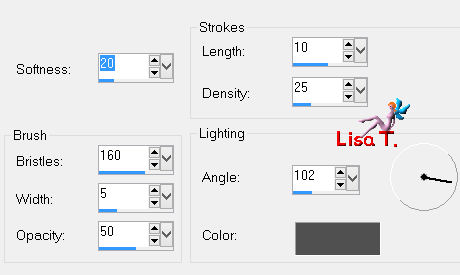
Step 13
in the layers palette, activate the top layer (Raster 3)
activate the decoration tube « deco perso tutoriel 44 »
edit/copy - back to your work - edit/paste as new layer
move it as shown on the final result
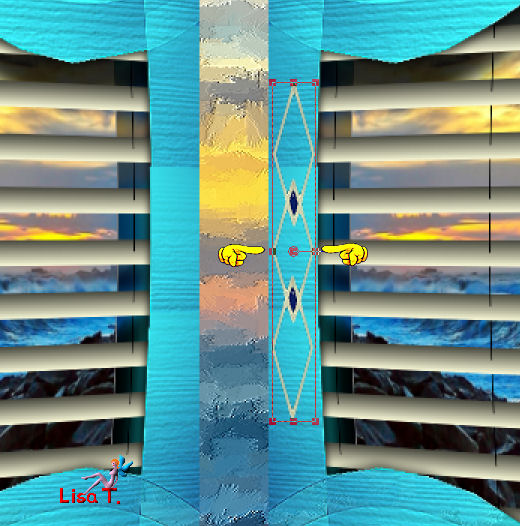
colorize it according to your tubes
activate the magic wand tool

select inside the fist and the third diamond shapes
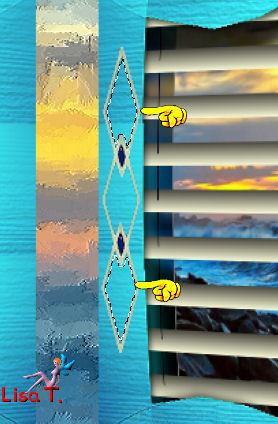
activate the image of the landscape (or one of your choice)
edit/copy - back to your work - edit/paste as new layer
Sweety resized to 50% (uncheck « resize all layers »)
and she kept the part of the image she wanted to stay visible
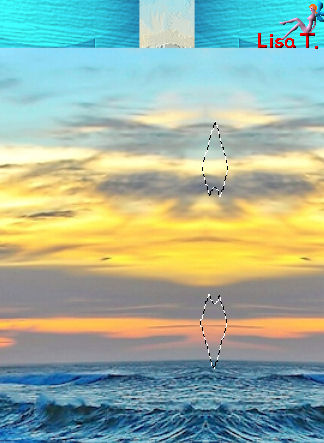
selections/invert
edit/clear/delete
selections/select none
layers/arrange/move down
in the layers palette, activate the layer avbove (Raster 4)
effects/3D effects/drop shadow/ 0 / 0 / 60 / 10 / black
layers/merge/merge down
layers/duplicate - image/mirror
layers/merge/merge down
Step 14
your tag and your layers palette look like this
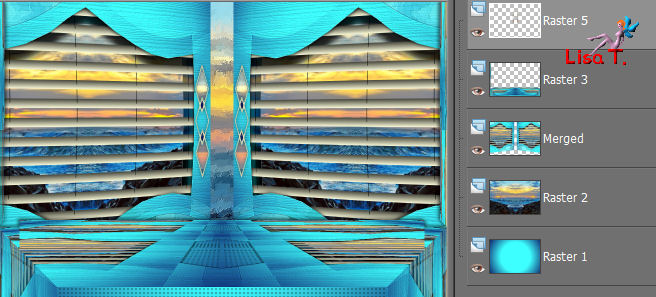
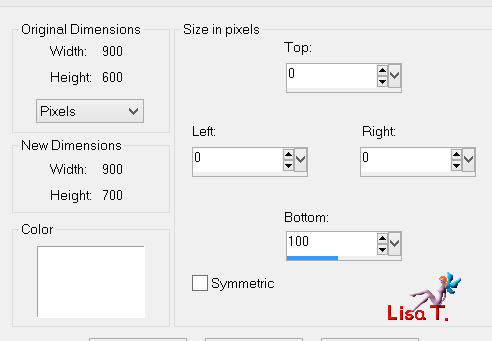
image/add borders/uncheck « symmetric »/contrasting color
layers/promote background layer
activate the magic wand tool/tolerance : 0, and select the lower part
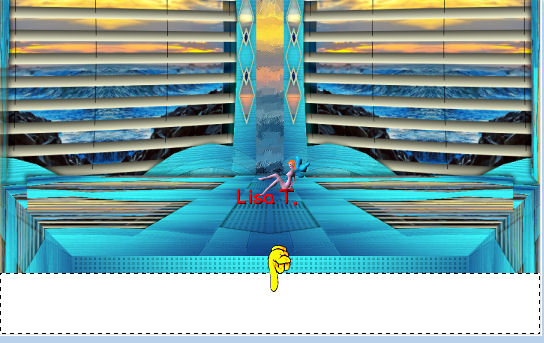
edit/clear/delete
selections/select none
Step 15
layers/duplicate
in the layers palette, activate Raster 1
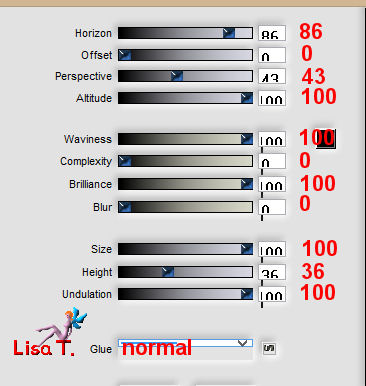
effects/plugins/Flaming Pear/Flood
in the layers palette, activate the layer above (copy of Raster 1)
effects/3D effects/drop shadow/ 0 / 0 / 60 / 10 / black
layers/merge/merge down
Step 16
edit/copy
image/canvas size
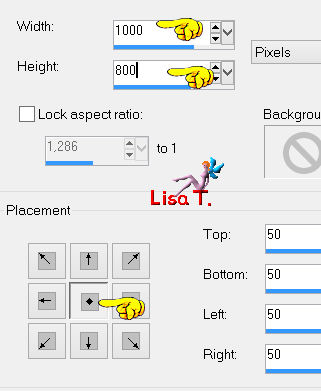
selections/select all
layers/new raster layer
selections/paste into selection
layers/arrange/move down
selections/modify/contract/50 pixels
selections/invert
selections/promote selection to layer
selections/select none
Step 17
keep this layer active
effects/distortion effects/wave

layers/duplicate - image/mirror
set the opacity between 50 and 55%
layers/merge/merge down
layers/duplicate - image/flip - image/mirror
set the opacity between 50 and 55%
layers/merge/merge down
effects/edge effects/enhance
effects/plugins/Flaming Pear/Flood

Step 18
your tag and your layers palette look like this
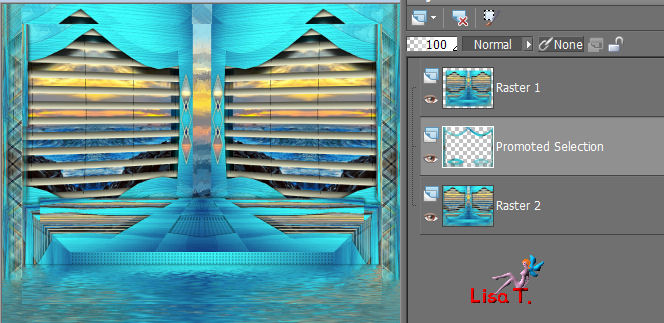
in the layers palette, activate the bottom layer (Raster 2)
adjust/blur/gaussian blur/25
effects/plugins/Flaming Pear/Flood (same settings as before, in step 1)
activate the selection tool/rectange/custom selection
top : 0 / left : 66 / bottom : 49 / right : 934
effects/texture effects/texture/Corel_15_049

keep the selection active, and activate the layer above (promoted selection)
edit/clear/delete
selections/invert
effects/3D effects/drop shadow/ 0 / 0 / 60 / 10 / black
selections/select none
Step 19
image/add borders/30 pixels/color 3/check « symmetric »
selections/select all
selections/modify/contract/30 pixels
effects/3D effects/drop shadow/ 0 / 0 / 60 / 10 / black
selections/invert
selections/promote selection to layer
effects/3D effects/buttonize/ 30 / 30 / 75
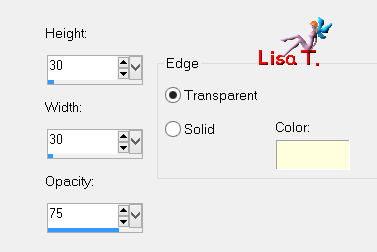
effects/edge effects/enhance more
selections/select all
selections/modify/contract/20 pixels
effects/3D effects/drop shadow/ 0 / 0 / 60 / 10 / black
selections/invert
effects/plugins/Cybia ScreenWork/Point Array/mode : 0

adjust/sharpness/sharpen
selections/select all
seletions/modify/contract/30 pixels
effects/3D effects/drop shadow/ 0 / 0 / 60 / 10 / black
selections/select none
layers/merge/merge all (flatten)
Step 20
selections/select all
selections/modify/contract/30 pixels
selections/modify/select selection borders
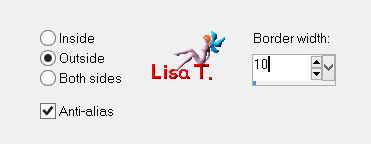
effects/3D effects/drop shadow/ 0 / 0 /60 / 10 / black
selections/select all
selections/modify/contract/30 pixels
selections/invert
selections/promote selection to lyer
selections/select none
The decoration
you will have to create your own decoration !! according to your preferences
copy and paste as new layer the tube of the character
Sweety chose a sitting woman, resized it to 85% and applied a « Flood effect »
then she moved it under the « promoted selection » layer
adjust/sharpness/sharpen
effects/3D effects/drop shadow/ 0 / 0 / 60 / 10 / balck
she chose a kitten, resized to 45%, and applied the same shadow
then she duplicated the layer, and on the copy, she applied the plugin Alien Skin Eye Candy 5 Impact
Perspective Shadow/ tab « settings » ->reflect in front Above and Close
tab « basic » ->
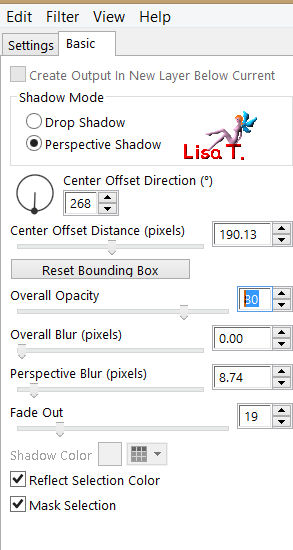
and finally she added some flowers, and dropped a shadow (chose your own settings)
Final Step
image/add borders/1 pixels/black
apply your signature
layers/merge/merge all (flatten)
image/resize/width 950 pixels
adjust/sharpness/unsharp mask
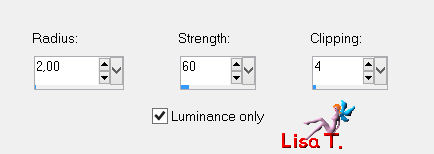
save as… type jpeg

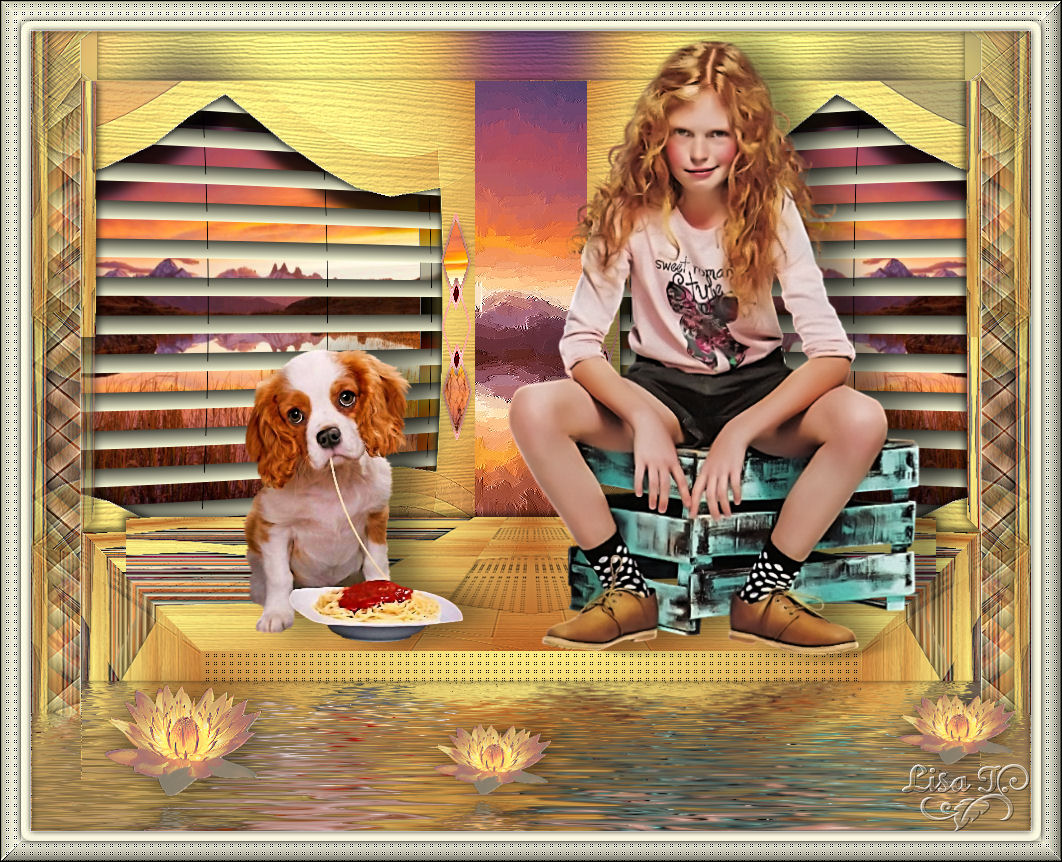
your tag is finished
Thank you to have realized it

To write to Sweety


If you send your creation to sweety, she will be very proud to present it here

My tag with my tubes
Back to the board of Sweety’s tutorials
board 1  board 2 board 2 

|