Tutorial 42

You will find the original tutorial Here
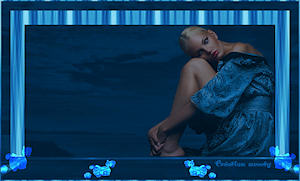
I am member of TWInc
this translated tutorial is protected


Sweety received the permission of the tubers to use their tubes.
You can find the banners of these tubers in the left column of her blog, under the heading "autorisations"

some of the tubes Sweety uses were received in sharing groups
or found on the web
if one of them is your property, please let us know
a link to your site will be added
they are provided as « single-use » for this tutorial
you are not allowed to share or used them for another purpose.
This tutorial is a personal creation,
any resemblance with another one would be pure coincidence
you are not allowed to share it or present it on your site, blog or forum
without the permission of Sweety

Thank you to the tubers for their great job
they make our creations possible

note of the translator : This translation is my property,
it is strictly forbidden to copy or distribute it on the Net
Thanks to Sweety for her kind permission
I work with PSP12, but it is possible to use another version.

have fun

Material
3 selections
1 landscape misted by Sweety
1 preset Extrude
1 texture
1 color palette
you will need a tube of a character and a decoration tube (not provided)
Sweety used a character tubed by Mara Pontes received in a sharing group
and a decoration tube created by Marie Liberté, received in a sharing group

Open the tubes, duplicate them and work with the copies
copy the selections and paste them into the folder « Selections » of « My PSP Files »
copy the texture and paste it into the folder « texture » of « My PSP Files »
double click on the preset to install it in the plugin (or import it)

Filters
Mehdi (Wavy Lab 1.1)
Mura’s Meister (Pole Transform)
Alien Skin Eye Candy 5 Impact (Extrude / Perspective Sahdow)
Unlimited 2 (Photo Aging Kit - provided)

Thank you to Tine for her permission to use her filters


Colors
foreground color -> color 1 -> #4541b5
background color -> color 2 -> #9abdee
color 3 -># black and color 3 -># white


Use the pencil to follow the steps
left click to grab it
 |

Realization
Step1
open a new transparent raster layer 950 * 600 pixels
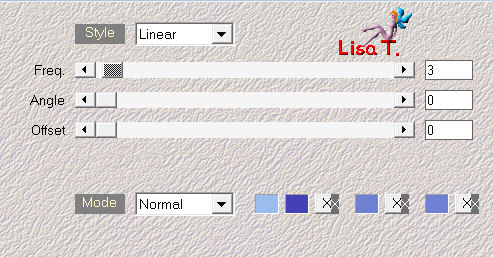
effects/plugins/Mehdi/Wavy Lab 1.1/Linear/ 3 / 0 / 0
layers/new raster layer
selections/select all
activate the misted landscape
edit/copy - back to your work - edit/paste into selection
selections/select none
Step 2
adjust/blur/radial blur/ 50 / 50 / 0 / 0 / 15

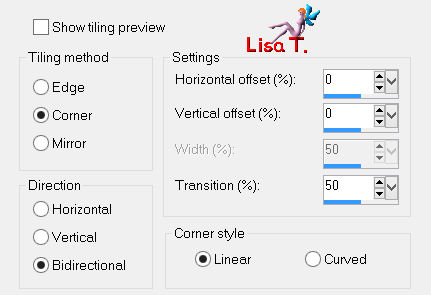
effects/image effects/seamless tiling/default settings
effects/edge effects/enhance
layers/merge/merge down
Step 3
layers/new raster layer
selections/load selection from disk/selection #1
paint white
selections/modify/contract/10 pixels
press the delete key of your keyboard
Step 4
the selection is still active
layers/new raster layer
layers/arrange/move down
fill with color 1
layers/new raster layer
activate the misted landscape
edit/copy - back to your work - edit/paste into selection
layers/merge/merge down
keep the selection active
Step 5
in the layers palette, activate the top layer (Raster 2)
layers/new raster layer
layers/arrange/move down
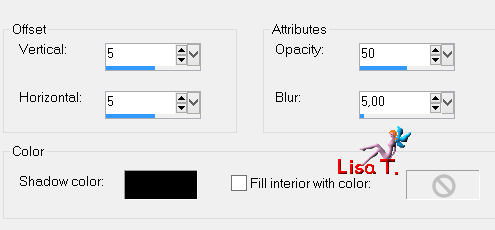
effects/3D effects/cutout/ 5 / 5 / 50 / 5 / black
layers/new raster layer
effects/3D effects/cutout/ -5 / -5 / 50 / 5 / black
selections/select none
Step 6
in the layers palette,a ctivate the top layer (Raster 2)
effects/plugins/Alien Skibn Eye Candy 5 Textures/Marble
in the tab « settings » choose « Veiny-Thick Veins »
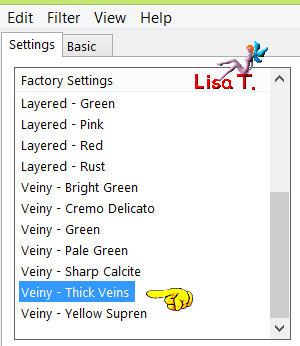
and in the tab « basic » use the following settings
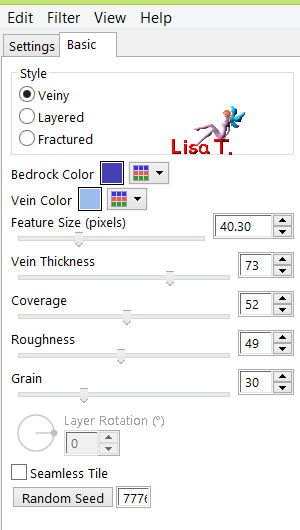
layers/merge/merge down 3 times
layers/duplicate
Step 7
effects/plugins/Mura’s Meister/Pole Transform/ 62 / 62 / 100 / 100 / 0 / 200 / 0
uncheck « invert » and « fill background », and « perspective »
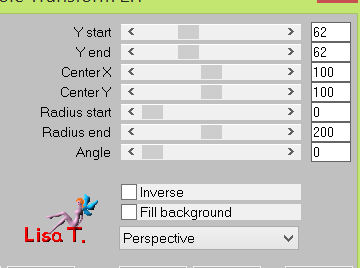
layers/duplicate - image/flip
layers/merge/merge down
layers/arrange/move down
Step 8
make sure « Copy of Raster 3 » is the active layer
effects/distortion effects/twirl/ -720
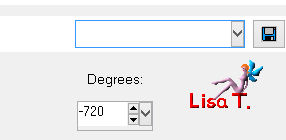
selections/load selection from disk/selection #1
press the delete key of your keyboard
selections/load selection from disk/selection #2
press the delete key of your keyboard
selections/select none
Step 9
in the layers palette,a ctivate the top layer (Raster 3)
layers/duplicate
layers/arrange/move down
effects/image effects/seamless tiling
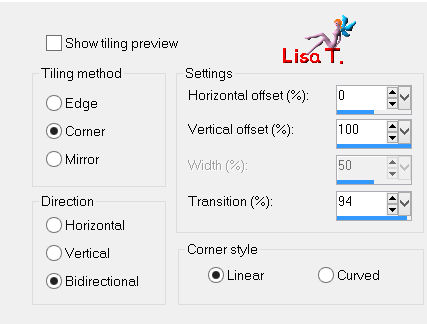
Step 10
your tag and your layers palette look like this
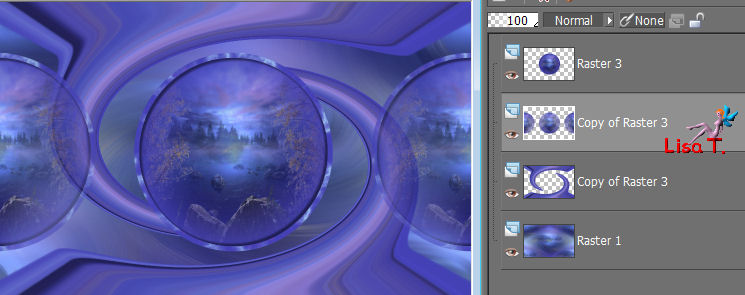
« Copy of Raster 3 » is the active layer
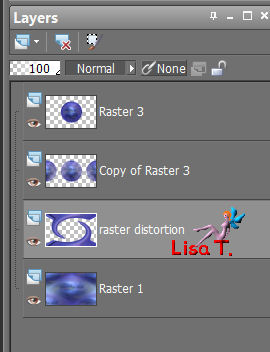
acitvate the layer below and rename it « raster distortion »
your layers palette looks like this now
Step 11
effects/plugins/Alien Skin Eye Candy 5 Impact/Extrude
in the tab « settings » choose « preset Extrude tuto 42 Sweety »
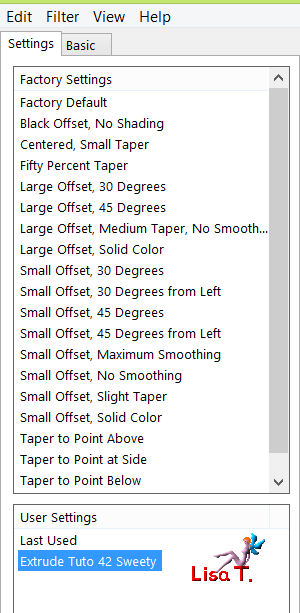
« basic » tab with the following settings
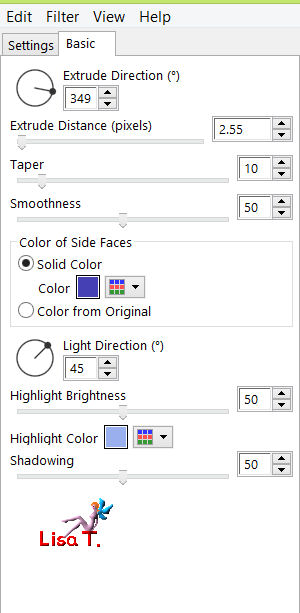
effects/3D effects/drop shadow/ 1 / 1 / 60 / 20 / black
in the layers palette, activate the layer above (Raster 3)
effects/plugins/Alien Skin Eye Candy 5 Impact/Extrude, with the same settings as before
layers/arrange/move down
selections/load selection from disk/selection #3
press the delete key of your keyboard
selections/select none
Step 12
your tag and your layers palette look like this
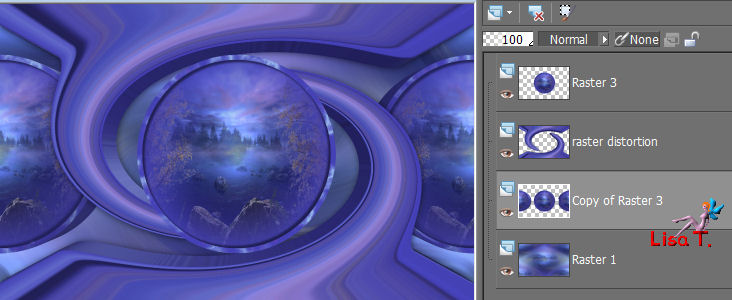
and «copy of Raster 3 » is the active layer
activate the bottom layer (Raster 1)
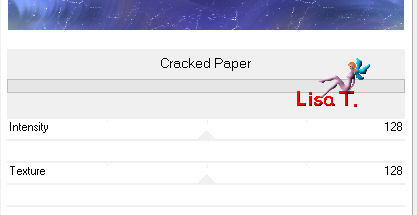
effects/plugins/Unlimited 2/Photo Aging Kit/Cracked Paper/default settings/ 128 / 128
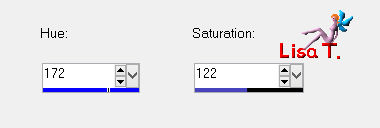
adjust/hue and saturation/colorize with color 1 (if you chose my colors)
layers/duplicate - image/mirror - image/flip
set the opacity on 50%
layers/merge/merge down
Step 13
in the layers palette, activate the layer above (copy of raster 3)
adjust/brightness and contrast/clarify/5,0
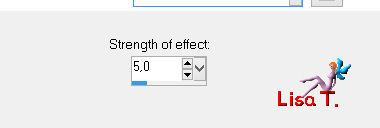
apply the same effect on « raster distortion » and on « raster 3 »
image/add borders/2 pixels/color 1
image/add borders/2 pixels/color 2
Step 14
layers/promote background layer
image/resize/uncheck « resize all layers »/90%
effects/image effects/offset/H : 0 / v : 31
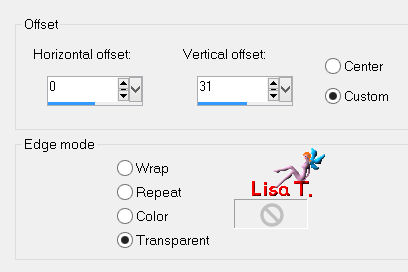
layers/duplicate
in the layers palette, activate the layer below (raster 1)
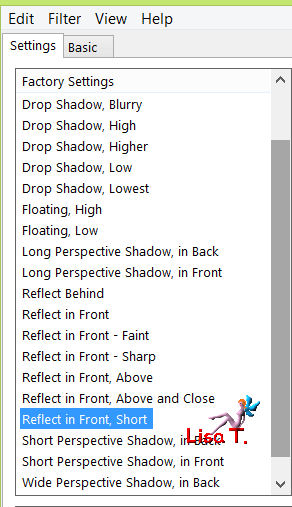
effects/plugins/Alien Skin Eye Candy 5 Impact/Perspective Shadow
in the tab « settings » choose « reflect in front , short »
tab « basic »
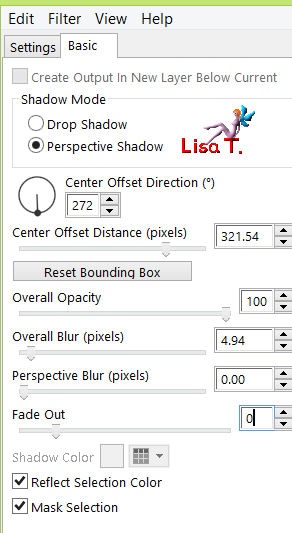
layers/new raster layer
layers/arrange/send to bottom
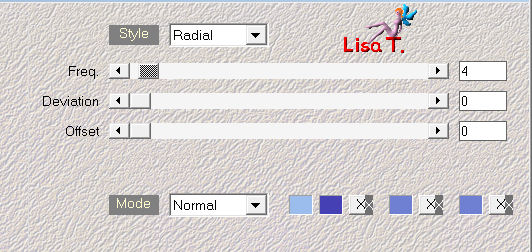
effects/plugins/Mehdi/Wavy Lab 1.1/Radial/ 4 / 0 / 0
Step 15
your tag and your layers palette look like this
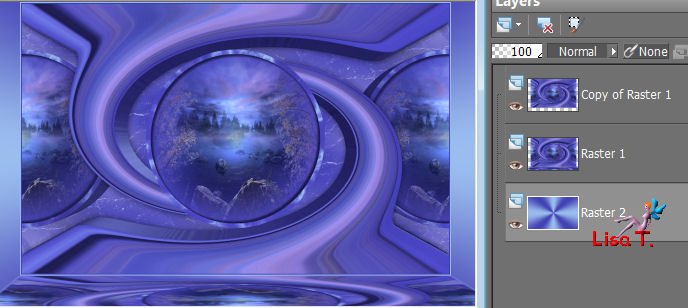
« raster 2 » (bottom layer) is the active layer
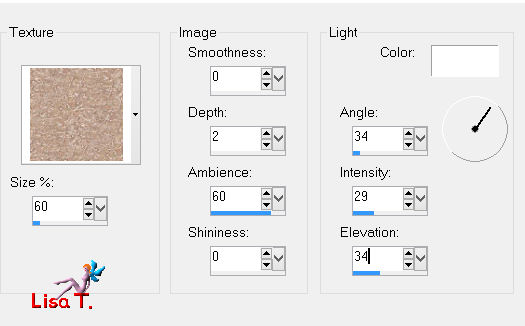
effects/texture effects/and find « leather01b_AS » (provided)
in the layers palette,a ctivate the layer above (raster 1)
effects/3D effects/drop shadow/ 0 / 0 / 60 / 10 / black
activate the top layer (copy of raster 1)
image/add borders/2 pixels/color 1
image/add borders/2 pixels/color 2
Step 16
selections/select all
image/add borders/40 pixels/color 1
effects/3D effects/drop shadow/ 0 / 0 / 60 / 10 / black
selections/invert
apply the effects « texture » as in step 15

selections/select none
activate the tube of the character
edit/copy - back to your work - edit/paste as new layer
resize if necessary and move it where your like
effects/3D effects/drop shadow/ 0 / 0 / 60 / 10 / black
activate the decoration tube
edit/copy - back to your work - edit/paste as new layer
resize eventually and move it where you like
effects/3D effects/drop shadow/ 0 / 0 / 60 / 10 / black
Final Step
image/add borders ->
2 pixels color 2
2 pixels color 1
1 pixel black
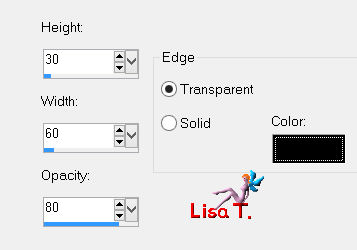
effects/3D effects/buttonize/ 30 / 60 / 80 / check « transparent »
apply your signature
layers/merge/merge all (flatten)
image/resize/width/950 pixels
adjust/sharpness/uncharp mask

save as… type jpeg

your tag is finished
Thank you to have realized it

To write to Sweety

don’t hesitate to send her your creation, it wil be a real pleasure for her to present it on her site

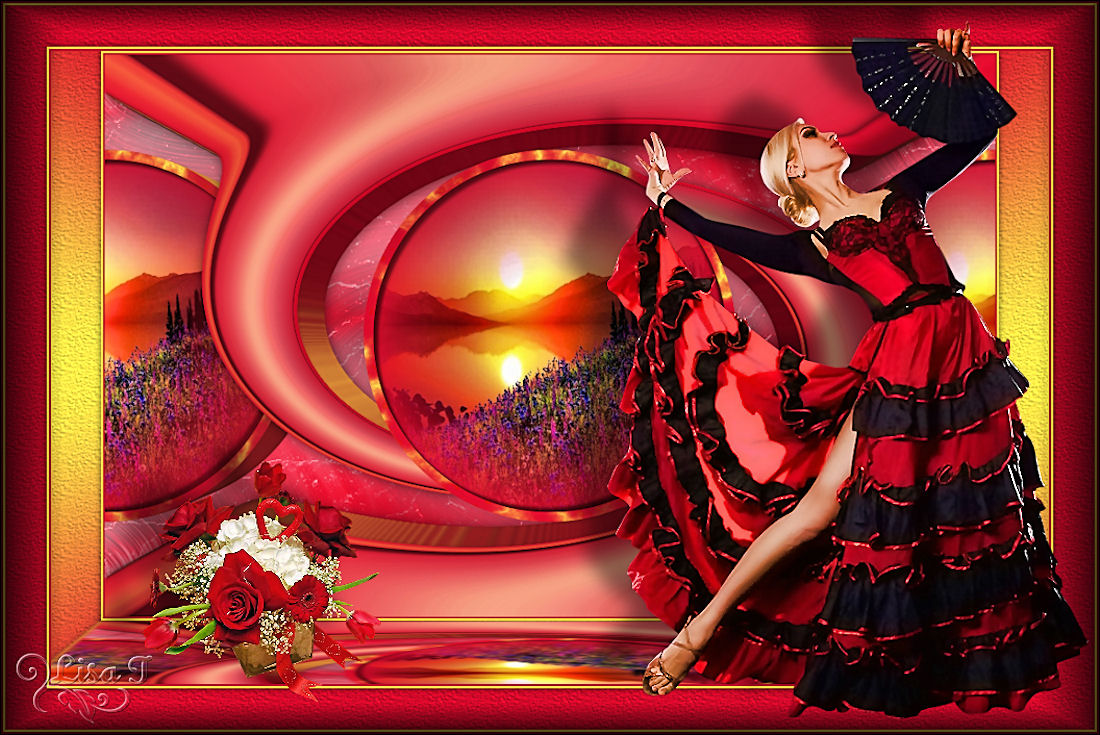
My tag with my tubes
Back to the boards of Sweety’s tutorials
board 1  board 2 board 2 

|