Tutorial 40

You will find the original tutorial Here
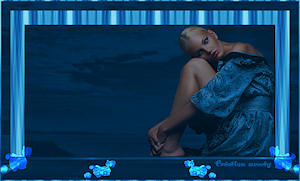

I am member of TWInc
this translated tutorial is protected


Sweety received the permission of the tubers to use their tubes.
You can find the banners of these tubers in the left column of her blog, under the heading "autorisations"

some of the tubes Sweety uses were received in sharing groups
or found on the web
if one of them is your property, please let us know
a link to your site will be added
they are provided as « single-use » for this tutorial
you are not allowed to share or used them for another purpose.
This tutorial is a personal creation,
any resemblance with another one would be pure coincidence
you are not allowed to share it or present it on your site, blog or forum
without the permission of Sweety

Thank you to the tubers for their great job
they make our creations possible

note of the translator : This translation is my property,
it is strictly forbidden to copy or distribute it on the Net
Thanks to Sweety for her kind permission
I work with PSP12, but it is possible to use another version.

have fun

Material
1 landscape (google image)
1 tube of a character « 34_femme_animabelle_p4 » (not provided) (received in a sharing group)
1 tube of an animal by T. Radyga « tubes-0138-2805-2013 » (not provided) (received in a sharing group)
1 decoration tube

Open the tubes, duplicate them and work with the copies
copy the selections and paste them into the folder « Selections » of « My PSP Files »


Filters
Mehdi (Wavy Lab 1.1) - Simple (Pizza Slice Mirror) - Tramages (Tow the Line) - Toadies (Weaver)
Mura’s Meister (Perspective Tiling) - AAA Frames (Foto Frame)

Thank you to Tine for her permission to use her filters
you will find most of the filters on her site


Colors
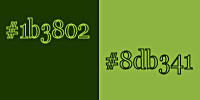
foreground color -> color 1 -> #1b3802 (dark color)
background color -> color 2 -> #8db341 (light color)

Use the pencil to follow the steps
left click to grab it
 |

Realization
Step1
open a new transparent layer 900 * 550 pixels
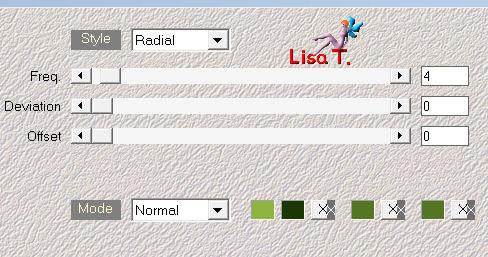
effects/plugins/Mehdi/Wavy Lab 1.1/radial 4 / 0 / 0
Step 2
adjust/blur/gaussian blur/30
effects/plugins/Simple/Pizza Slice Mirror
layers/duplicate - image/mirror
set the opacity on 50%
layers/merge/merge down
Step 3
selections/load-save selection/from disk/selection #1
selections/promote selection to layer
selections/select none
effects/plugins/Tramages/Tow the Line/default settings
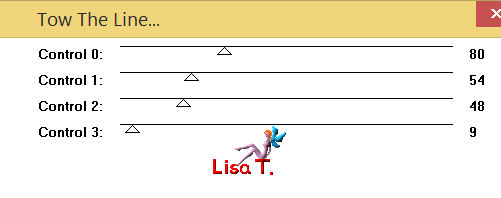
layers/duplicate - image/mirror
layers/merge/merge down
Step 4
layers/duplicate
effects/image effects/seamless tiling
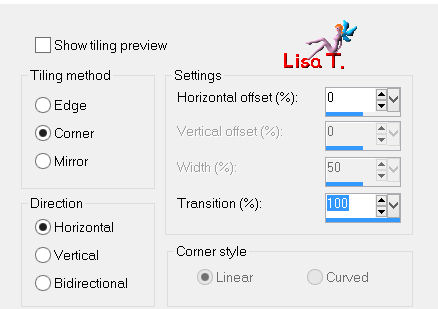
layers/arrange/move down
Step 5
selections/load-save selection/from disk/selection #2
press the delete key of your keyboard
selections/select none
Step 6
your work and your layers palette look like this
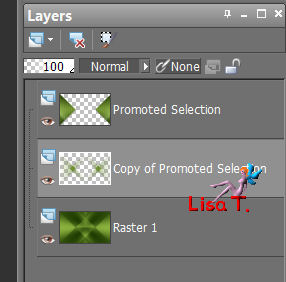
in the layers palette, activate the layer above (promoted selection)
layers/merge/merge down
layers/duplicate
effects/image effects/seamless tiling/default settings
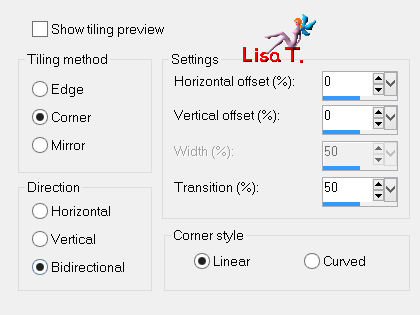
Step 7
in the layers palette, activate the bottom layer (raster 1)
selections/load-save selection/from disk/selection #2
selections/promote selection to layer
selections/select none
image/flip
image/free rotate/right/90°/ both boxes unchecked
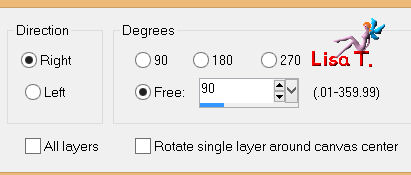
set the opacity on 65%/blend mode on « multiply »
Step 8
your work and your layers palette look like this
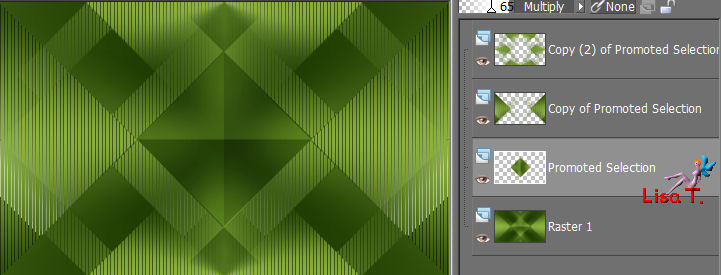
in the layers palette, « promoted selection » is the active layer
activate the bottom layer (raster 1)
selections/load-save selection/from disk/selection #3
selections/modify/contract/1 pixel
selections/promote selection to layer
keep the selection active
Step 9
layers/new raster layer
activate the image of the landscape
edit/copy - back to your work - edit/paste into selection
layers/duplicate
effects/plugins/Toadies/Weaver/default settings
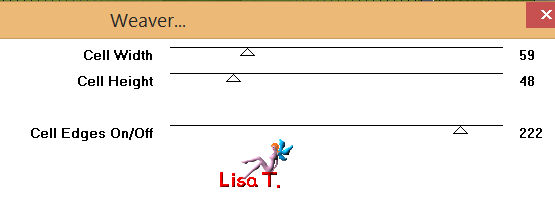
selections/modify/contract/10 pixels
press the delete key of your keyboard
selections/invert
effects/3D effects/drop shadow/ 0 / 0 / 60 / 10 / black
selections/select none
Step 10
your work and your layers palette look like this
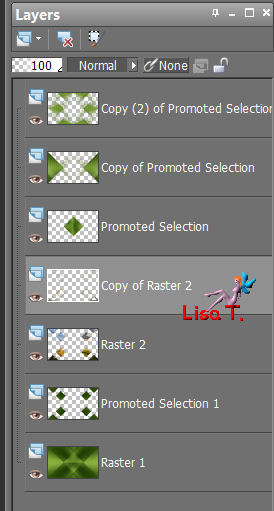
« copy of raster 2 » is the active layer
effects/3D effects/inner bevel/bevel 2
30 /20 / 90 / 0 / 40 / 315 / 50 / 30
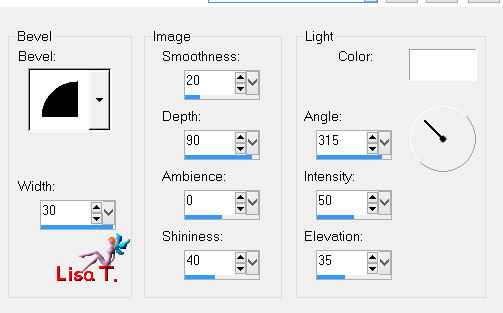
in the layers palette, activate the layer below : « raster 2 »
set the opacity on 60% (or other)
activate the third layer from the top (promoted selection)
selections/select all
selections/float - selections/defloat
Step 11
layers/new raster layer
activate the imageof the landscape
edit/copy - back to your work - edit/paste into selection
layers/duplicate
effects/plugins/Toadies/What are You ?../ (40 / 40)

selections/modify/contract/40 pixels
press the delete key of your keyboard
selections/invert
effects/3D effects/drop shadow/ 0 / 0 / 60 / 10 / black
selections/select none
Step 12
layers/duplicate
layers/arrange/bring to top
effects/image effects/seamless tiling
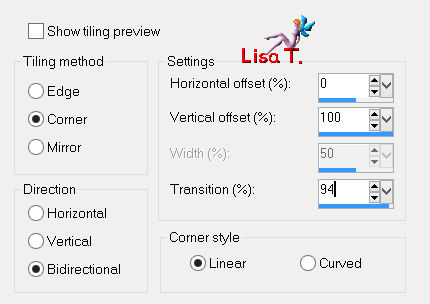
effects/reflection effects/feedback
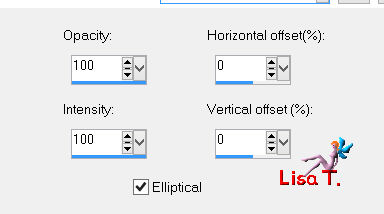
selections/load selection from disk/selection 2
press the delete key of your keyboard
selections/select none
set the blend mode on « dodge » and the opacity 55%
Step 13
your tag looks like this
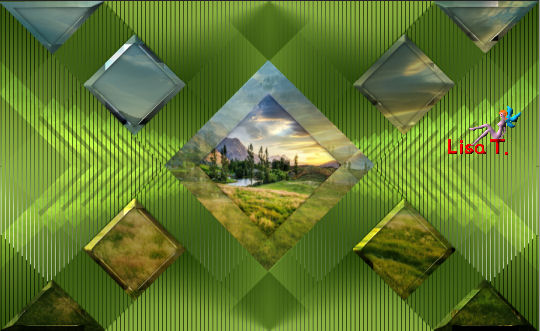
your layers palette looks like this
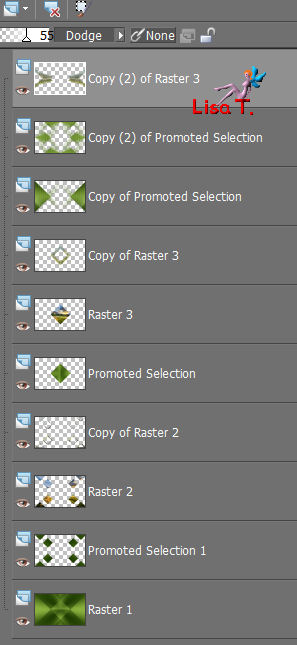
in the layers palette, activate the fourth layer from the bottom (copy of raster 2)
layers/merge/merge down
set the blend mode on « overlay »
your work and your layers palette look like this
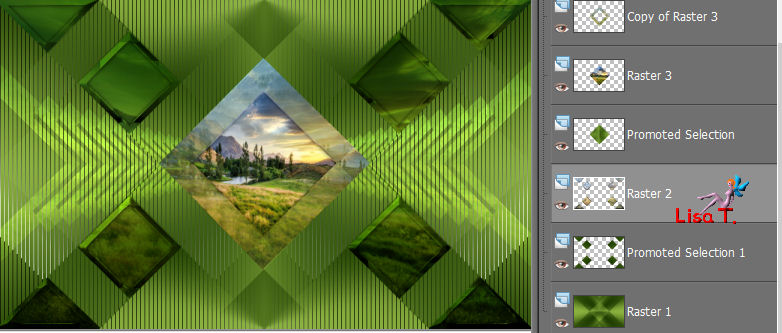
Step 14
in the layers palette, «raster 2 » is the active layer
activate the layer on top of the stack (copy 2 of raster3)
edit/copy special/copy merged
edit/paste as new layer
image/resize/uncheck « resize all layers »/40%
effects/distortion effects/polar coordinates/rectangular to polar/check « color »
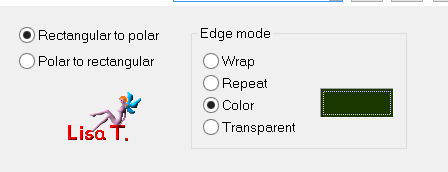
activate the magic wand tool

click in the outer part of the oval
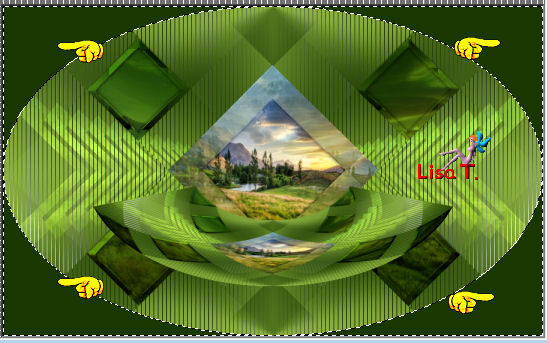
Step 15
selections/promote selection to layer
in the layers palette, activate the layer below (raster 4)
press the delete ley of your keyboard
selections/select none
effects/3D effects/drop shadow/ 12 / 12 / 60 / 30 / black
layers/arrange/move down 6 times
layers/duplicate - image/flip
layers/merge/merge down
Step 16
your layers palette look like this
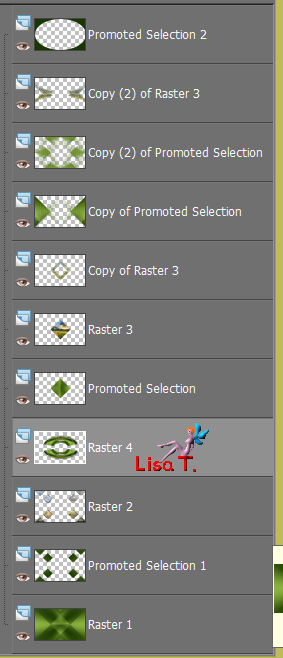
« raster 4 » is the active layer
layers/arrange/move up 3 times
activate the layer below (copy of raster 3)
layers/ delete/yes
« raster 3 » is now the active layer
layers/merge/merge down
set the opacity on 100% and the blend mode on « normal »
Step 17
in the layers palette, activate the layer above (raster 4)
selections/select all
selections/float - selections/defloat
activate the layer below ((promoted selection)
press the delete key of your keyboard
the selection os stil active
activate the second layer from the top (copy 2 of raster 3)
press the delete key of your keyboard
do the same thing with the layer below (copy 2 of promoted selection)
activate the layer below (copy of promoted selection)
press the delete key of your keyboard
selections/select none
Step 18
activate the 4th layer from the bottom (the landscape)
selections/select all
selections/float - selections/defloat
layers/new raster layer
effects/3D effects/cutout/ 5 / 5 / 50 / 5 / black
layers/new raster layer
effects/3D effects/cutout/ -5 / -5 / 50 / 5 / black
selections/select none
Step 19
activate the top layer (promoted selection 2)
close « the eye » of this layer
activate any other layer
layers/merge/merge visible
edit/copy - edit/paste as new image and set aside for a later use
back to your work, activate the top layer and open « the eye » of this layer
Step 20
selections/select all
selections/float - selections/defloat
selections/invert
layers/new raster layer
effects/3D effects/cutout/ 5 / 5 / 50 / 5 / black
layers/new raster layer
effects/3D effects/cutout/ -5 / -5 / 50 / 5 / black
layers/merge/merge down twice
selections/invert - selections/modify/contract/5 pixels
activate the image you set aside in step 19
edit/copy - back to your work - edit/paste into selection
selections/select none
layers/merge/merge down
Step 21
layers/duplicate
adjust/blur/gaussian blur/10
effects/plugins/Toadies/Weaver/default settings

effects/plugins/Mura’s Meister/Perspective Tiling
80 / 0 / 0 / 20 / 0 / 0 / 100 / 255
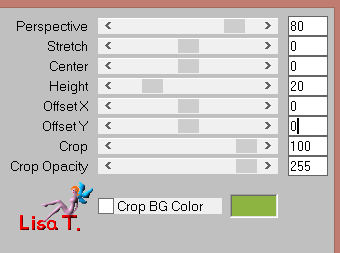
effects/3D effects/drop shadow/ -12 / 12 / 60 / 30 / black
in the layers palette, activate the bottom layer (merged)
view/rulers, and activate the Pick Tool (K)
point the cursor on the top middle « handle » and pull the layer upwards until 440
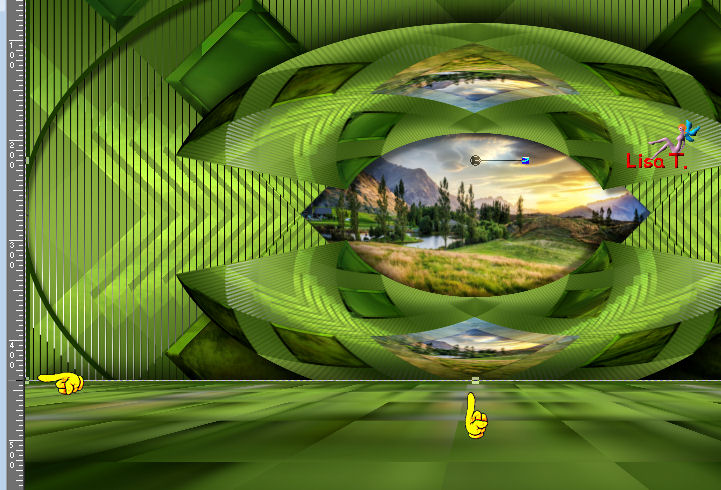
disable the rulers and the pick tool
The decoration
activate the tube of the character
edit/copy - back to your work - edit/paste as new layer
layers/arrange/bring to top
move it where you like, and resize if necessary
effects/3D effects/drop shadow/ 5 / 5 / 50 / 5 / black
activate the other tube (an animal, an objetc, other...)
edit/copy - back to your work - edit/paste as new layer
move it opposite to the character
resize if necessary
drop the same shadow
image/add borders/check « symmetric » ->
2 pixels color 2
4 pixels color 1
40 pixels with a contrasting color
selections/select all
selections/modify/contract/40 pixels
selections/invert
effects/plugins/Mehdi/Wavy Lab 1.0/Radial : 4 / 0 / 0

selections/select none
image/add borders/check « symmetric »/4 pixels color 1
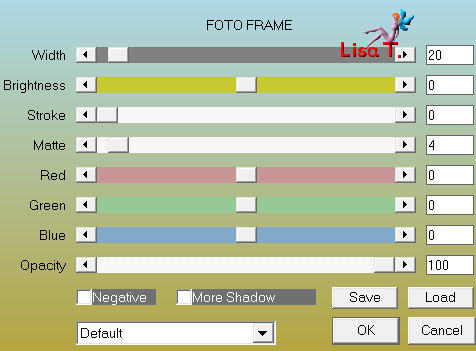
effects/plugins/AAA Frames/Foto Frame/ 20 / 0 / 0 / 4 / 0 / 0 / 0 / 100
optional :
to enhance the color, Sweety selected the small white band and painted it with a color matching the others
note of the translator : I also added an inner bevel effect on this band
Final Step
apply your signature
layers/merge/merge all (flatten)
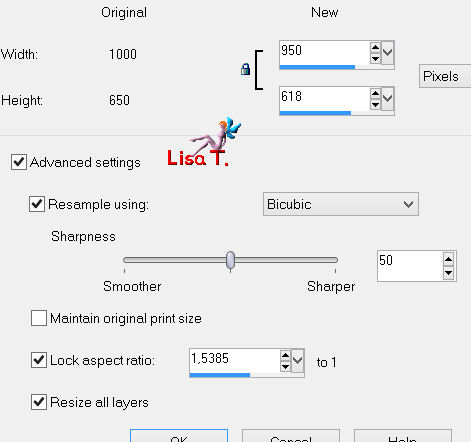
image/resize/width 950 pixels
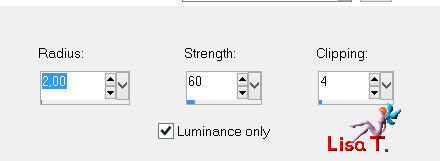
adjust/sharpness/unsharp mask

save as… type jpeg

your tag is finished
Thank you to have chosen this tutorial

To write to Sweety


Sweety would be very glad to see your creations, so do not hesitate to send them to her
Back to the board of Sweety’s tutorials
board 1  board 2 board 2 

|