tutorial 39

You will find the original tutorial Here

I am member of TWInc
this translated tutorial is protected


Sweety received the permission of the tubers to use their tubes.
You can find the banners of these tubers in the left column of her blog, under the heading "autorisations"

some of the tubes Sweety uses were received in sharing groups
or found on the web
if one of them is your property, please let us know
a link to your site will be added
they are provided as « single-use » for this tutorial
you are not allowed to share or used them for another purpose.
This tutorial is a personal creation,
any resemblance with another one would be pure coincidence
you are not allowed to share it or present it on your site, blog or forum
without the permission of Sweety

Thank you to the tubers for their great job
they make our creations possible

note of the translator : This translation is my property,
it is strictly forbidden to copy or distribute it on the Net
Thanks to Sweety for her kind permission
I work with PSP12, but it is possible to use another version.

have fun

Material
scraps elements (finding the fairies full. Received in a sharing group)
1 image « 9b4994f86e55 » (google image misted by Sweety)
1 tube of character by Tocha (received in a sharing group)
1 decoration tube
selections

Open the tubes, duplicate them, close the originals and work with the copies
copy the selections and paste them into the folder « Selections » of « My PSP Files »


Filters
Flaming Pear (Kioto Color - Perspective Tiling)
FM Tile Tools (Blend Emboss)
Unlimited 2/&BKG Designers sf10 II (Fan Blades)
AAA Frames (Texture Frames - Foto Frame)

Thank you to Tine for her permission to use her filters


Use the pencil to follow the steps
left click to grab it
 |

Realization
Step1
open a new transparent raster layer / 950 * 600 pixels
selections/select all
activate « paper 7 »
edit/copy - back to your work - edit/paste into selection
selections/select none
adjust/blur/gaussian blur/20
Step 2
layers/duplicate
image/resize/uncheck « resize all layers »/90%
effects/edge effects/enhance
effects/geometric effects/perspective vertical/ -50/check « wrap »

Step 3
activate the pick tool tool (K)
stretch up and down

press the M key of your keyboard to disable the pick tool
selections/select all
selections/float - selections/defloat
selections/modify/contract/15 pixels
Step 4
keep the selections active
layers/new raster layer
activate « paper 6 »
edit/copy - back to your work - edit/paste into selection
selections/modify/contract/15 pixels
press the delete key of your keyboard
selections/invert
effects/3D effects/drop shadow/ 0 / 0 / 40 / 25 / black
layers/merge/merge down
selections/select none
Step 5
selections/load-save selection/load from disk/selection #1
layers/new raster layer
activate « paper 10 »
edit/copy - back to your work - edit/paste into selection
selections/invert
effects/3D effects/drop shadow/ 0 / 0 / 40 / 25 / black
selections/select none
alayers/arrange/move down
Step 6
your work and your tag look like this

in the layers palette, « raster 2 » (middle layers) is the active layer
activate the to p layer (copy of raster 1)
layers/merge/merge visible
layers/duplicate - image/flip
set the blend mode on « multiply » ( or other )
layers/merge merge down
Step 7
selections/load-save selection/load from disk/selection #2
layers/new raster layer
activate « paper 7 »
edit/copy - back to your work - edit/paste into selection
selections/select none
(the following effect is optional, it depends on your colors)
effects/plugins/Flaming Pear/Kioto Color
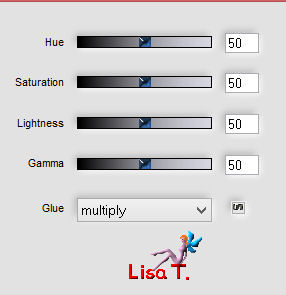
layers/arrange/move down
in the layers palette, activate the layer above (merged)
set the blend mode on « Luminance (legacy) »
layers/merge/merge down
Step 8
selections/load-save selection/load from disk/selection #3
selections/modify/contract/25 pixels
activate « paper 6 »
edit/copy - back to your work - edit/copy into selection
effects/plugins/Flaming Pear/Kioto Color

selections/invert
effects/3D effects/drop shadow/ 0 / 0 / 40 / 25 / black
selections/invert
Step 9
selections/modify/contract/25 pixels
activate « paper 7 »
edit/copy - back to your work - edit/paste into selection
effects/plugins/Flaming Pear/Kiot Color

selections/invert
effects/3D effects/drop shadow/ 0 / 0 / 40 / 25 / black
selections/invert
Step 10
keep the selection active
layers/new raster layer
activate the image « 9b4994f86e55 » (or one of your choice)
edit/copy - back to your work - edit/paste into selection
effects/plugins/FM Tile Tools/Blend Emboss
seletions/select none
layers/merge/merge down
Step 11
image/canvas size

activate the magic wand tool, tolerance 0
click into the transparent part around the tag
activate « paper 10 »
edit/copy - back to your work - edit/paste into selection
effects/plugins/Flaming Pear/Kioto Color (same settings as before)
selections/invert
edit/COPY
Step 12
selections/select all
image/add borders/check « symmetric »/50 pixels/contrasting color
selections/invert
edit/paste into selection
selections/invert
effects/3D effects/drop shadow/ 0 / 0 / 40 / 25 / black
selections/modify/contract/50 pixels
effects/3D effects/drop shadow/ 0 / 0 / 40 / 25 / black
selections/select none
Step 13
layers/duplicate
image/resize/uncehck « resize all layers »/90% or 95%
effects/geometric effects/perspective vertical/ -50/check « wrap »

effects/image effects/offset/ (H : 0 / V : 22)
view/rulers and activate the Pick tool (K)
place the cursor on the bottom « handle » and move it upwards
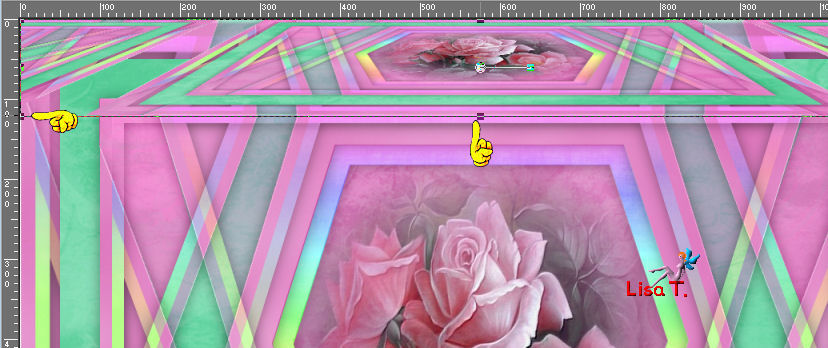
Step 14
disable the pick tool (M)
activate the magic wand tool, tolerance 0
click in the middle of the shape
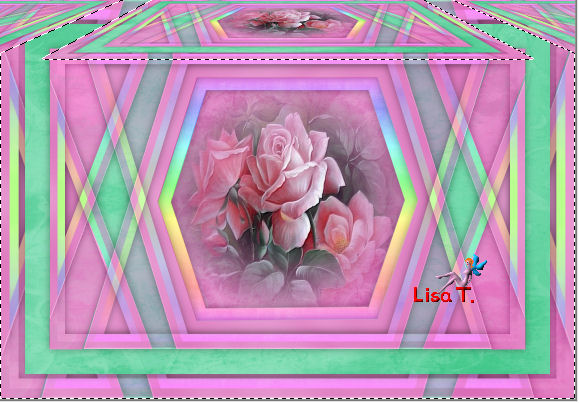
layers/new raster layer
activate « papier 6 »
edit/copy - back to your work - edit/paste into selection
effects/plugins/Flaming Pear/Kioto Color

Step 15
adjust/add-remove noise/add noise/check « random »/noise 50%

adjust/sharpness/sharpen
selections/select none
activate the selection tool/rectangle/custom selection/top : 131 / left : 0 / bottom : 800 / right : 1150
press the delete key of your keyboard
selections/select none
layers/merge/merge down
Step 16
layers/duplicate
effects/distortion effects/wave

you layers palette and your work look like this

the active layer is « copy 2 of raster 1 »
layers/arrange/move down
activate the eraser tool, size 80
ersae the semicircle at the top left

layers/duplicate - image/mirror
in the layers palette, activate the top layer (copy of raster 1)
layers/merge/merge down (twice)
effects/3D effects/drop shadow/ 6 / 6 / 40 / 25 / black
Step 17
in the layers palette, activate the top layer (raster 1)
selections/load-save selection/load from disk/selection #4
selections/invert
effects/plugins/Unlimited 2/&BKG Designers sf10 II/Fan Blades/default settings/ 5 / 128 / 128 / 128

selections/promote selection to layer
effects/plugins/Flaming Pear/Kioto Color

set the opacity of the layer between 60 and 65
selections/select none
Step 18
your work and your layers palette look like this

the active layer is the « promoted selection »
choose a color in your tag (Sweety chose green)
selections/select all
image/add borders/check « symmetric »/100 pixels/ and fill with this color
selections/invert
effects/plugins/Flaming Pear/Kioto Color (same as before)
Step 19
selections/modify/contract/3 pixels
activate « papier 6 »
edit/copy - back to your work - edit/paste into selection
effects/plugins/Flaming Pear/Kioto Color (same as before)
effects/plugins/AAA Frames/Texture Frames/ 9 / 0 / 0 / 1 / 100 / check « stroke »

keep the selection active
effects/plugins/AAA Frames/Foto Frame

Step 20
selections/promote selection to layer
selections/edit selection - it becomes red and your layers palette look like this

the active layer is « selection »
activate the layer below (promoted selection)
the selection layer disappears
image/mirror
the floating selection layer appears again
selections/defloat - everything is back in order
set the opacity on 50%
selections/select none
layers/merge/merge down
Step 21
layers/duplicate
effects/plugins/Mura’s Meister/Perspective Tiling/ 80 / 0 / 0 / 23 / 0 / 0 / 100 / 255
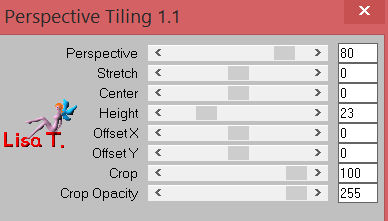
selections/select all
selections/float - selections/defloat
selections/modify/select selection borders/inside and anti-alias checked/ border width 4 pixels
layers/new raster layer
activate « paper 10 »
edit/copy - back to your work - edit/paste into selection
selections/select none
layers/merge/merge down
Step 22
activate the pick tool (K) mode « perspective »

bring the « floor » down as shown

disable the pick tool (M)
effects/3d effects/drop shadow/ 0 / 0 / 80 / 40 / black
layers/merge/merge all (flatten)
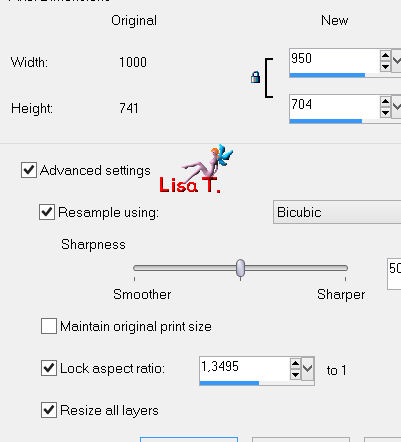
image/resize/width 950 pixels
activate the selection tool/rectangle/custom selection/top : 653 / left : 29 / bottom : 664 / right : 921)
activate « paper 10 »
edit/copy - back to your work - edit/paste into selection
effects/plugins/Flaming Pear/Kioto Color (same as before)
selections/select none
The decoration
activate the tube of the character
edit/copy - back to your work - edit/paste as new layer
image/resize/uncheck « resize all layers »/70%
move it as shown

effects/3D effects/drop shadow/ -30 / 70 / 50 / 15 / black

activate the tube « c548a50d »
edit/copy - back to your work - edit/paste as new layer
move it opposite to the character
Sweety added an effect Flaming Pear/Kioto Colors (same settings as before)
effects/3D effects/drop shadow/ 0 / 0 / 80 / 20 / black
Final Step
apply your signature
layers/merge/merge all (flatten)
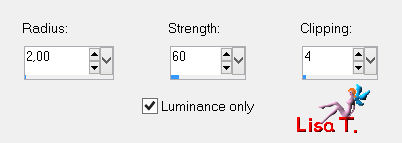
adjust/sharpness/unsharp mask
file/save as... type jpeg
your tag is finished
Thank you to have created a tag with this tutorial

To write to Sweety


She would be really very glad to receive your creations

my tag with my tubes

Back to the board of Sweety’s tutorials
board 1  board 2 board 2 

|