Tutorial 37

You will find the original tutorial Here

I am member of TWInc
this translated tutorial is protected


Sweety received the permission of the tubers to use their tubes.
You can find the banners of these tubers in the left column of her blog, under the heading "autorisations"

some of the tubes Sweety uses were received in sharing groups
or found on the web
if one of them is your property, please let us know
a link to your site will be added
they are provided as « single-use » for this tutorial
you are not allowed to share or used them for another purpose.
This tutorial is a personal creation,
any resemblance with another one would be pure coincidence
you are not allowed to share it or present it on your site, blog or forum
without the permission of Sweety

Thank you to the tubers for their great job
they make our creations possible

note of the translator : This translation is my property,
it is strictly forbidden to copy or distribute it on the Net
Thanks to Sweety for her kind permission
I work with PSP12, but it is possible to use another version.

have fun

Material
1 misted landscape by Animabelle
1 tube of a character by Claudia Viza
3 selections
1 color palette
1 decoration tube
Open the tubes, duplicate them and work with the copies
copy the selections and paste them into the folder « Selections » of « My PSP Files »


Filters
Mehdi/Wavy Lab 1.1
AP 01 [Innovations]/Lines Silverlining
Simple/Pizza Slic Mirrer & Centre Tile
Toadies/What Are You ?..
Penta.Com/Dot And Cross
Alien Skin Eye Candy 5 Impact/Glass
Mock/bevel
Graphic Plus/Cross Shadow
Mura’s Meister/Perspective Tiling
Thank you to Tine for her permission to use her filters


Colors
foreground color -> color 1 -> # #97ffff
background color -> color 2 -> # #015253
color 3 -># #e8b870

Use the pencil to follow the steps
left click to grab it
 |

Realization
Step1
open a new transparent raster layer 950*600 pixels
effects/plugins/Mehdi/Wavy Lab 1.1/Linear (2 / 0 / 0)

activate the selection tool/rectangle/custom selection
top : 162 / left : 0 / bottom : 392 / right : 950
selections/promote selection to layer
selections/select none
Step 2
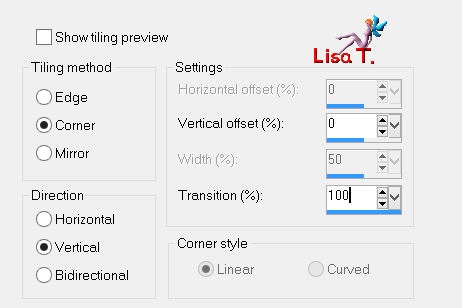
effects/image effects/seamless tiling
check « corner and Vertical »
activate the selection tool/rectangle/custom selection
top : 143 / left : 0 / bottom : 600 / right : 950
edit/clear (delete)
selections/select none
Step 3
keep this layer active
layers/duplicate - image/flip
layers/merge/merge down
layers/duplicate
layers/merge/merge down
effects/plugins/AP 01 [Innovations]/Lines Silverlining/Dotty Grid 10 / -1 / 10 / 0 / 0 / 0

Step 4
layers/duplicate
image/free rotate/check « left » and « free »/90°

in the layers palette, activate the layer below (promote selection)
selections/select all
selections/float - selections/defloat
in the layers palette, activate the layer above
edit/clear (delete)
selections/select none
Step 5
layers/arrange/move down
effects/plugins/Simple/Pizza Slice Mirror
in the layers palette, activate the top layer (promoted selection)
delete this layer
now, « copy of promoted selection » is the active layer
layers/duplicate
layers/arrange/move down
effects/plugins/Toadies/What Are You ?../ 20 / 20

effects/plugins/Penta.Com/Dot And Cross/ 72 / 10 / 2

set the blend mode of the layer on « multiply »
Step 6
keep this layer active (copy 2 of promoted selection)
you can notice there are small black streaks, we are going to erase them
selections/load selection/from disk/selection 1
press the delete key of your keyboard
selections/select none
Step 7
in the layers palette, activate the top layer (copy of promoted selection)
set the blend mode on « dodge »
selections/load selection/from disk/selection 2
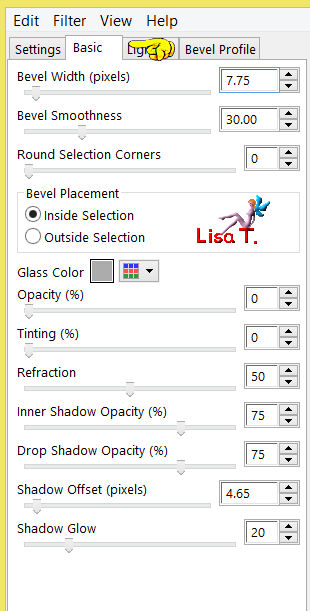
effects/plugins/Alien Skin Eye Candy 5 Impact/Glass
in the « settings » tab, choose « clear, basic ans lighting »
effects/edge effects/enhance
selections/select none
Step 8
in hte layers palette, activate the layer below (copy 2 of promoted selection)
activate the Pick tool (K)
stretch the image to the right and to the left

adjust/sharpness/sharpen
in the layers palette, activate the layer above (copy of promoted selection)
keep the Pick tool active
stretch to the right and to the left, but stop before touching the edges
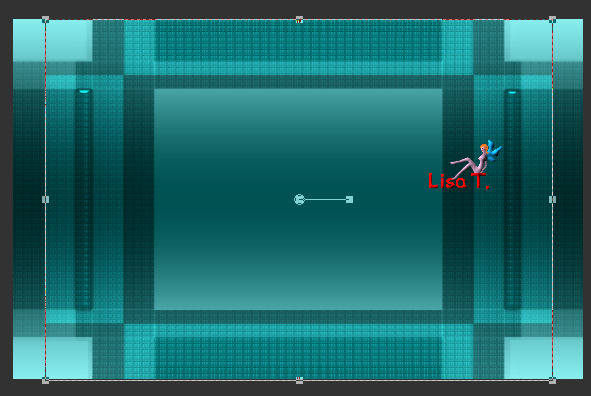
press the (M) key of your keyboard to disable the Pick Tool
adjust/sharpness/sharpen
Step 9
the top layer is still active
layers/new raster layer
layers/arrange/meve down twice
activate the selection tool/rectangle/custom selection
top : 116 / left : 235 / bottom : 485 / right : 714
effects/plugins/Muras’ Meister/click on « reset » to get your colors back
100 / 100 / 3 / 0 / 0 / 0 / 0 / 0 / 0

Step 10
layers/new raster layer
activate the landscape
edit/copy - back to your work - edit/paste into selection
if you use the tube Sweety chose (Animabelle’s tube), you must resize to 170% (uncheck « resize all layers »)
layers/merge/merge down
selections/invert
edit/clear (delete)
selections/invert
adjust/sharpness/sharpen
Step 11
keep the selection active
layers/new raster layer
effects/3D effects/cutout/ 10 / 10 / 75 / 25
layerss/new raster layer
effects/3D effects/cutout/ -10 / -10 / 75 / 25
layers/merge/merge down
set the opacity of this layer on 80% (or other of your choice)
Step 12
the selection is still active
layers/new raster layer
fill with color 2 (dark)
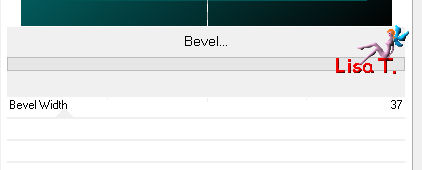
effects/plugins/Mock/Bevel/ 37
selections/modify/contract/36 pixels
edit/clear (delete)
selections/select none
effects/3D effects/inner bevel

layers/arrange/move down
Step 13
activate the selection tool/rectangle/custom selection
top : 151 / left : 271 / bottom : 449 / right : 678
layers/new raster layer
layers/arrange/move down
effects/3D effects/cutout/ 10 / 10 / 75 / 25
layers/new raster layer
effects/3D effects/cutout/ -10 / -10 / 75 / 25
layers/merge/merge down twice
selections/select none
Step 14
your layers palette looks like this
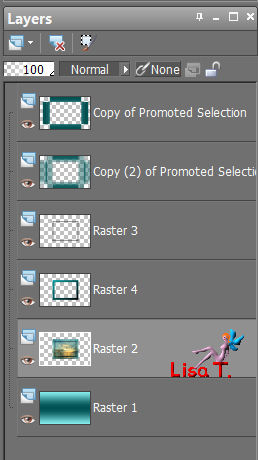
and « raster 2 » is the active layer
activate « Raster 3 » (third from the top)
layers/merge/merge down twice
Step 15
selections/select all
selections/float - selections/defloat
activate the layer above (copy 2 of promoted selection)
selections/modfiy/select selection borders/5
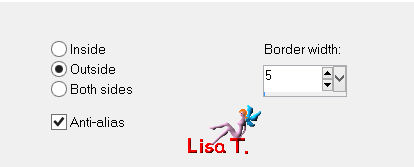
layers/new raster layer
fill the selection with color 3
selections/select none
effects/plugins/Penta.Com/Dot And Cross/ 72 / 10 / 2

Step 16
in the layers palette, activate the bottom layer (Raster 1)
effects/plugins/Simple/Centre Tile
effects/plugins/Graphic Plus/Cross Shadow/default settings

Step 17
in the layers palette, activate the top layer (copy of promoted selection)
selection/select all
selections/float - selections/defloat
selections/modify/select selection borders/outside/anti alias/4
(don’t worry about the big number of selections)
layers/new raster layer
fill with color 3 (click several times), use the zoom if necessary
selections/select none
effects/3D effects/drop shadow/ 0 / 0 / 75 / 15 / black
Step 18
layers/duplicate
effects/distortion effects/wave

selections/load selection/from disk/selection 3
edit/clear (delete)
selections/select none
layers/duplicate - image/mirror
layers/merge/merge down twice
effects/plugins/Penta.Com/dot And Cross/ 72 / 10 / 2
effects/plugins/Graphic Plus/Cross Shadow/default settings/ 50 / 50 / 50 / 50 / 50 / 50 / 128 / 128
Step 19
your layers palette looks like this

edit/copy special/copy merged
activate the selection tool/rectangle/custom selection
top : 1 / left : 179 / bottom : 94 / right : 770
layers/new raster layer
edit/paste into selection
layers/arrange/move down
selections/select none
layers/duplicate - image/flip
Step 20
image/add borders/3 pixels/color 3
layers/duplicate
effects/geometric effects/perspective horizontal
distortion 30 / check « transparent »
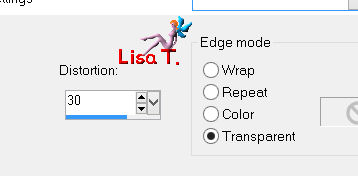
view/rulers
activate the pick tool (K)
push the image to the left to 185

disable the rulers and the pick tool
layers/duplicate - image/mirror
layers/merge/merge down
Step 21
in the layers palette, activate the bottom layer (background)
layers/promote background layer
laeyrs/duplicate
effects/plugins/Mura’s Meister/Perspective Tiling/ 80 / 0 / 0 / 16 / 0 / 0 / 100 / 255

your tag and your work look like this

activate the top layer (copy of background)
layers/merge/merge down
effects/3D effects/drop shadow/ 0 / 0 / 100 / 40 / black
Step 22
selections/select all
image/add borders/10 pixels/color 2
selections/select all
image/add borders/10 pixels/color 3
selections/select all
image/add borders/10 pixels/color 2
selections/select all
selections/modify/contract/30 pixels
selections/invert
effects/plugins/Penta.Com/Dot And Cross/ 72 / 10 / 2
Step 23
selections/select all
image/add borders/30 pixels/color 2
selections/invert
layers/new raster layer
effects/plugins/Mehdi/Wavy Lab 1.1/Radial/ 4 / 0 / 0

effects/plugins/Alien Skin Eye Candy 5 Impact/Glass/settings « clear »
 
set the blend mode of the layer on « overlay »
layers/merge/merge down
selections/select none
Step 24
optional effect
effects/plugins/Nik Software color efex pro 3.0
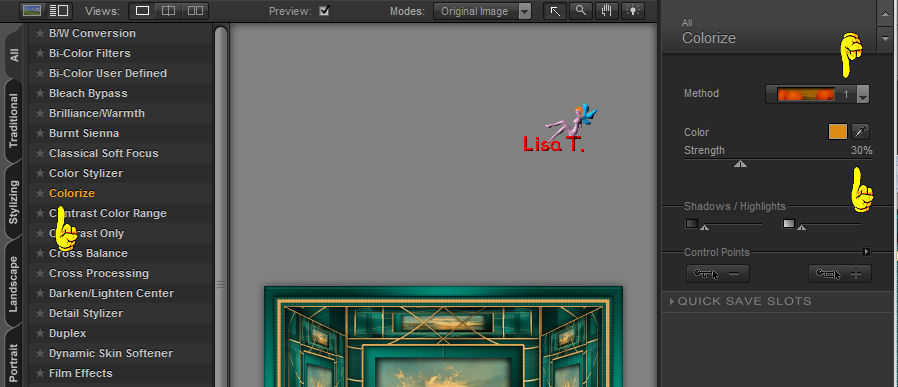
selections/select all
selections/modify/contract/60 pixels
selections/invert
seletions/promote selection to layer
selections/select none
the decoration
activate the tube « claudiaviza-mujer15182 »
edit/copy - back to your work - edit/paste as new layer
move it to the right
effects/3D effects/drop shadow/ 0 / 0 / 100 / 40 / black
layers/arrange/move down
adjust/sharpness/sharpen
acitvate the tube « wB4vOJmhYr1GO »
edit/copy - back to your work - edit/paste as new layer
move it to the left
image/mirror
image/resize/uncheck « resize all layers »/60%
effects/3D effects/drop shadow/ 0 / 0 / 100 / 40 / black
Final step
apply your signature
laeyrs/merge/merge all (flatten)
image/resize/width 950 pixels
adjust/sharpness/unsharp mask


Apply your signature
save as… type jpeg

your tag is finished
Thank you to have realized it

To write to Sweety

if you have any difficulty with this tutorial, don’t hesitate to say it

Sweety would be very happy to see your creation and present it on her blog

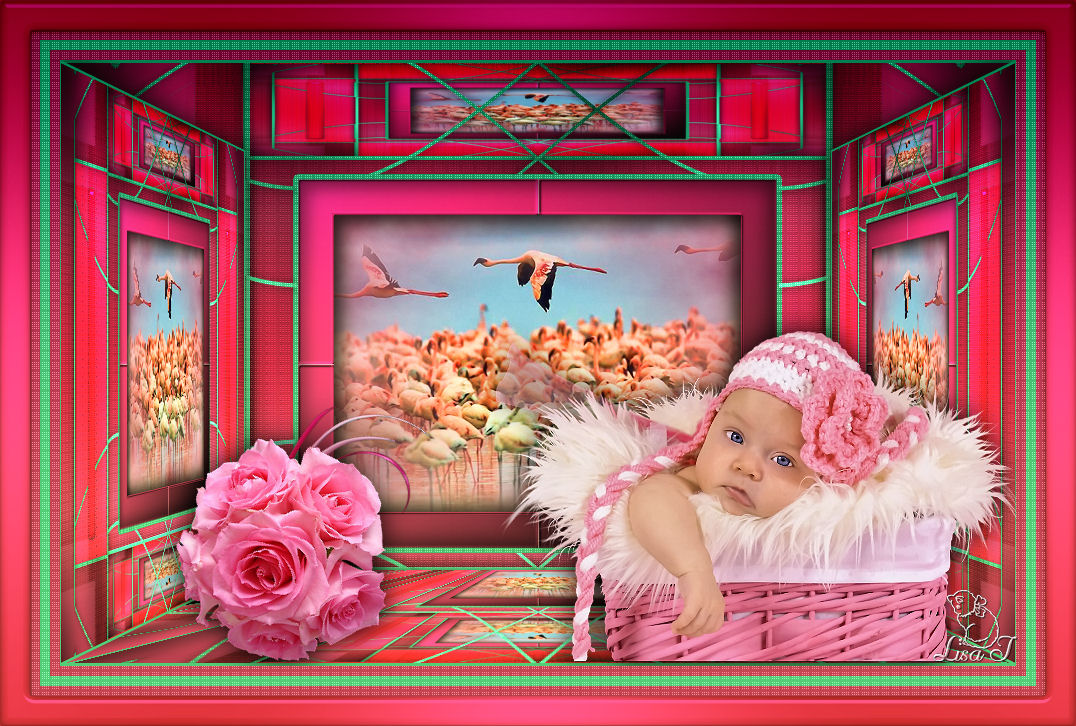
my tag with my tubes
Back to the board of Sweety’s tutorials
board 1  board 2 board 2 

|