Tutorial 36

You will find the original tutorial Here
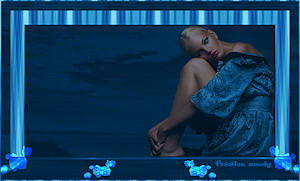
I am member of TWInc
this translated tutorial is protected


The tubes Sweety uses were received in sharing groups
or found on the web
if one of them is your property, please let us know
a link to your site will be added
they are provided as « single-use » for this tutorial
you are not allowed to share or used them in any other way.
This tutorial is a personal creation,
any resemblance with another one would be pure coincidence
you are not allowed to share it or present it on your site, blog or forum
without the permission of Sweety

Thank you to the tubers for their great job
they make our creations possible

This translation is my property,
it is strictly forbidden to copy or distribute it on the Net
Thanks to Sweety for her kind permission
I work with PSP12, but it is possible to use another version.

have fun

Material
1 texture - copy it and paste it into the folder « texture » of « My PSP Files »
1 image « 519811_barcraigs_réservoir_scotland » found on Google Images
1 character tube « cal_guis_12_03_2008_glamour » received in a sharing group
1 flower tube « Zenyra-Fleurs33 » received in a sharing group
4 selections - copy them and paste them into the folder « selections » of « My PSP Files »
Open the tubes, duplicate them and work with the copies

Filters
Flaming Pear/Flexify 2
(if you have difficulties with this filter, the final shape is provided in the material
you’ll have to colorize it eventually - Don’t forget to apply the effert « mirror » of step 5)
Filters Unlimited 2/Andrew’s Filters/In To The Center Of Things (provided)
Graphic Plus/Cross Shadow
AP 01 |Innovations]/Lines Silverlining
Mura’s Meister/Perspective Tiling
Toadies/What Are You ?..
&<Bkg Designers IV>
you can find the filters on Tine ‘s Site - Thank you Tine for your permission


Colors
foreground color -> color 1 -> #6d242b
background color -> color 2 -> #fdd4dc


Use the pencil to follow the steps
left click to grab it
 |

Realization
Step1
open a new transparent raser layer 950 * 600 pixels
in the materials palette, prepare a linear gradient -> 45 / 1
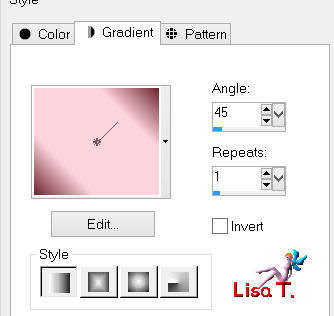
adjust/blur/radial blur
check « spin and elliptical »/strength 100%/horizontal offset 50%/vertical offset 50%/protect center 0%

Step 2
layers/duplicate - image/mirror - image/flip
set the opacity of the layer on 50%
layers/merge/merge down
Step 3
layers/duplicate
image/resize/uncheck « resize all layers »/80%
effects/plugins/Flaming Pear/Flexify 2
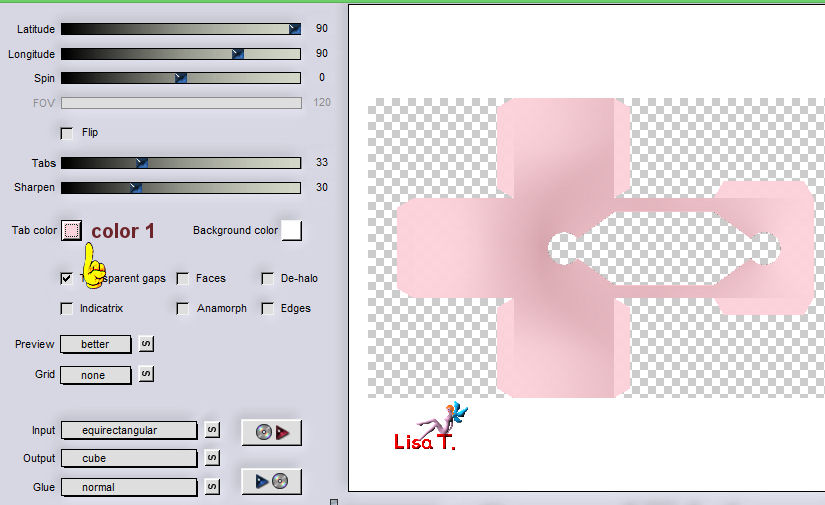
(shape provided if you have problems with the filter)
activate the selection tool (S)/custom selection/ top 0 / left 0 / bottom 600 / right 260
edit/clear (delete)
selections/select none
Step 4
layers/duplicate - image/mirror
move it as shown
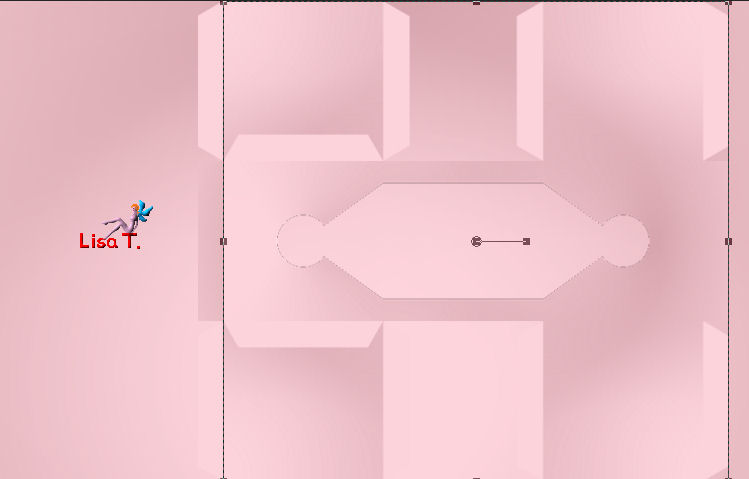
selections/load-save selection/from disk/selection 1
edit/clear (delete)
selections/select none
layers/merge/merge down
Step 5
close the « eye » of the bottom layer (Raster 1) to see what your work looks like
keep layer « copy of raster 1 » active
edit/copy - edit/paste as new image
image/mirror
edit/copy - back to your work - selections/select all
selections/float - selections/defloat
layers/new raster layer
edit/paste into selection
set the opacity of the layer on 50%
adjust/sharpness/sharpen
selections/select none
Step 6
selections/load-save selection/from disk/selection 1bis
layers/new raster layer
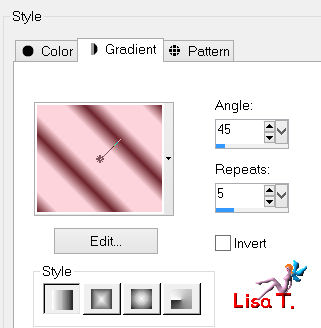
activate the flood fill tool, and fill the selection with a linear gradient ( 45 / 5)
selections/select none
layers/merge/merge down twice
Step 7
layers/new raster laeyr
activate the selection tool/custom selection
top 200 / let 260 / bottom 400 / right 291
fill the selection with color 1 (dark color)
optional : effects/plugins/Graphic Plus/Cross Shadow/default settings
selections/select none
layers/duplicate - image/mirror
move it as shown on the sreenshot below
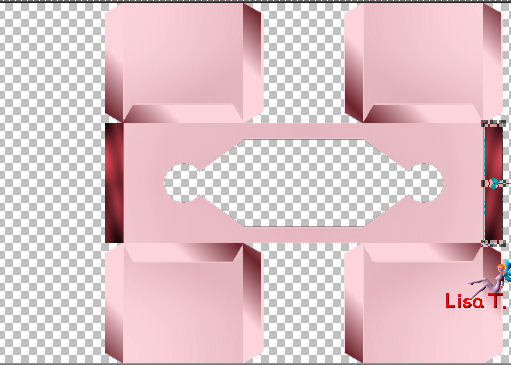
layers/merge/merge down twice
Step 8
effects/image effects/offset/(H : -97 / V : 0 )
acitvate the Pick tool (K)
stretchto the right and to the left
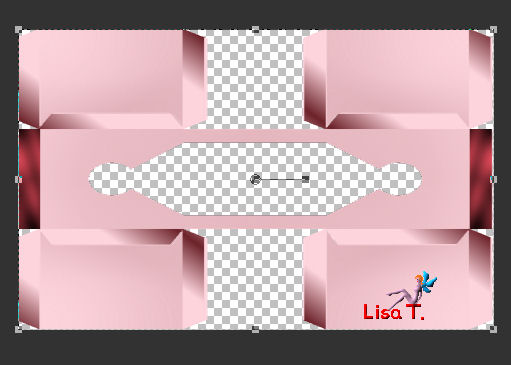
disable the Pick Tool (M)
if you closed the « eye » of Raster 1, you can now open it
step 9
make sure the top layer is active (copy of Raster 1)
selections/load-save selection/from disk/selection 2
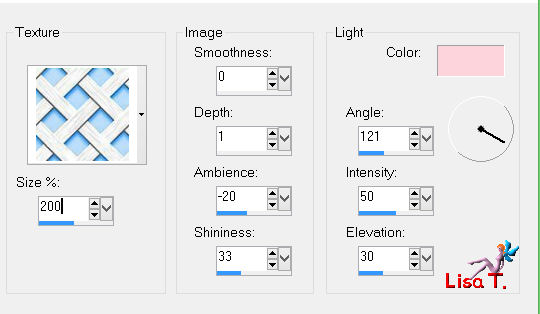
effects/texture effect/texture/and find the texture « tuile » (provided) - color 2 - with the following settings
selections/invert
effects/3D effects/drop shadow/ 6 / 6 / 75 / 30 / black
selections/select none
Step 10
keep the same layer active
activate the selection tool /custom selection/( top 199 / left 144 / bottom 398 / right 903)
selections/promote selection to layer
effects/plugins/Unlimited 2/Andrew’s Filters 5/in To The Center Of Things
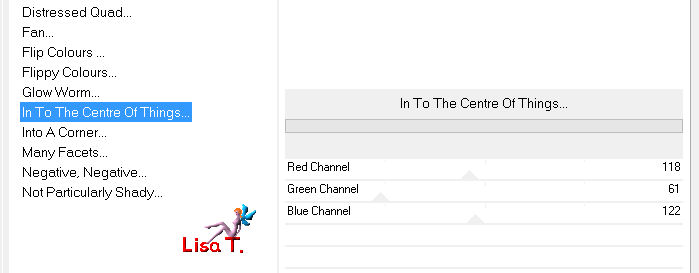
selections/select none
for the example, Sweety chose to set the blend mode on « Luminance »
Step 11
keep the same layer active (Promoted selection)
layers/duplicate - image/mirror
set the opacity on 50%
layers/merge/merge down
layers/duplicate - image/mirror
set the opacity on 50%
layers/merge/merge down
effects/plugins/Graphic Plus/Cross Shadow/ 81 / 50 / 50 / 50 / 50 / 50 / 50 / 128
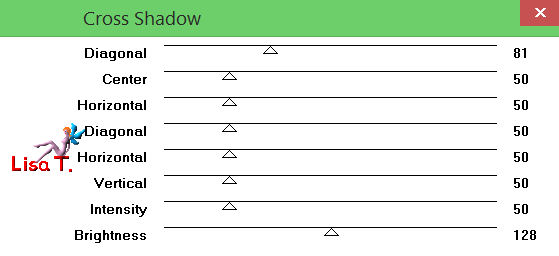
Step 12
your tag and your layers palette look like this
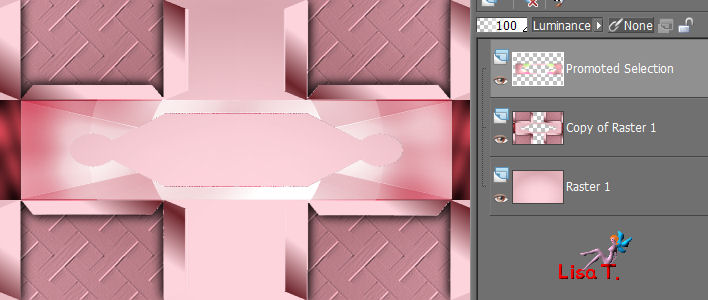
layers « promoted selection » is still active
adjust/add-remove noise/add noise/check « monochrome and uniform » / noise 15%
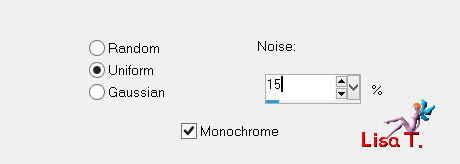
adjust/sharpness/sharpen
layers/merge/merge down
Step 13
selections/load-save selection/from disk/selection 3
layers/new raster layer
activate the image « 519811_barcraigs_réservoir_scotland » (or one of your choice)
edit/copy - back to your work - edit/paste into selection
layers/new raster layer
effects/3D effects/cutout/ 5 / 5 / 75 / 25 / black
layers/new raster layer
apply the effect « cutout » once more/ -5 / -5 / 75 / 25 / black
layers/merge/merge down twice
Step 14
keep the seection active
effects/plugins/Alien Skin Eye Candy 5 Impact/Glass
in the tab « settings » choose « clear »
in « basic » choose color 2
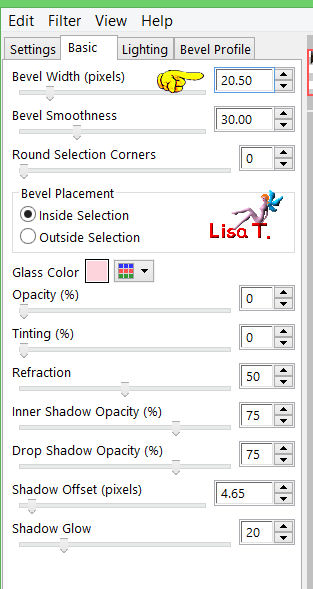
selections/select none
set the opacity between 50% and 60% (you choose)
layers/duplicate - image/mirror
layers/merge/merge down
adjust/sharpness/sharpen
Step 15
activate the image of the landscpae once more
image/mirror - edit copy
back to your work
selections/load-save selection/from disk/selection 4
layers/new raster layer
edit/paste into selection
layers/new raster layer
effects/3D effects/cutout/ 5 / 5 / 75 / 25 / black
layers/new raster layer
effects/3D effects/cutout/ -5 / -5 / 75 / 25 / black
layers/merge/merge down twice
effects/plugins/Alien Skin Eye Candy 5 Impact/Glass/same settings as in step 14
selections/select none
set the opacity between 50% and 60% (you choose)
layers/duplicate - iamge/mirror
layers/merge/merge down
Step 16
your work and your layers palette look like this
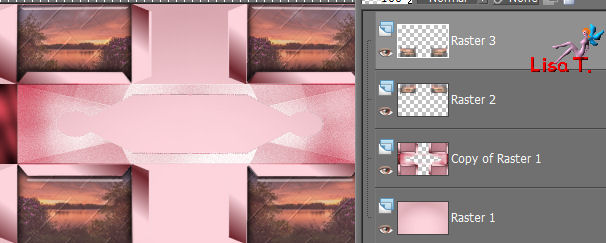
in the layers palette, « Raster 3 » is active
layers/merge/merge down twice
activate the magic wand tool, tolerance 0 and select the center o f the shape
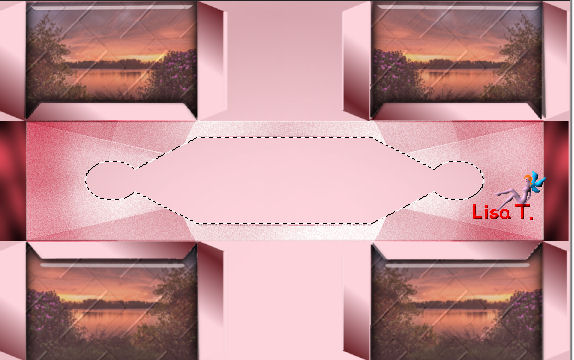
selections/modify/expand/3 pixels
layers/new raster layer
layers/arrange/move down
activate the image of the landscape
edit/copy - back to your work - edit/paste into selection (or your image)
you may change the opacity and the blend mode as you like best
Step 17
layers/new raster layer
effects/3D effects/cutout/ 5 / 5 / 75 / 25 / black
layers/new raster layer
effects/3D effects/cutout/ -5 / -5 / 75 / 25 / black
layers/merge/merge down
selections/select none
your layers palette look like this
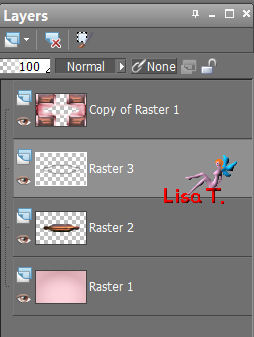
Step 18
in the layers palette, activate the bottom layer (Raster 1)
layers/new raster layer
selections/select all
acitvate the image of the landscape
edit/copy - back to your work - edit/paste into selection
selections/select none
effects/image effects/seamless tiling/default settings
adjust/blur/radial blur

Step 19
layers/duplicate - image/mirror - image/flip
set the opacity on 50%
layers/merge/merge down
set the blend mode on « hard light » (or other, according to your colors)
effects/edge effects/enhance (or enhance more)
you may change the opacity if you like (on the example, Sweety set the opacity on 80%)
your layers palette look like this
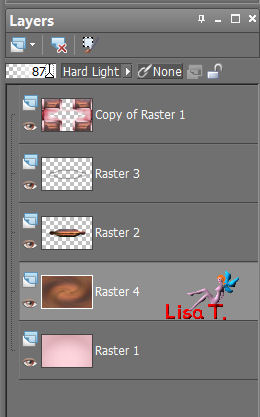
make sure « Raster 4 » is the active layer in the layers palette
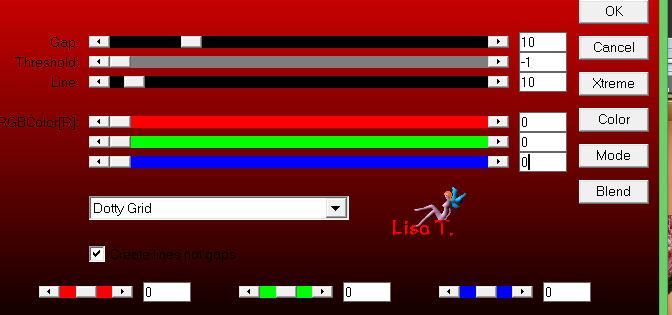
effects/plugins/AP 01 [Innovations]/Lines Silverlining/Dotty Grid
Step 20
in the layers palette, activate the top layer (copy of Raster 1)
edit/copy - edit/paste as new image
set aside, you will need it later to create the decoration
back to your work
selections/select all
layers/new raster layer
effects/3D effects/cutout/ 5 / 5 / 75 / 25 / black
layers/new raster layer/
effects/3D effects/cutout/ -5 / -5 / 75 / 25 / black
layers/merge/merge down
selections/select none
image/add borders/check « symmetric »/1 pixel/color 1 (dark color)
layers/promote background layer
Step 21
layers/duplicate
adjust/blur/gaussian blur/10
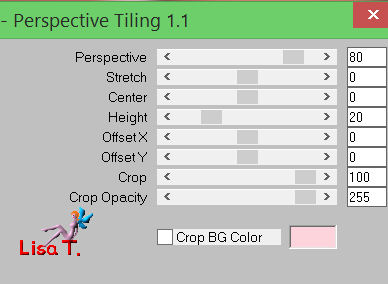
effects/plugins/Mura’s Meister/Perspective Tiling/ 80 / 0 / 0 / 20 / 0 / 0 / 100 / 255
in the layers palette, activate the bottom layer (Raster 1)
image/resize/uncehck « resize all layers »/90%effects/image effects/offset/ ( 0 / 30 )
view/rulers, activate the Pick tool (K)
place the pointer on the bottom cursor and pull up to 485

Step 22
disable the rulers and the Pick tool
layers/new raster layer
layers/arrange/send to bottom
fill with color 1 (dark color)
in the layers palette, activate the layer above (Raster 1)
layers/duplicate
effects/plugins/Toadies/What Are You ?..

effects/edge effects/enhance (or enhance more)
Step 23
make sure « copy of Raster 1 » is the active layer
layers/arrange/move down
set the blend mode on « Multiply » (or other, according to your colors)
activate the layer above (Raster 1)
effects/3D effects/drop shadow/ 6 / 6 / 70 / 30 / black
acitvate the top layer (the layer of the floor)
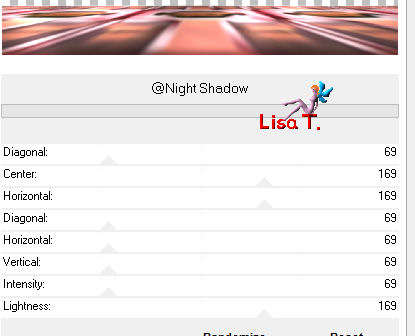
effects/plugins/Filters Unlimited2/&<Bkg Designers IV>@Night Shadow/defautl settings
Step 24 (the decoration)
image/add borders/check « symmetric »/3 pixels/color 1 (dark color)
activate the image you set aside on step 20
effects/geometric effects/circle/check « transparent »
image/resize/uncheck « resize all layers »/20%
edit/copy - back to your work - edit/paste as new layer
move it as shown on the screenshot
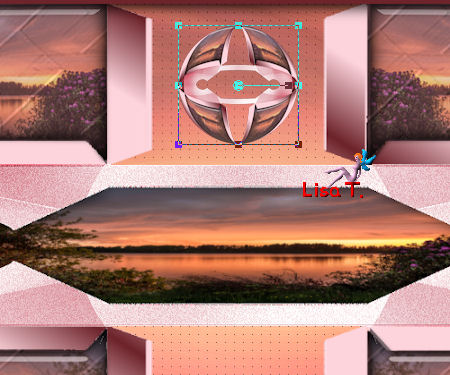
set the blend mode as you like (Sweety set the blend mode of the example on « multiply »)
(note of the translator : I chose « Luminance (Legacy) »)
layers/duplicate
effects/image effects/offset/ ( 0 / -320 )
activate the tube « cal_guis_12_03_2008 »
edit/copy - back to your work - edit/paste as new layer
image/mirror
move it to the left (see final result)
resize if necessary
effects/3D effects/drop shadow/ 6 / 30 / 50 / 15 / black
adjust/sharpness/sharpen
activate the tube of the flower
edit/copy - back to your work - edit/paste as new layer
image/resize/uncheck « resize all layers »/60%
move it to the right (see final result)
effects/3D effects/drop shadow/ -6 / -30 / 50 / 15 / black
adjust/sharpness/sharpen
Final Step
selections/select all
image/ad borders/20 pixels/color 2 (light color)
selections/invert
adjust/add-remove noise/add noise/same settings as in step 12

adjsut/sharpness/sharpen
selections/select none
image/add borders/3 pixels/color 1 (dark color)
apply your signature
layers/merge/merge all (flatten)
image/resize/width 900 pixels
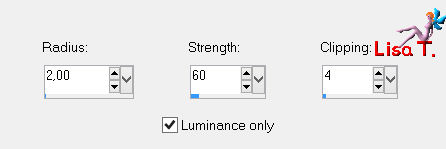
adjust/sharpness/unsharp mask
file/save as... Type jpeg

your tag is finished
Thank you to have realized it

To write to Sweety


my tag with my tubes


Back to the board of Sweety’s tutorials
board 1  board 2 board 2 

|