tutorial 35
You will find the original tutorial Here

I am member of TWInc
this translated tutorial is protected


The tubes Sweety uses were received in sharing groups
or found on the web
if one of them is your property, please let us know
a link to your site will be added
they are provided as « single-use » for this tutorial
you are not allowed to share or used them in any other way.
This tutorial is a personal creation,
any resemblance with another one would be pure coincidence
you are not allowed to share it or present it on your site, blog or forum
without the permission of Sweet

Thank you to the tubers for their great job
they make our creations possibl
This translation is my property,
it is strictly forbidden to copy or distribute it on the Net
Thanks to Sweety for her kind permission
I work with PSP12, but it is possible to use another version.
have fun
Material
8 selections - 2 presets for BKG Designers sf10II and Special effects 1
1 mask - 1 image - 1 tube (character) - 1 tube (vase of flowers)

Implementation
Open the tubes, duplicate them, close the originals and work with the copies
copy the selections and paste them into the folder « selections » of « My PSP Files »
import the presets into Unlimiteds 2
open the mask and minimize it
Filters
Graphic Plus/Cross Shadow
AAA Frames/Foto Frame
Alien Skin Eye Candy 5 Impact/Glass and Extrude
Simple/Top Left Mirror and Diamonds
Filters Unlimited 2
&<BKG Designers>sf10II/OLI Rayons de Soleil (provided)
Special Effects 1/Halftone (provided)
Textures/Patchwork
Thank you to Tine for her kind permission
you will find the filters on her site


Colors

color 1 -> foreground color -> #11133a
color 2 -> background color -> #82a3ff
Use the pencil to follow the steps
left click to grab it
 |
Realization
Step1
open a new transparent background layer / 950 * 600 pixels
activate the flood fill tool and fill with color 1 (dark color)
layers/new raster layer
fill with color 2 (light)
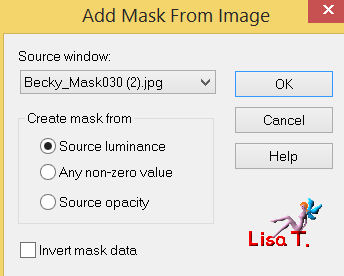
layers/new mask layer/from image/choose « Becky_Mask030 »/uncheck « invert mask data »
layers/merge/merge group
Step 2
image/resize/uncheck « resize all layers »/110%
effects/image effects/offset/ H : 5 / V : 0
activate the selection tool (S)/custom selection/ top : 0 / left : 0 / bottom : 600 / right : 377
edit/clear/delete
selections/select none
layers/duplicate - image/mirror
layers/merge/merge down
selections/load-save selection/from disk/selection 1
edit/clear/delete
selections/select none
Step 3
in the layers palette, activate the bottom layer (Raster 1)
selection tool/rectangle/custom selection/ top : 216 / left : 0 / bottom : 384 / right : 268
selections/promote selection to layer
layers/arrange/bring to top
fill with color 2
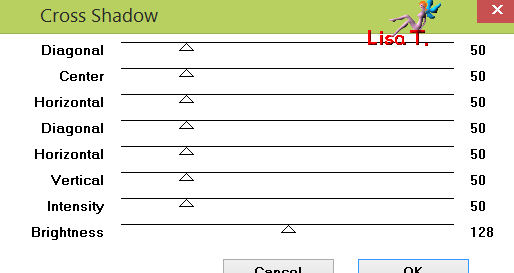
effects/plugins/Graphic plus/Cross Shadow/50 /50 /50 /50 /50 /50 /50 /128
selections/modify/contract/10 pixels
fill with color 1
effects/plugins/ Graphic Plus/Cross Shadow/50/50/50/50/50/50/128/128
apply this effects twice, according to your colors

selections/modify/contract/15 pixels
activate the image of the landscape
edit/copy - back to your work - edit/paste into selection
Step 4
keep the selection active
effects/plugins/AAA Frames/Foto Frame
adapt the settings according to your colors

selections/modify/contract/19 pixels
effects/plugins/Alien Skin Eye Candy 5 Impact/Glass
choose « Clear » in the settings and set Bevel Width 11.75 in the Basic tab

selections/select none
layers/duplicate - image/mirror
layers/merge/merge down
Step 5
in the layers palette, the top layer is active (promoted selection)
layers/new raster layer
activate selection tool/rectangle/custom selection
top : 217 / left : 273 / bottom : 383 / right : 676
fill the selection with color 2
effects/plugins/Graphic plus/Cross Shadow/50 /50 /50 /50 /50 /50 /50 /128
selections/modify/contract/10 pixels
paint the selection with color 1
effects/plugins/Graphic plus/Cross Shadow/50 /50 /50 /50 /50 /50 /128 /128
apply this effect once or twice, according to your colors
selections/modify/contract/15 pixels
activate the landscape
edit/copy - back to your work - edit/paste into selection
effects/plugins/AAA Frames/Foto Frame
adapt the settings according to your colors
Step 5 Bis
layers/duplicate
selections/edit selection (it becomes red, it is normal)
in the layers palette, activate the layer below (copy of raster 2)
image/mirror (the selection is floating)
selections/promote selection to layer
in the layers palette, set the opacity on 50%
layers/merge/merge down twice
selections/modify/contract/19 pixels
effects/plugins/Alien Skin Eye Candy 5 Impact/Glass
in the tab « settings » choose « Clear, in the « basic » tab, set bevel width 11.75
selections/select none
Step 6
your tag and your layers palette look like this

in the layers palette, raster 2 is active
selection/load selection from disk/selection 2
in the layers palette, activate the bottom layer (raster 1)
selections/promote selection to layer
layers/arrange/bring to top
fill with color 2
selections/select none
in the layers palette, activate the second layer from the bottom (group raster 2)
selections/load from disk/selection 3
selections/promote selection to layer
fill with color 1
selections/select none
effects/plugins/Simple/Top Left Mirror
Step 7
in the layers palette, activate the top layer (promoted selection 1)
effects/geometric effects/pentagon/check « wrap »

selections/load selection from disk/selection 4
edit/clear/delete
selections/select none
activate the selection tool/rectangle/custom selection
top : 380 / left : 311 / bottom : 600 / right : 640
edit/clear/delete
selections/select none
Step 8
in the layers palette, the top layer is still active (promoted selection 1)
layers/duplicate - image/flip
layers/merge/merge down
activate the selection tool/rectangle/custom selection
top : 217 / left : 311 / bottom : 378 / right : 643
selections/promote selection to layer
in the layers palette, activate the layer below (promoted selection 1)
edit/clear/delete
selections/select none
Step 9
in the layers palette, activate the top layer (promoted selection 3)
activate the eraser tool, size 60 pixels
erase the left hook

effects/image effects/offet/ H : 75 / V : 0 )
layers/duplicate - image/mirror
move it properly as shown on the final result

layers/merge/merge down
activate the magic wand tool/tolerance 0, and select the hooks
selections/modify/expand/1 pixel
fill the selection with color 1
selections/select none
Step 10
effects/texture effects/blinds/color 2
width 10 / opacity 30 / check both boxes

effects/3D effects/drop shadow/ 0 / 0 / 100 / 4 / black
in the layers palette,a ctivate the second layer from top (promoted selection 1)
effects/texture effects/blinds/color 1
width 10 / opacity 30 / check both boxes
effects/plugins/Unlimited 2/&<Bkg Designers sf10II>
OLI Rayons de Soleil/0 / 0 / 50 / 80 / 60 / 140

in the layers palette, set the blend mode on « hard light » and the opacity on 100% (or other)
Step 11
in the layers palette, activate the top layer
layers/new raster layer
activate the selection tool/rectangle
top : 195 / left : 0 / bottom : 405 / right : 950
fill the selection with color 2
effects/texture effects/blinds
width 10 / opacity 30/uncheck Horizontal

once more, apply Unlimited 2, same settings as in step 10
Step 12
keep this layer active
selections/modify/contract/15 pixels
edit/clear/delete
selections/select none
effects/3D effects/drop shadow/ 0 / 0 / 100 / 15 / black
in thel layers palette, set the blenc mode on « hard light » and the oapcity on 100% (or other)
effects/edge effects/enhance
Step 13
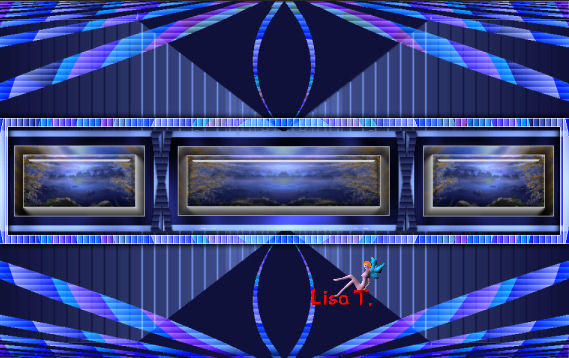
your rag and your layers palette look like this
in the layers palette, the top layer is active (Raster 3)
activate the bottom layer (raster 1)
layers/new raster layer
fill with color 2
effects/plugins/Unlimited 2/Special effects 1/Halftone

Step 14
keep this layer active
effects/plugins/Simple/Diamonds
layers/duplicate - image/mirror
in the layers palette, set the opacity on 50%
layers/merge/merge down
in the layers palette, set the blend mode on « dodge » (or other) and the opacity on 60%
Step 15
in the layers palettena ctivate the 4th layer from the bottom (promoted selection 2)
layers/arrange/bring to top
selections/load selection from disk/selection 5
selections/modify/expand/4 pixels
edit/clear/delete
in the layers palette, activate the third layer form the bottom (group raster 2)
edit/clear/delete
selections/select none
your layers palette look like this

Step 16
in the layers palette, acitvate the top layer (promoted selection 2)
effects/plugins/Alien Skin Eye Candy 5 Impact/Extrude
in the tab « basic » choose « Black Offset, No Shading »
and the tab « basic » with the following settings and color 2

Step 17
in the layers palette, the top layer is active (promoted selection 2)
selections/load selection from disk/selection 6
effects/plugins/Textures/Patchwork/ 4 / 8

selections/select none
selections/load selection from disk/selection 7
fill the selection with color 2
effects/plugins/Grapnic Plus/Cross Shadow/50/50/50/50/50/50/50128
selections/select none
effects/3D effects/drops shadow/ 0 / 0 / 100 / 20 / black
Step 18
in the layers palette, activate « Raster 2 » (middle frame)
layers/merge/merge down
alyers/duplicate
acitvate the layer below
effects/distortion effects/wave

in the layers palette,a ctivate the second layer from the top (raster 3)
layers/duplicate
layers/arrange/move down 4 times (above the layer with the wave)
effects/distortion effects/wave/same settings as before (still in memory)
layers/merge/merge down
you can « play » with the blend mode and the opacity of the layer, according to your colors
Step 19
in the layers palette,a ctivate the 4th layer from the top (promoted selection 1)
selections/load selection from disk/selection 8
edit/clear/delete
selections/select none
Step 20
image/add borders/3 pixels/check « symmetric »/color 1
selections/select all
image/add borders/50 pixels/color 1
selections/invert
effects/plugins/Grapnic Plus/Cross Shadow/50/50/50/50/50/50/128/128 twice
layers/new raster layer
fill with color 2
effects/plugins/Unlimited 2/Special Effects 2/Halftone (as in step 13)
in the layers palette, set the blend mode on « overlay »
effects/edge effects/enhance
layers/duplicate
effects/plugins/Simple/Diamonds
let the blend mode of this layer on « overlay »
selections/invert
effects/3D effects/drop shadow/ 6 / 6 / 70 / 30 / black
and again drop shadow/ -6 / -6 / 70 / 30 / black
Step 21
selections/select all
layers/new raster layer
effects/3D effects/cutout/ 0 / 0 / 75 / 25 / color 1
image/add border/3 pixels/color 2
selections/select none
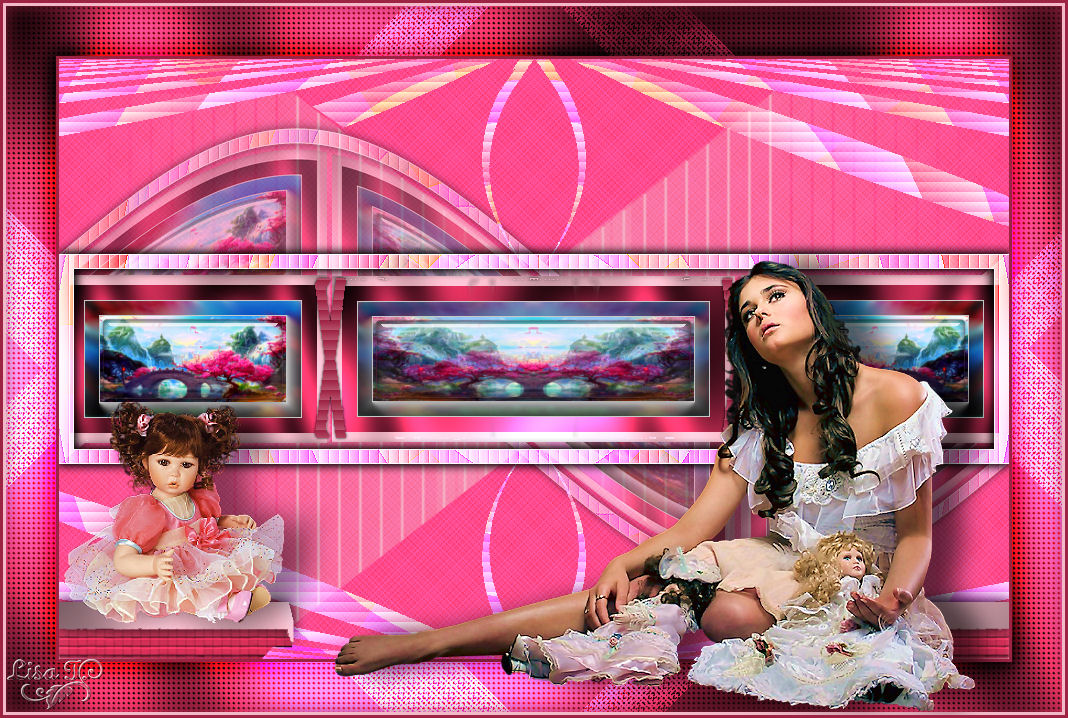
activate the tube « NP-758 » (Sweety colorized it with her colors)
image/mirror (resize eventually)
edit/copy - back to your work - edit/paste as new layer
move it to the right (see final result)
drop a shadow of your choice
activate the tube of the vas of flowers
edit/copy - back to your work - edit/paste a snew layer
resize eventually, and drop a shadow of your choice
image/add borders/3 pixels/color 1
apply your signature
layers/merge/merge all (flatten)
Final step
image/resize/width 950 pixels
adjust/sharpness/unsharp mask

file/save as… type jpeg
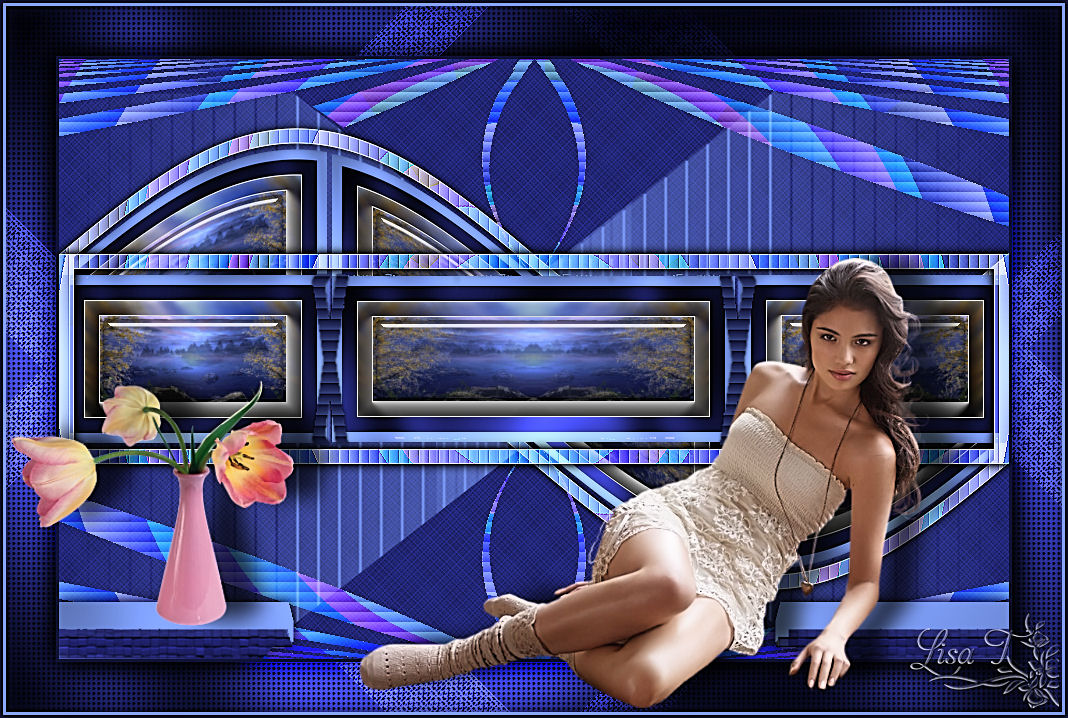
your tag is finished
Thank you to have realized it
To write to Sweety

To subscribe to her newsletter, see her homme page

my tag with my tubes
Back to the board of Sweety’s tutorials
board 1  board 2 board 2

|