

You will find the original tutorial Here

Sweety has the permission of the tubers to use their tubes.
You can find the banners of these tubers in the left column of her blog, under the heading "autorisations"

some of the tubes Sweety uses were received in sharing groups
if you think one of them is your property, please let her know
a link to your site will be added
they are provided as « single-use » for this tutorial
you are not allowed to share or use them for another purpose.
you are not allowed to present them on your site, blog or forum
This tutorial is a personal creation,
any resemblance with another one would be pure coincidence

Thank you to the tubers for their great job
they make our creations possible

translator’s note : This translation is my property,
it is strictly forbidden to copy or distribute it on the Net
Thanks to Sweety for her kind permission
Sweety works with PSPX2, I work with PSP2020 Ultimate, but it is possible to use another version.
tubes without tuber‘s watermark are ALWAYS stolen tubes
Please respect the tuber ‘s work
do like me : choose tubes with a watermark and give credit to the tuber
Thank you ! have fun...

Hints and Tips
TIP 1 -> if you don’t want to install a font -->
open it in a software as « Nexus Font » (or other font viewer software of you choice)
as long as both windows are opened (software and font), your font will be available in your PSP
TIP 2 -> from PSPX4, in the later versions of PSP the functions « Mirror » and « Flip » have been replaced by -->
« Mirror » --> image => mirror => mirror horizontal
« Flip » --> image => mirror => mirror vertical

Supplies
selections - decorations and tubes – presets - masks

the main tubes are not provided
Lisa's note => I used one of my tubes so create my Tag
open the tubes and duplicate. Close the orignals and work with the copies (to preserve original files)
place selections, gradients, brushes, styled lines, etc.... provided, into the dedicated folders of « My Corel PSP »
open the masks and minimize to tray
important NOTE : save mask « barrafade-inf » into the folder « masks » of PSP general folder
double click on the presets to install automatically

Plugins
Filters Unlimited 2.0==>Alfs Border FX : (Border fade1) -
AAAFrames : (Foto Frames) -
MuRa’s Smeiless : (Emboss At Alpha) -
Alien Skin Eyes Candy 5==>Impact : (Glass - Extrude)-
VM Toolbox: (Zoom Blur) -

Thank you Renée Salon for your permission to use your filters page


Colors
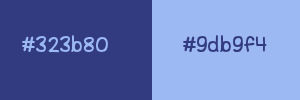
foreground color -> FG -> color 1 -> #323b80
background color -> BG-> color 2 -> #9db9f4
dont hesitate to change blend mode and colors accoring to your tubes and likings
you will need about 1 hour to create your tag (not counting the time to choose your tubes)
according to the version of PSP you use, your tag might be slightly different from the example

Use the pencil to mark your place
along the way
hold down left click to grab and move it
 |

Realization
1
open a new transparent image 950 * 550 px
selections => select all
copy / paste your landscape tube into selection
selections => select none
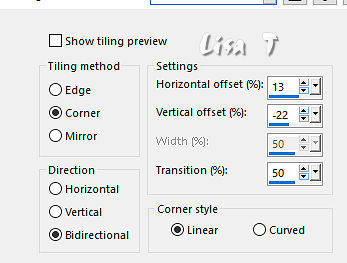
effects => image effects => seamless tiling
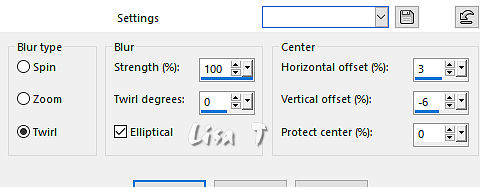
adjust => blur => radial blur
layers => duplicate
image => mirror => mirror horizontal
opacity of the layer : 50%
layers => merge => merge visible
2
effects => plugins => Unlimited 2 => Alfs Border FX => Border fade 1
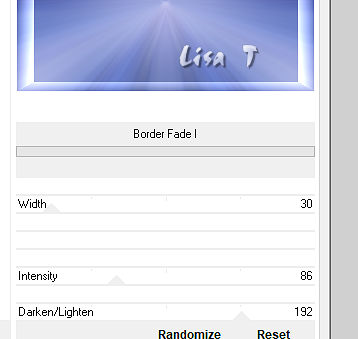
selections => load-save selection => from disk => selection # 1
hit the DELETE key of your keyboard
layers => new raster layer
flood fill selection with color 2
layers => new raster layer
copy / paste your landscape tube into selection
effects => Art Media Effects => brush strokes
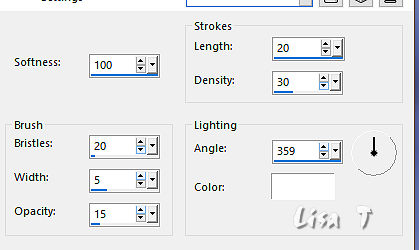
layers => merge => merge down
selections => select none
3
layers => duplicate
effects => distortion effects => Punch
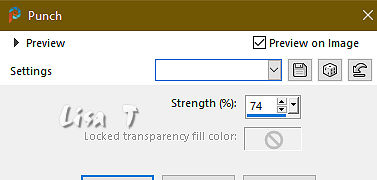
adjust => sharpness => sharpen
layers => merge => merge down
highlight bottom layer
enable the Selection tool / custom selection
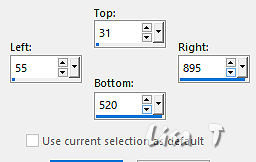
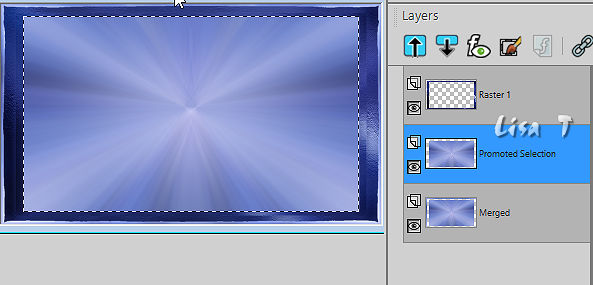
selections => promote selection to layer
your layers palette and tag look like this
4
Middle layer is highlighted (promoted selection)
layers => new raster layer
flood fill selection with color 1
selections => modify => contract => 10 px
hit the DELETE key of your keyboard
highlight « Promoted Selection » again
effects => Art Media Effects => brush strokes ( same settings as previously )
selections => modify => contract => 10 px
layers => new raster layer
flood fill selection with color 1
selections => modify => contract => 10 px
hit the DELETE key of your keyboard
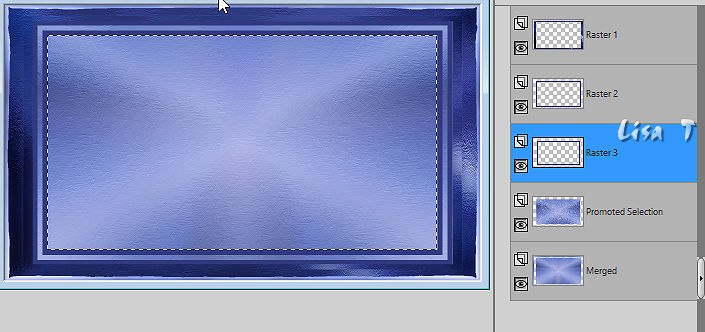
your layers palette and tag look like this
5
Raster 3 is highlighted
layers => new raster layer
layers => arrange => move down
copy / paste your landscape tube into selection
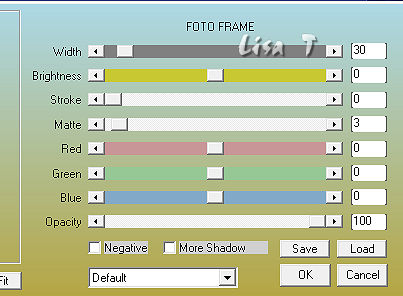
effects => plugins => AAA Frames => Foto Frame
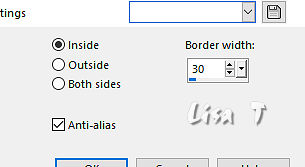
selections => modify = > select selection borders
effects => Art Media Effects => brush strokes ( same settings as previously )
effects => plugins => AAA Frames => Foto Frame
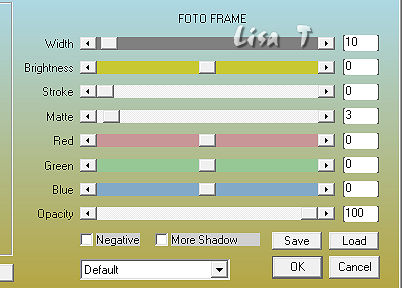
6
selections => load-save selection => from disk => selection # 2
effects => 3D effects => drop shadow => 0 / 0 / 60 / 30 / black
selections => select none
layers => merge => merge visible
7
edit => copy
edit => paste as new image
set aside for a later use
back to the original work
layers => new raster layer
flood fill layer with color 1
highlight the mask « création.tine-masque318 » => image => mirror => mirror horizontal
minimize again / back to the original work
layers => new mask layer => from image
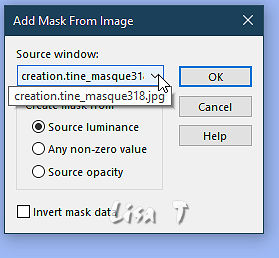
layers => merge => merge group
effects => plugins => Mura’s Seamless => Emboss at Alpha
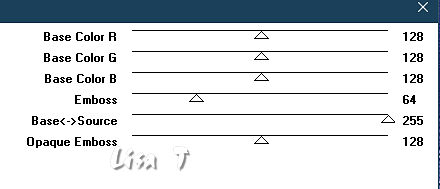
8
your layers palette and tag look like this
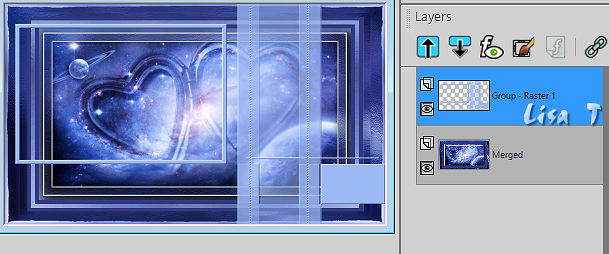
mask layer is highlighted
view => rulers
enable the Pick tool
stretch top, right, bottom and left cursors =>…
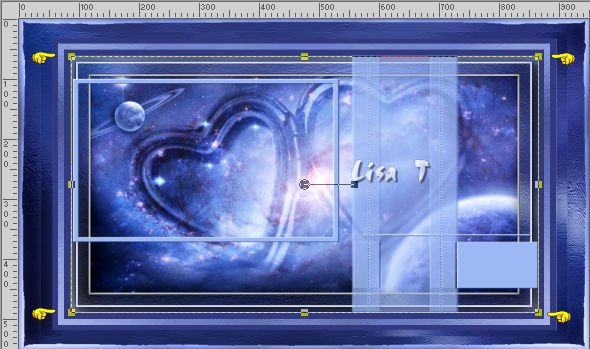
hit the « M » key of your keyboard to disable the tool
view => rulers (to disable)
enable the Selection tool / custom selection
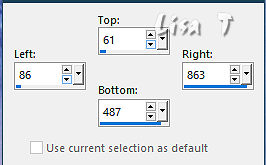
highlight bottom layer
effects => Art Media Effects => brush strokes ( same settings as previously )
selections => select none
9
layers => new raster layer
enable the Selection tool / custom selection
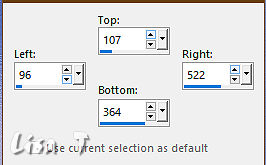
copy / paste into selection the image set aside in step 7 (don’t close this image, you will need it again)
selections => invert
effects => 3D effects => drop shadow => 0 / 0 / 60 / 30 / black
selections => select none
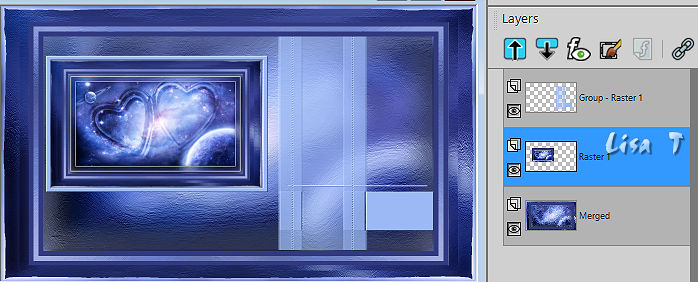
delete « promoted selection »
your layers palette and tag look like this
10
« Raster 1 » is highlighted
layers => new raster layer
selections => load-save selection => from disk => selection # 3
flood fill selection with color 2
selections => modify => contract => 5 px
hit the DELETE key of your keyboard
selections => select none
close the eye of bottom layer (merged)
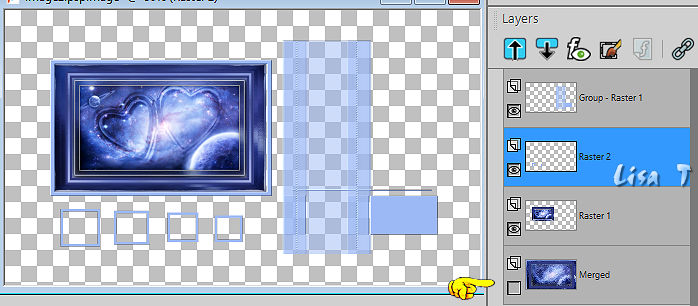
« Raster 2 » is now highlighted
11
enable the Magic Wand tool and select inside the first square on the left
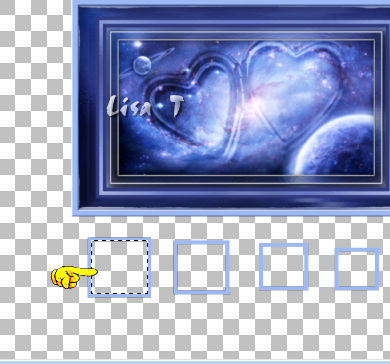
layers => new raster layer
copy / paste into selection the image set aside in step 7
effects => plugins => Alien Skin Eye Candy 5 Impact / Glass / settings tab => Clear
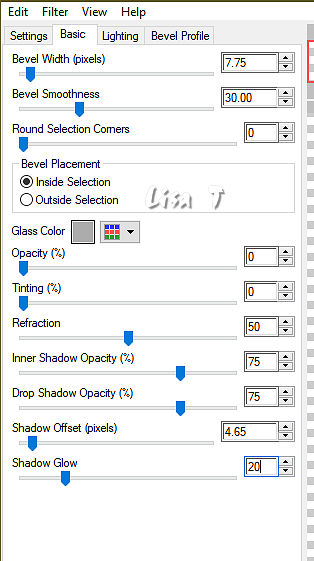
selections => select none
highlight « Raster 2 » (underneath)
enable the Magic Wand tool and select inside the second square on the left
highglight « Raster 3 » (above)
copy / paste into selection the image set aside in step 7
effects => plugins => Alien Skin Eye Candy 5 Impact / Glass ( same settings as previously )
selections => select none
do exactly the same work on the two other squares
don’t close the image set aside in step 7, you will need it again
12
your layers palette and tag look like this
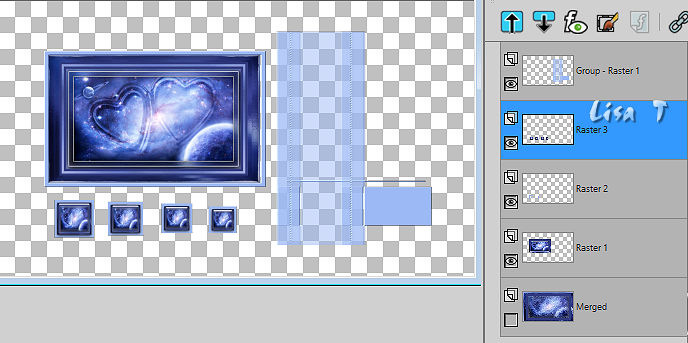
« Raster 3 » is highlighted
layers => merge => merge down
open the eye of bottom layer but keep Raster 2 » highlighted
layers => duplicate
effects => plugins => Alien Skin Eye Candy 5 Impact / Extrude
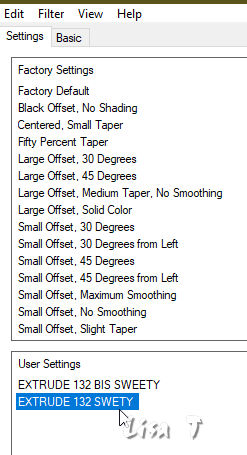
layers => arrange => move down
highlight layer above (Raster )
layers => merge => merge down
effects => image effects => offset => H : 19 / V : 1 / tick « custom » and « transparent »
13
your layers palette and tag look like this
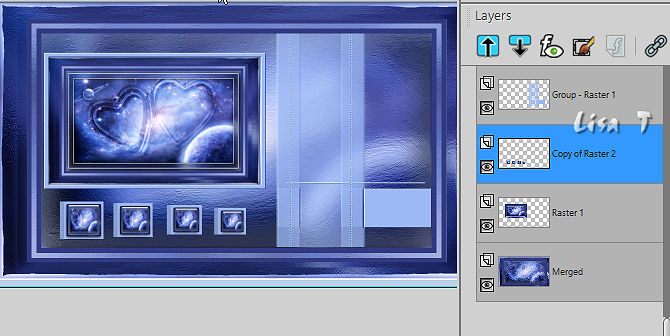
« Copy of Raster 2 » is highlighted (second from top)
selections => load-save selection => from disk => selection # 4
copy / paste your landscape tube into selection
selections => select none
copy / paste « Deco perso 1 » as new layer
don’t move it
layers => arrange => move down TWICE
blend mode of the layer : Luminance (Legacy)
14
your layers palette and tag look like this
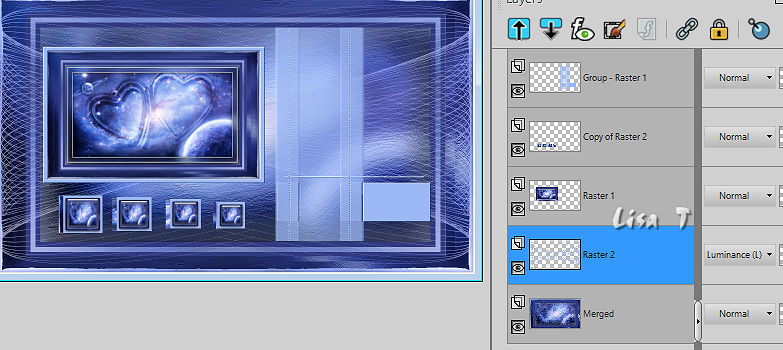
enable the Selection tool / custom selection
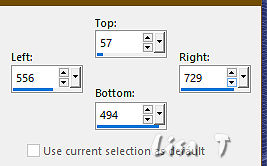
hit the DELETE key of your keyboard
selections => select none
highlight top layer
copy / paste « déco modifiée cf6d30ff » as new layer
blend mode of the layer : Luminance (Legacy)
effects => image effects => offset => H : 165 / V : 0 / tick « custom » and « transparent »
15
Highlight « Group Raster 1 » (the mask)
effects => 3D effects => drop shadow => 0 / 0 / 60 / 30 / black
enable the Selection tool / custom selection
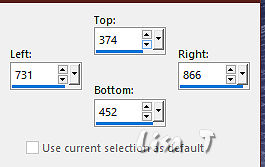
selections => modify => contract => 5 px
hit the DELETE key of your keyboard
layers => new raster layer
copy / paste into selection the image set aside in step 7
selections => select none
16
your layers palette and tag look like this
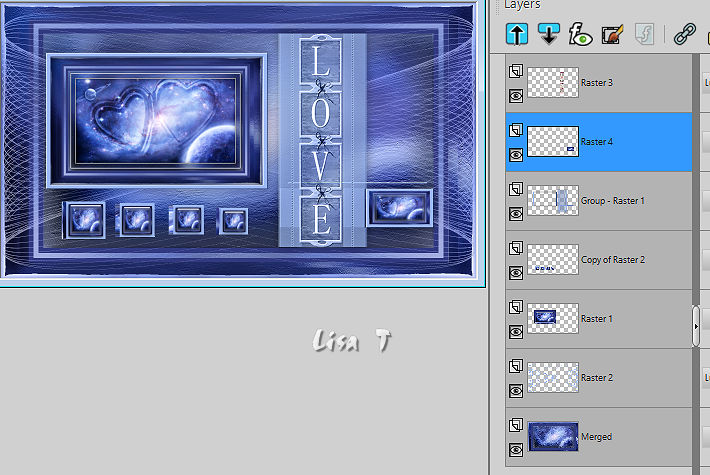
second layer from top is highlighted (Raster 4)
layers => arrange => move down
enable the Selection tool / custom selection
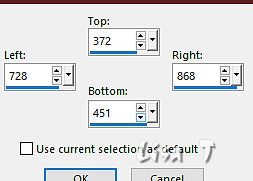
selections => promote selection to layer
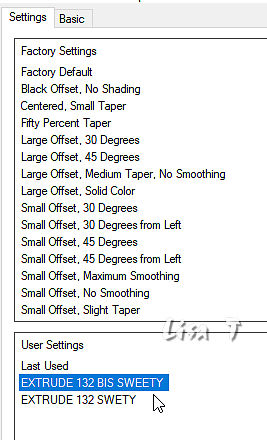
effects => plugins => Alien Skin Eye Candy 5 Impact / Extrude
selections => load-save selection => from disk => selection # 5
copy / paste your landscape tube into selection
selections => select none
layers => arrange => move down
17
Highglight « Raster 2 » (second from bottom)
enable the Selection tool / custom selection
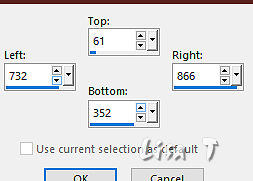
hit the DELETE key of your keyboard
selections => select none
highlight top layer
copy / paste the Word Art tube as new layer
effects => image effects => offset => H : 322 / V : 43 / tick « custom » and « transparent »
image => add borders => tick « symmetric » => 3 px color 1
18
layers => duplicate
image => resize => untick « resize all layers » => 90%
effects => image effects => offset => H : - 47 / V : 26 / tick « custom » and « transparent »
highlight bottom layer
layers => promote background layer
effects => plugins => VM Toolbox / Zoom Blur

layers => new raster layer
flood fill layer with color 2
layers => new mask layer => from image
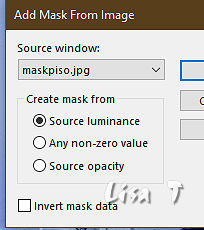
layers => merge => merge group
layers => duplicate
mirror => mirror horizontal
layers => merge => merge down
effects => plugins => Mura’s Seamless => Emboss at Alpha ( same settings as previously )
19
highlight top layer
your layers palette and tag look like this
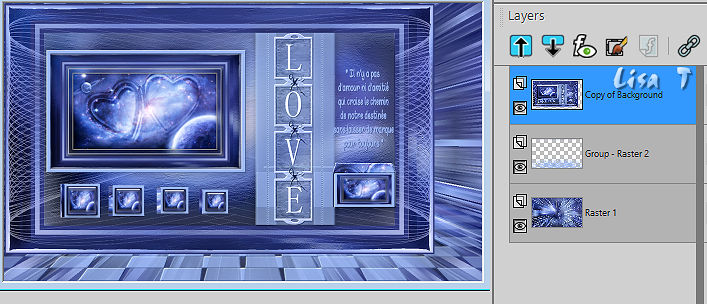
effects => image effects => offset => H : 93 / V : 0 / tick « custom » and « transparent »
layers => new mask layer => from Disk
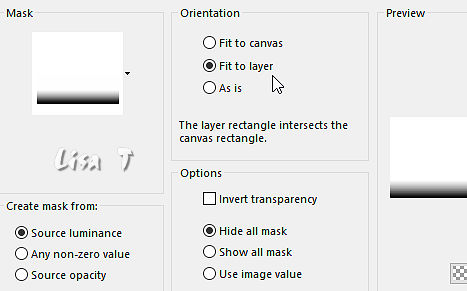
layers => merge => merge group
copy / paste the character tube as new layer
Final Step
apply your watermark or signature
write your licence number if you used a licensed tube
layers => merge => merge all (flatten)
image => resize => tick « resize all layers » => 950 px width
save your work as... type .jpeg optimized
your tag is finished

To write to Sweety


Back to the boards of Sweety’s tutorials
board 1 board 2 board 2 board 3 board 3 board 4 board 4


|