

You will find the original tutorial Here

Sweety has the permission of the tubers
to use their tubes.
You can find the banners of these tubers in the left column
of her blog, under the heading "autorisations"

some of the tubes Sweety uses were received
in sharing groups
if you think one of them is your property, please let
her know
a link to your site will be added
they are provided as « single-use » for
this tutorial
you are not allowed to share or use them for another purpose.
you are not allowed to present them on your site, blog
or forum
This tutorial is a personal creation,
any resemblance with another one would be pure coincidence

Thank you to the tubers for their great
job
they make our creations possible

translator’s note : This translation is my property,
it is strictly forbidden to copy or distribute it on the Net
Thanks to Sweety for her kind permission
Sweety works with PSPX2, I work with PSP2020, but it is possible to use
another version.
tubes without tuber‘s watermark are ALWAYS stolen tubes
Please respect the tuber ‘s work
do like me : choose tubes with a watermark and give credit to the tuber
Thank you ! have fun...

Hints and Tips
TIP 1 -> if you don’t
want to install a font -->
open it in a software as « Nexus Font » (or
other font viewer software of you choice)
as long as both windows are opened (software and font),
your font will be available in your PSP
TIP 2 -> from PSPX4,
in the later versions of PSP the functions « Mirror » and « Flip » have
been replaced by -->
« Mirror » --> image => mirror => mirror horizontal
« Flip » --> image => mirror => mirror vertical

Supplies
mask - tubes - selections - palette

main tubes are not provided
place the selections into the folder « selections » of
Corel PSP general folder
open the mask and minimize to tray
prepare the colors into the materials palette

Plugins
Filter Factory
VanDerLee Unplugged X
AP1 [Innovations]
Mura’s Meister
Flaming Pear
AAA Frames
Filters Unlimited 2

Thank you Tine for your permission to
use your filters page


Colors
foreground color -> FG -> color 1 -> #5868a4
background color -> BG-> color 2 -> #dafefe

don’t hesitate to change opacities and blend modes
to match your tubes an colors
you will need about 1 hour to create your tag (not counting
the time to choose your tubes)
according to the version of PSP you use, your tag might
be slightly different from the example

Use the pencil to mark your place
along the way
hold down left click to grab and move it
 |

Realization
1
open a new transparent image 900 * 550 px
selections => select all
copy / paste into selection the landscape image
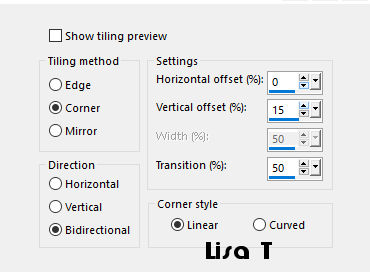
effects => image effects => seamless tiling

effects => image effects => seamless
tiling
adjust => blur => gaussian blur

2
effects => plugins => Filter Factory => Gallery
S / Itsa Edge Thing

edit => repeat => Filter Factory => Gallery S
/ Itsa Edge Thing
apply this effect twice
adjust => sharpness => sharpen
prepare a radial gradient

layers => new raster layer
selections => load-save selection => from alpha
channel => selection # 1
flood fill selection with the gradient
selections => select none
3
effects => image effects => seamless tiling

effects => plugins => Filter Factory => Gallery
B / Button deluxe

4
layers => new raster layer
selections => load-save selection => from alpha channel
=> selection # 2
copy / paste into selection the landscape image
selections => select none
layers => duplicate
image => mirror => mirror horizontal
layers => arrange => merge down
layers => arrange => move down
your layers palette and tag look like this
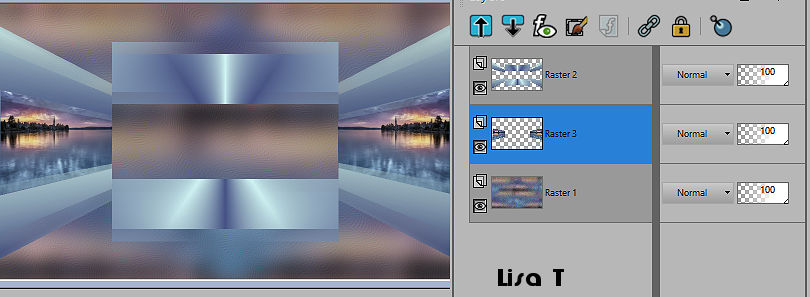
5
raster 3 is highlighted
selections => load-save selection => from alpha channel
=> selection # 3
layers => new raster layer
effects => plugins => VanDerLee unplugged-X-V2.0
/ Jalusi

opacity of the layer : 85%
selections => select none
effects => 3D effects => drop shadow => 0 /0 /
70 / 40 / color 1
6
highlight top layer
selections => load-save selection => from alpha channel
=> selection # 4
effects => plugins => Filter Factory => Gallery
S / Itsa Edge Thing (same settings as before)
adjust => sharpness => sharpen
selections => invert
effects => plugins => AP1[Innovations] / Lines Silverlining
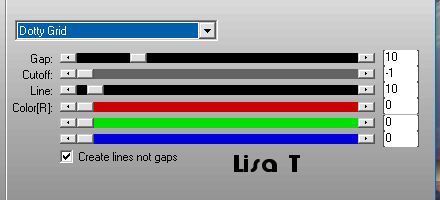
effects => 3D effects => drop shadow => 0 /0 /
70 / 40 / color 1
selections => select none
7
your layers palette and tag look like this

effects => 3D effects => drop shadow => 0 /0 /
70 / 40 / color 1
enable the Selection tool / custom selection

highlight bottom layer
selections => promote selection to layer
layers => arrange => move up TWICE
selections => invert
effects => 3D effects => drop shadow => 0 /0 /
70 / 40 / black
selections => invert
keep selection active
8
effects => 3D effects => inner bevel

selections => modify => contract => 20
px
layers => new raster layer
copy / paste into selection the landscape image
selections => invert
effects => 3D effects => drop shadow => 0 /0 /
70 / 40 / black
selections => select none
layers => merge => merge down
9
your layers palette and tag look like this

highlight Raster 2
layers => merge => merge down 3 times
enable the Pick tool
move as shown below
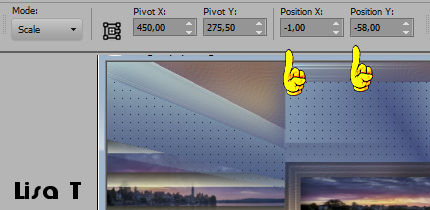
10
your layers palette and tag look like this

Raster 3 is highlighted
layers => duplicate
effects => plugins => Mura’s Meister => Perspective
Tiling

effects => image effects => offset => H : 0
/ V : -50 / tick « custom » and « transparent»
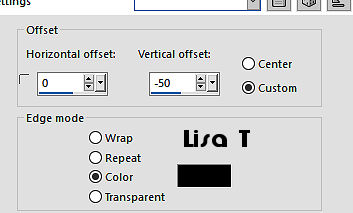
if necessary, view => rulers
enable the Pick tool and
stretch upward

layers => arrange => move down
11
highlight top layer
layers => new mask layer => from image
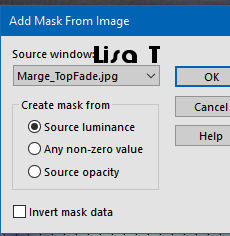
layers => duplicate
layers => merge => merge group
effects => 3D effects => drop shadow => 0 /0 /
70 / 40 / color 1
copy / paste the « deco 1 » as new
layer
effects => image effects => offset => H : 0
/ V : 210 / tick « custom » and « transparent»

12
highlight second layer from the top
layers => duplicate
effects => plugins => Flaming Pear => Flexify
2

image => resize => untick « resize all layers » => 20%
effects => image effects => offset => H : 0
/ V : -45 / tick « custom » and « transparent»

13
image => add borders => tick « symmetric » => 2
px color 1
selections => select all
image => add borders => tick « symmetric » => 60
px color 1
edit => copy
selections => invert
effects => plugins => AAA Frames => Foto Frame
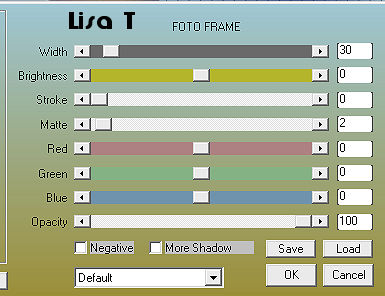
14
selections => load-save selection => from disk => selection # 5
effects => plugins => Unlimited 2 => &<Bkg
Designer IV> => sf10 Shades of Shadow

edit => repeat => Unlimited 2 => &<Bkg
Designer IV> => sf10 Shades of Shadow
selections => select none
selections => load-save selection => from alpha channel
=> selection # 6
flood fill selection with color 2
selections => select all
selections => modify => contract => 30 px
15
selections => invert
edit => paste into selection (image you copied in step13)
effects => plugins => VM Toolbox / Zoom Blur

effects => 3D effects => drop shadow => 0 /0 /
80 / 31 / black
16
selections => invert
selections => modify = > select selection borders

flood fill selection with color 2
selections => select all
selections => modify => contract => 60 px
selections => modify = > select selection borders
(same settings as before)
flood fill selection with color 2
selections => select none
Decoration
copy / paste the character tube as new layer
place where you like
add elements of your choice
drop a nice shadow to each one
image => add borders => tick « symmetric » => 2
px color 2
Final step
apply your watermark or signature
layers => merge => merge all (flatten)
image => resize => tick « resize all layers » => 950
px width
save your work as... type .jpeg
your tag is finished

My tag with my tubes
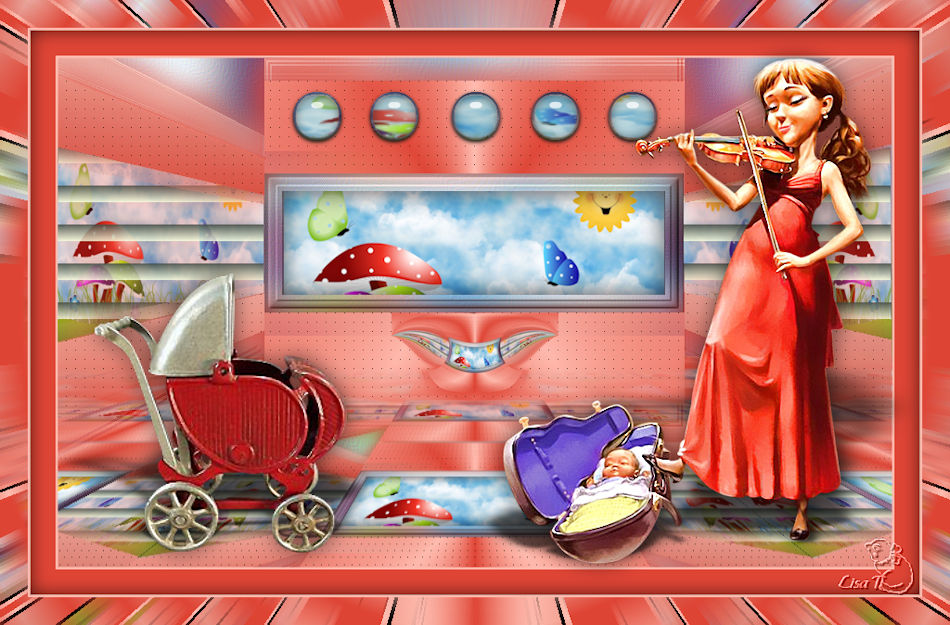
To write to Sweety


Back to the boards of Sweety’s tutorials
board 1 board 2 board 2 board 3 board 3

|