

You will find the original tutorial Here
Sweety has the permission of the tubers to use their tubes.
You can find the banners of these tubers in the left column
of her blog, under the heading "autorisations"

some of the tubes Sweety uses were received in sharing
groups
or found on the web
if one of them is your property, please let us know
a link to your site will be added
they are provided as « single-use » for
this tutorial
you are not allowed to share or use them for another purpose.
you are not allowed to present them on your site, blog
or forum
This tutorial is a personal creation,
any resemblance with another one would be pure coincidence

Thank you to the tubers for their great job
they make our creations possible

translator’s note : This translation is my property,
it is strictly forbidden to copy or distribute it on the Net
Thanks to Sweety for her kind permission
Sweety works with PSPX2, I work with PSP2018, but it is possible to use
another version.
tubes without tuber‘s watermark are ALWAYS stolen tubes
Please respect the tuber ‘s work
do like me : choose tubes with a watermark and give credit to the tuber
Thank you ! have fun...

Hints and Tips
TIP 1 -> if you don’t
want to install a font -->
open it in a software as « Nexus Font » (or
other font viewer software of you choice)
as long as both windows are opened (software and font),
your font will be available in your PSP
TIP 2 -> from PSPX4,
in the later versions of PSP the functions « Mirror » and « Flip » have
been replaced by -->
« Mirror » --> image -> mirror -> mirror horizontal
« Flip » --> image -> mirror -> mirror vertical

Material
color palette - decoration

you will need a character tube and various decoration
tube (ot provided)
the character tube used in this version is created
by Colybrix, and the vase by Babette
to create my personal version, I used a character tube
created by Ladybird and a decoration tube created by Tine

Plugins
Funhouse -> ZigZaggerate - Filter Factory
-> Gallery B -> Button De Luxe

Thank you to Tine for her permission to use her filters
page


Colors
foreground color -> FG -> color 1 -> #446a5f
background color -> BG-> color 2 -> #b8ddd6
color 3 -> #e2c3bf

you will need about 1 hour to create your tag (not
counting the time to choose your tubes)
according to the version of PSP you use, your tag
might be slightly different from the example
 
Use the pencil to follow the steps
hold down left click to grab it and move it
 |
 
Realization
1
pick up 2 colors into you tubes -> FG / dark color - BG
-> light color
open a new transparent image 900 * 600 px
selections -> select all
copy paste into selection the character tube
selections -> select none
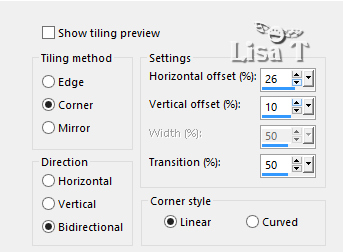
effects -> image effects -> seamless tiling
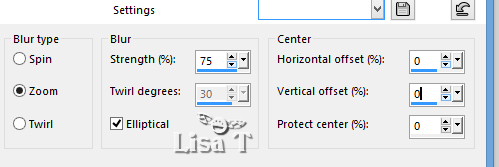
adjust -> blur -> radial blur
2
layers -> duplicate
image -> mirror -> mirror horizontal
layers -> merge -> merge down
layers -> new raster layer
flood fill selection with FG color
layers -> arrange -> send to bottom
layers -> merge -> merge all (flatten)
effects -> plugins -> Funhouse -> ZigZaggerate

copy paste as new image -> set aside for a later
use
3
optional step if you don’t like the colors
in the layers palette, right click on the layer and promote
background layer
layers -> new raster layer
layers -> arrange -> send to bottom
flood fill tis layer with FG color
highlight top layer and set the blend mode on Luminance
(Legacy) (or other)
layers -> merge -> merge down
4
enable selection tool -> custom selection

selections -> promote selection to layer
selections -> select none
effects -> plugins -> Filter Factory / Gallery B
/ Button De Luxe
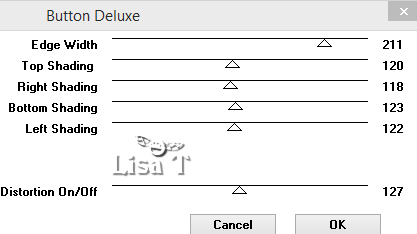
effects -> edge effects -> enhance
layers -> duplicate
image -> mirror -> mirror horizontal
layers -> merge -> merge down
set the blend mode on Luminance (Legacy) (or other)
5
selections -> load selection -> from disk -> selection
1
layers -> new raster layer
copy / paste into selection the image you set aside in
step 2
selections -> modify -> contract / 20 px
DELETE on your keyboard
selections -> invert
effects -> 3D effects -> drop shadow -> 0 / 0
/ 50 10 / black
selections -> invert
selections -> modify -> contract / 20 px
selections -> invert
effects -> 3D effects -> drop shadow -> 0 / 0
/ 50 10 / black
selections -> invert
copy / paste into selection the image you set aside instep
2
selections -> modify -> contract / 20 px
DELETE on your keyboard
selections -> invert
effects -> 3D effects -> drop shadow -> 0 / 0
/ 50 10 / black
selections -> invert
selections -> modify -> contract / 20 px
selections -> invert
effects -> 3D effects -> drop shadow -> 0 / 0
/ 50 10 / black
selections -> select none
don’t close the image you set up in step 2, you will
need it once more
6
selections -> load selection -> from disk -> selection
2
copy / paste as new layer the flower tube (or other decoration
of your choice)
resize if necessary
place the tube properly in the middle of the selection
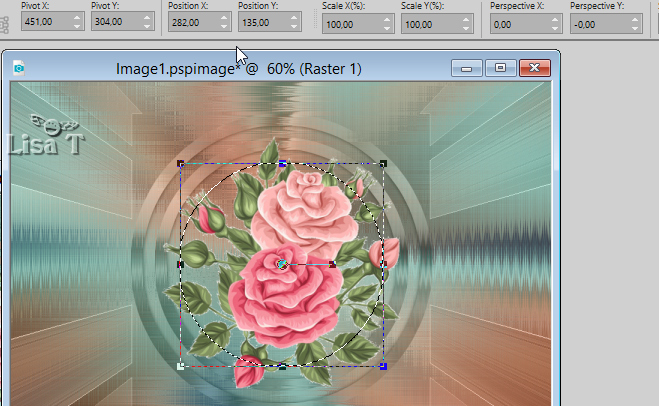
if necessary : selections -> invert
DELETE
layers -> arrange -> move down
opacity of the layer between 65% and 70%
selections -> select none
your work looks like this

7
Raster 3 is highlighted
highlight Raster 1
layers -> merge -> merge down
highlight middle layer (promoted selection)
effects -> 3D effects -> drop shadow -> 0 / 0
/ 50 10 /BG color
your work looks like this

8
layers -> new raster layer
enable selection tool -> custom selection
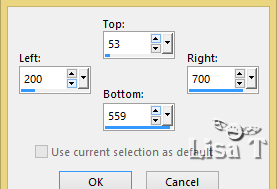
copy / paste into selection « Deco perso 1 »
selections -> select none
blend mode of the layer : Luminance (Legacy) (or other)
(translator’s note : I left blend mode on normal to keep original colors to the flowers and the frame)
layers -> duplicate
highlight Raster 3
image -> resize -> untick « resize all
layers -> 98%
layers -> merge -> merge down
image -> resize -> untick « resize all layers
-> 85%
9
your work looks like this

highlight Raster 1
layers -> duplicate
image -> resize -> untick « resize all layers
-> 75%
image -> free rotate
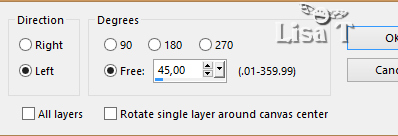
10
highlight bottom layer
selections -> load selection -> from disk -> selection
3
layers -> new raster layer
selections -> invert
copy / paste the flower tube into selection
opacity of the layer between 25% and 30%
selections -> select none
11
selections -> load selection -> from disk -> selection
4
layers -> new raster layer
layers -> arrange -> move down
copy / paste the flower tube into selection
opacity of the layer between 40% and 45%
selections -> select none
layers -> duplicate
image -> mirror -> mirror horizontal
layers -> merge -> merge down
12
your work looks like this

image -> add borders -> tick « symmetric » -> 2
px color 3
selections -> select all
image -> add borders
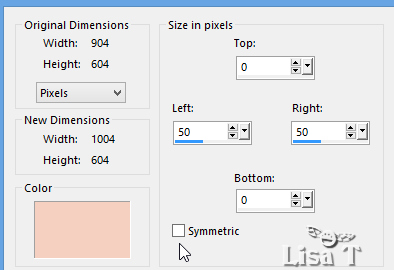
effects -> image effects -> seamless tiling
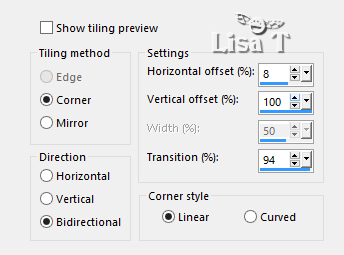
selections -> invert
selections -> promote selection to layer
selections -> select none
13
enable selection tool -> custom selection
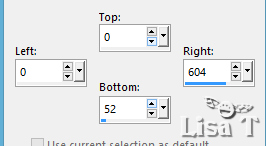
DELETE
selections -> select none
image -> mirror -> mirror horizontal
layers -> merge -> merge down
image -> add borders
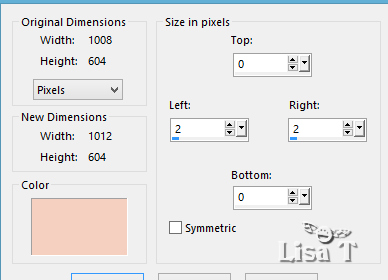
Decoration
copy / paste as new layer the character tube
resize if necessary
place where you like and drop a shadow of you choice
add the decorations and elements you want
final step
image -> add borders -> tick « symmetric » -> 2
px FG color
apply your watermark or signature
layer s-> merge -> merge all (flatten)
save your work as... type .jpeg
your tag is finished
 
To write to Sweety

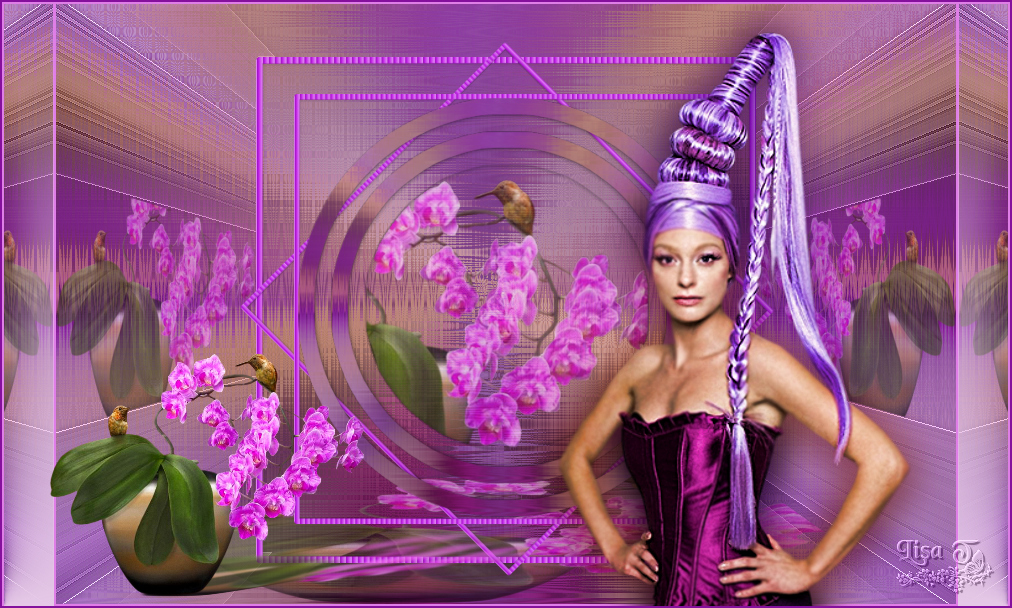
My personal version with tubes signed by Ladybird and
Tine

Back to the boards of Sweety’s tutorials
board 1 board 2 board 2 board 3 board 3

|