
You will find the original tutorial Here

Sweety has the permission of the tubers to use their tubes.
You can find the banners of these tubers in the left column
of her blog, under the heading "autorisations"

some of the tubes Sweety uses were received in sharing
groups
or found on the web
if one of them is your property, please let us know
a link to your site will be added
they are provided as « single-use » for
this tutorial
you are not allowed to share or use them for another purpose.
you are not allowed to present them on your site, blog
or forum
This tutorial is a personal creation,
any resemblance with another one would be pure coincidence

Thank you to the tubers for their great job
they make our creations possible

translator’s note : This translation is my property,
it is strictly forbidden to copy or distribute it on the Net
Thanks to Sweety for her kind permission
Sweety works with PSPX2, I work with PSP2018, but it is possible to use
another version.
tubes without tuber‘s watermark are ALWAYS stolen tubes
Please respect the tuber ‘s work
do like me : choose tubes with a watermark and give credit to the tuber
Thank you ! have fun...

Hints and Tips
TIP 1 -> if you don’t
want to install a font -->
open it in a software as « Nexus Font » (or
other font viewer software of you choice)
as long as both windows are opened (software and font),
your font will be available in your PSP
TIP 2 -> from PSPX4,
in the later versions of PSP the functions « Mirror » and « Flip » have
been replaced by -->
« Mirror » --> image -> mirror -> mirror horizontal
« Flip » --> image -> mirror -> mirror vertical

Material
decoration - selection

to prevent from the theft of tubes, they are not
provided any longer
you will have to use your personal bank of images
prepare a landscape image - decorations -
translator’s note : I
used one of my tubes (under the heading : "children"
)
you can download it for free HERE

Plugins
Mura’s Meister - VM Natural - Filter’s
Unlimited 2.0 / VM Stylize

Filters
Mura’s Meister - VM
Natural - Filter’s Unlimited 2.0 / VM Stylize
Thank
you to Tine for her permission to use her filters page


Colors
foreground color -> FG -> color 1 -> #9566521
background color -> BG-> color 2 -> #ebcdcd

you will need about 1 hour to create your tag (not
counting the time to choose your tubes)
according to the version of PSP you use, your tag
might be slightly different from the example

Use the pencil to follow the steps
hold down left click to grab it and move it
 |

Realization
1
open the landscape image (or any other image of your
choice)
pick up 2 colors into this image
into the materials palette, set the dark color into
the FG box, and the light color into the BG box
or you may use Sweety’s colors
open a new transparent image 900 * 600 pixels
effects -> plugins -> Mura’s Meister

effects -> image effects -> seamless tiling

effects -> art media effects -> brush strokes

2
selections -> select all
selections -> modify -> contract / 50 pixels
selections -> invert
effects -> 3D effects -> drop shadow -> 0 / 0
/ 60 / 30 / black
layers -> new raster layer
copy / paste into selection the landscape image
blend mode of the layer : Luminance (Legacy) - (optional)
- opacity : 25% (optional)
effects -> user defined filter ->

selections -> select none
3
layers -> new raster layer
selections tool -> custom selection

flood fill selection with color 1
selections -> modify -> contract / 15 pixels
DELETE on your keyboard
layers -> new raster layer
layers -> arrange -> move down
copy / paste into selection the landscape image
selections -> invert
effects -> 3D effects -> drop shadow -> 0 / 0
/ 60 / 30 / black
4
highlight top layer (raster 3)
selections -> select none
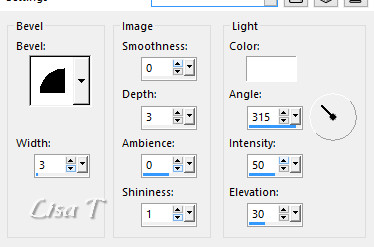
effects -> 3D effects -> inner bevel

layers -> merge -> merge down
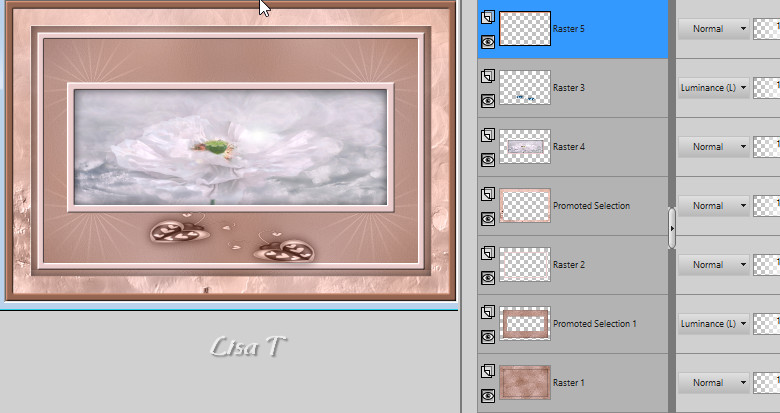
your tag and layers palette look like this

highlight bottom layer (Raster 1)
selections -> select all
selections -> modify -> contract / 50 pixels
selections -> invert
selections -> promote selection to layer
selections -> select none
highlight Raster 2 (just above)
layers -> merge -> merge down
5
your tag and layers palette look like this

highlight Raster 1 (bottom layer)
selections -> load selection from disk -> selection
1
selections -> promote selection to layer
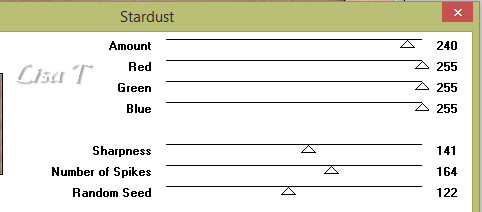
effects -> plugins -> VM Natural / Stardust

selections -> select none
layers -> duplicate
image -> mirror -> mirror horizontal
opacity of the layer : 50%
layers -> merge -> merge down
blend mode of the layer : Luminance (Legacy) - or other....
(optional)
layers -> duplicate
image -> mirror -> mirror vertical
effects -> image effect s-> offset -> H :
0 / V : 12 / custom / transparent
opacity of the layer : 50%
layers -> merge -> merge down
adjust -> sharpness -> sharpen
6
your tag and layers palette look like this

layers -> new raster layer
selections tool -> custom selection

flood fill selection with color 1
selections -> modify -> contract / 13 pixels
DELETE
selections -> select none
effects -> 3D effects -> inner bevel as in step 4
7
highlight top layer
layers -> new raster layer
selections tool -> custom selection

copy / paste into selection a « heart tube » of
your choice (or another tube of course)
if necessary -> blend mode set on Luminance (Legacy)
- (or colorize)
selections -> select none
effects -> 3D effects -> drop shadow of your choice
selections -> select all
layers -> new raster layer
copy / paste into selection the Deco perso provided (frame)
if necessary -> blend mode set on Luminance (Legacy)
- (or colorize)
selections -> select none
8
your tag and layers palette look like this

top layer is highlighted
layers -> new raster layer
selections tool -> custom selection

copy / paste into selection a « heart tube » of
your choice (or another tube of course)
if necessary -> blend mode set on Luminance (Legacy)
- (or colorize)
selections -> select none
effects -> 3D effects -> drop shadow of your choice
layer-> merge -> merge visible
9
layers -> duplicate
image -> resize -> untick « resize all
layers » -> 90%
effects -> image effects -> offset -> H :
0 / V : 30
highlight « merged » layer (just
underneath)
effects -> plugins -> Mura’s Meister / Perspective
Tiling

layers -> arrange -> bring to top
highlight layer underneath (copy of merged)
enable the Pick tool (K key on your keyboard) and stretch
the layer to the right and to the left

selections -> select all
layers -> new raster layer
layers -> arrange -> bring to top
copy / paste into selection the Deco perso provided (frame)
selections -> select none
blend mode set on Luminance (Legacy) (optional)
selections -> select all
selections -> float - selections -> defloat
effects -> 3D effects -> drop shadow -> 0 / 0
/ 50 / 25 / black
selections -> select none
10
copy / paste your character tube as new layer - resize
if necessary
place it where you like
drop a shadow of your choice
add decorations if you wish
layers -> merge -> merge visible
layers -> duplicate
image -> resize -> untick « resize all layers » -> 90%
highjlight bottom layer (merged)
effects -> plugins -> Unlimited 2 -> VM
Stylize / Zoom Blur

11
image -> add borders -> 2 pixels color 1
apply your watermark
image -> resize -> 950 pixels (width)
adjsut -> sharpness -> sharpen
file -> save as... type .jpeg
your tag is finished

To write to Sweety


Back to the boards of Sweety’s tutorials
board 1  board
2 board
2  board
3 board
3 

|