Tutorial
100

You will find the original tutorial Here
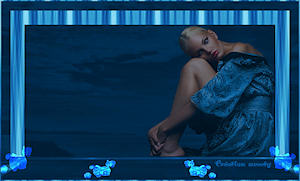
Sweety
has the permission of the tubers to use their tubes.
You can find the banners of these tubers in the left column
of her blog, under the heading "autorisations"

the tubes Sweety uses were received in sharing groups
the main ones are not provided anymore (to prevent the
theft of tubes on the web)
we only provide selections, decorations and small elements
This tutorial is a personal creation,
any resemblance with another one would be pure coincidence

Thank you to the tubers for their great job
they make our creations possible

translator’s note : This translation is my property,
it is strictly forbidden to copy or distribute it on the Net
Thanks to Sweety for her kind permission
Sweety works with PSPX2, I work with PSPX9, but it is possible to use another
version.
tubes without tuber‘s watermark are ALWAYS stolen tubes
Please respect the tuber ‘s work
do like me : choose tubes with a watermark and give credit to the tuber
Thank you ! have fun....

Material
colors - decorations - selections

not provided -> 1 character (woman or other) - image,
or landscape - decoration (flowers, vase..)
copy / paste selections into the folder « selections » or
Corel PSP genera folder (into Documents)
duplicate all tubes and decorations, work with the copies
to preserve originals in case you have to redo you work
thank you to Cickadesign and Marie-Liberté for their beautiful
tubes used in the top version

Plugins
DCSpecial (Crystal) - Simple (Zoom Out Ans Flip) - Unlimited
2 (&<Bkg Designers/sf10II - VM Stylize/Zoom
Blur)

Thank you to Tine for her permission to use her filters
page


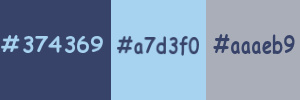
Colors
foreground color -> FG -> color 1 -> #374369
background color -> BG-> color 2 -> #a7d3f0
color 3 -> #aaaeb9
you will need about 1 hour to create your tag (not counting
the time to choose your tubes)
according to the version of PSP you use, your tag might
be slightly different from the example

Use the pencil to follow the steps
hold down left click of your mouse to grab it and move
it


Realization
1
open the image (landscape or Flower)
pixk up 2 colors (FG : light color - BG :
dark color)
open a new transparent layer 950 * 600 pixels
selections -> select all
copy / paste the image into selection
selections -> select none
2
effects -> image effects -> seamless tiling
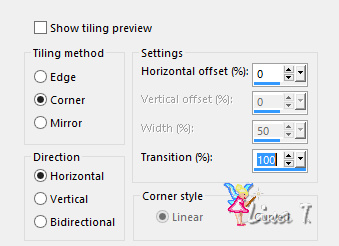
redo the same effect with the following settings
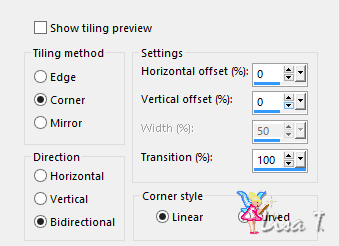
adjust -> blur -> gaussian blur -> 10
3
effects -> plugins -> Unlimited 2 -> DCSpecial
-> Crystal
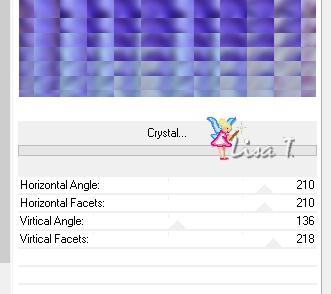
adjust -> sharpness -> sharpen
layres -> duplicate
selections -> load-save selection -> from disk -> selection
1
selections -> promote selection to layer
selections -> select none
image -> free rotate
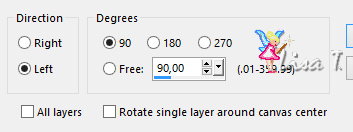
image -> resize -> uncheck « resize all
layers » -> 80%
4
your work looks like this
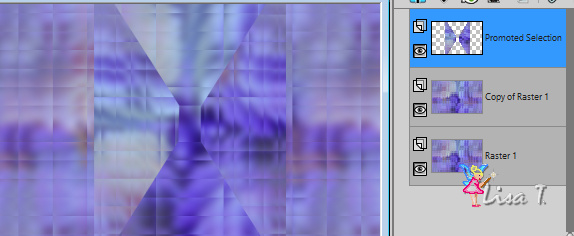
top layer is highlighted (promoted selection)
layers -> merge -> merge down
effects -> reflection effects -> rotating mirror
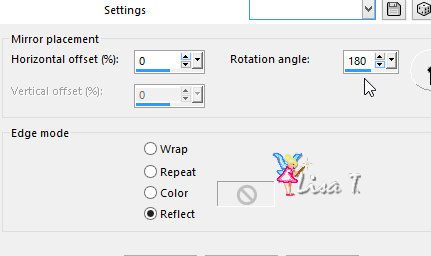
effects -> plugins -> Simple -> Zoom Out And
Flip
effects -> 3D effects -> drop shadow -> 10 /
10 / 50 / 10 / black
5
selections -> load-save selection -> from disk -> selection
2
highlight bottom layer (Raster 1)
layers -> new raster layer
copy / paste into selection the image (landscape or other)
effects -> art media effects -> brush strokes
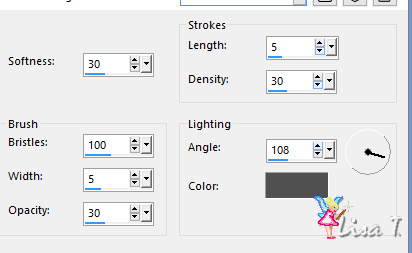
selections -> select none
6
highlight top layer (copy of Raster 1)
activate selections tool -> custom selection
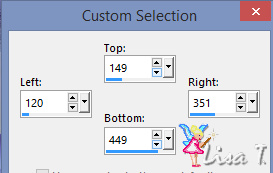
selections -> promote selection to layer
activate your image and apply the effects -> image -> mirror
-> mirror horizontal
edit -> copy
then undo this effect on the image (for a later use)
back on your work
layers -> new raster layer
edit -> paste into selection
selections -> invert
effects -> 3D effects -> drop shadow -> 10 /
10 / 50 / 10 / black *** -10 /
-10 / 50 / 10 / black
selections -> select none
7
your work looks like this
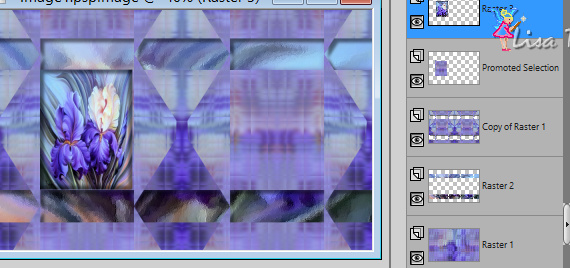
top layer is highlighted (Raster 3) -> lower the opacity
to 75%
layers -> merge -> merge down
copy / paste decoration 1 as new layer
effects -> image effects -> offset
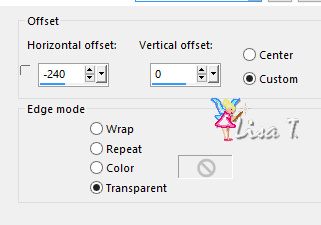
layers -> merge -> merge down
layers -> duplicate
image -> mirror -> mirror horizontal
layers -> merge -> merge down
8
selections -> load-save selection -> from disk -> selection
3
highlight layer below (Copy of Raster 1)
selections -> promote selection to layer
selections -> select none
layers -> duplicate
image -> mirror -> mirror horizontal
layers -> merge -> merge down
selections -> load-save selection -> from disk -> selection
4
DELETE
selections -> select none
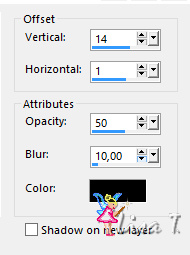
effects -> 3D effects -> drop shadow -> 14 /
1 / 50 / 10 / black *** -14 /
-1 / 50 / 10 / black
9
selection tool -> custom selection
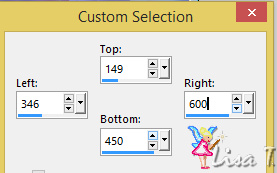
highlight the layer below (Copy of Raster 1)
selections -> promote selection to layer
layers -> new raster layer
copy / paste the image into selection
lower the opacity of this layer to 75%
selections -> select none
copy / paste decoration 1 as new layer
don’t move it
10
your work looks like this
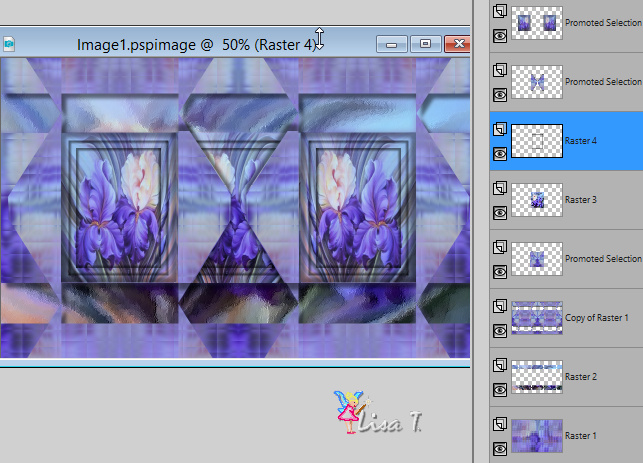
Raster 4 is highlighted
layers -> merge -> merge down twice
image -> add borders -> 3 pixels BG color
11
layers -> duplicate
image -> resize -> 95%
effects -> distortion effects -> lens distortion
as before
your work looks like this
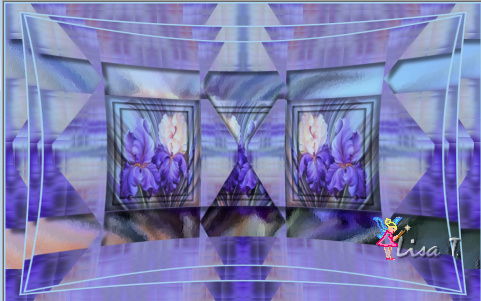
effects -> 3D effects -> drop shadow -> 10 /
10 / 50 / 10 / black
apply the same shadow on the layer below (Copy of Background)
12
highlight top l ayer (copy 2 of background)
copy / paste as new layer decoration 2
colorize if necessary or set the blend mode on « Luminance
(Legacy) »
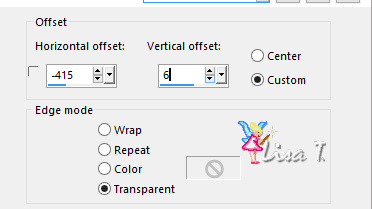
effects -> image effects -> offset
layers -> duplicate
image -> mirror -> mirror horizontal
layers -> merge -> merge down
set the blend mode as you like. Sweety chose « Luminance
(Legacy) » for her second version
*************
another option : selections -> select all
selections -> float - selections -> defloat
layers -> new raster layer
layers -> arrange -> move down and flood fill with
one of your colors
highlight layer above again and set the blend mode on « Luminance
(Legacy) » (or other)
selections -> select none
layers -> merge -> merge down
*************
effects -> 3D effects -> drop shadow -> 0 / 0
/ 80 / 40 / black
right click on bottom layer and promote background layer
13
layers -> merge -> merge visible
edit -> COPY
selections -> select all
image -> add borders -> 60 pixels (any color)
selections -> invert
edit -> paste into selection
adjust -> blur -> radial blur
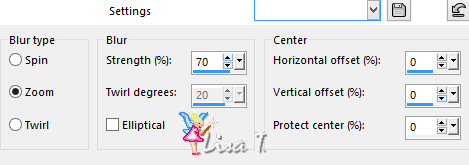
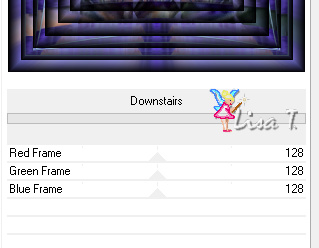
effects -> plugins -> Ulimited 2 -> &<Bkg
Designers sf10II> -> Downstairs
selections -> invert
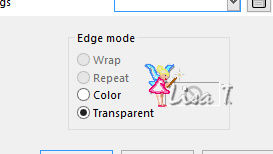
effects -> geometric effect s-> circle (check « Transparent »)
layers -> promote background layer
selections -> invert
effects -> 3D effects -> drop shadow -> 0 / 0
/ 100 / 50 / black
selections -> select none
14
highlight bottom layer
selection tool -> custom selection
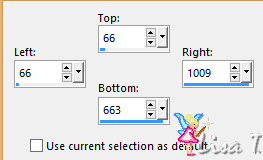
layers -> new raster layer
flood fill with BG color
effects -> texture effects -> blinds / color 1

lower the opacity of the layer to 35%
selections -> select none
optional :blend mode on Luminance (Legacy) or other
of your choice
selections -> load-save selection -> from disk -> selection
5
highlight bottom layer
edit -> copy into selection the landscape image (Background
image)
effects -> 3D effects -> inner bevel
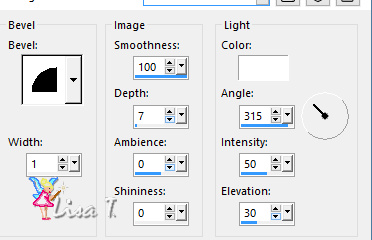
apply this effect once more
selections -> select none
copy / paste decoration 3 as new layer
don’t move it
15
in the layers palette, decoration 3 is highlighted
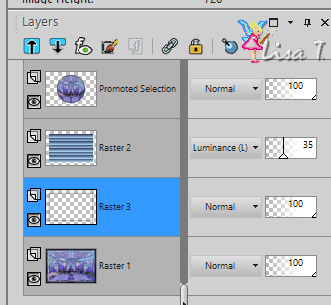
highlight bottom layer (Background)
selections -> select all
selections -> modify -> contract : 25 pixels
selections -> invert
copy / paste your background image into selection
effects -> plugins -> Unlimited 2 -> VM Stylize
/ Zoom Blur
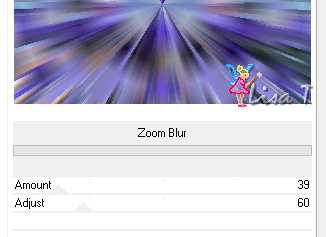
selections -> promote selection to layer
selections -> select none
image -> add borders -> 3 pixels BG color
16
selections -> select all
image -> add borders -> BG color -> ...
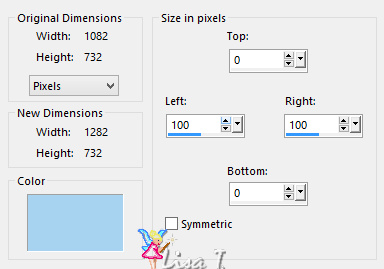
edit -> copy
selections -> select none
activate selection tool -> custom selection
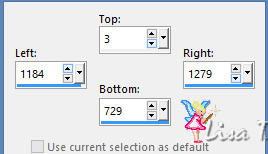
edit -> paste into selection
selections -> promote selection to layer
effects -> geometric effects -> Perspective Horizontal
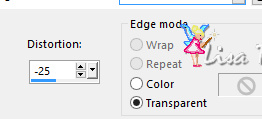
selections -> select none
layers -> duplicate
image -> mirror -> mirror horizontal
layers -> merge -> merge down
Decoration
copy / paste your character tube (or other tube of your
choice of course) as new layer
move it where you like
drop a shadow of your choice
do the same for other decorations if you add some
Final Step
image -> add borders -> 3 pixels -> FG
color
image -> resize (if necessary) -> check « resize
all layers » -> give the size you like
file -> expàort -> type .jpeg optimized /
20
your tag is finished
Thank you to Maryvonne, who tests my tutorials, for her
kindness and patience !!

we hope you had pleasure following this tutorial
don’t hesitate so send your creations to Sweety
it will be her reward and pleasure to present them on her
site
To write to Sweety


My tag with my tubes


don't hesitate to send your creations to Sweety, she will
present them on the Gallery of this tutoriel


Back to the boards of Sweety’s tutorials
board 1  board
2 board
2  board
3 board
3 

|