

You will find the original tutorial here :
This tutorial is a personal creation.
Any resemblance with another one would be only pure
coincidence.
It is stricly forbidden to modify tubes, to change
their name or take off the matermarks,
To present them on your sites or blog,
To share them in groups,
to make a bank of images, or to use them on lucrative purposes.

Thank you to respect Shawnee’s work and the tubers
work.
Don’t hesitate to warn me if you have any trouble
with this translation,
and I’ll try to fix the problem as quickly as I can

I used PSP 2020 to create my tag and make the translation
you can follow this tutorial with another version
of PSP, but the result might be slightly different

Supplies
2 masks - tubes – palette - Shawnee’s watermark
- heart Frames - colors palette

TIP 1 -> if you don’t want to install a font -->
open it in a software as « Nexus Font » (or
other font viewer software of you choice)
as long as both windows are opened (software and font),
your font will be available in your PSP
TIP 2 -> from PSPX4, in the later versions of PSP the
functions « Mirror » and « Flip » have
been replaced by -->
« Mirror »has become --> image => mirror => mirror
horizontal
« Flip » has become --> image => mirror => mirror
vertical

Plugins needed
It@lian Effect > Effeto Fantasma
AAA Frame > foto frame
AAA Frame > Texture
Mura's Meister > perspective Tiling
Alien Skin Eye candy 5 impact > perspective shadow
Alien Skin Eye candy 5 texture > Stone Wall
DC Spécial > Book
Thank you Renée Salon for sharing your plugins page


Use the pencil to mark your place
along the way
hold down left click to grab and move it
 |

Prepare your work !
duplicate all the tubes (Shift + D) and work with
the copies to preserve originals
save your work often in case of problems with your psp
use the Dropper tool to pick up your colors into your tubes
and misted images
don’t forget to erase the tuber’s watermark
Shawnee chose these :
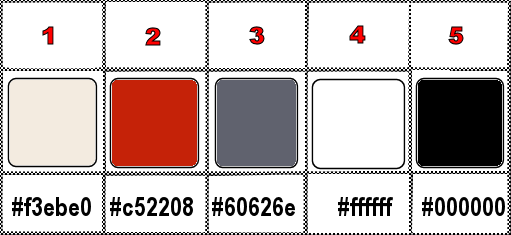
don’t hesitate to change blend modes and opacities
of the layers to match your personal colors and tubes
open the masks and minimize to tray
1
open a new image => transparent => 900 * 650
px
flood fill with color 1
layers => new raster layer
selections => select all
copy / paste the frame « T49 St Valentin » into
selection
Shawnee provides an empty frame in case you want to change
the background image
selections => select none
2
effects => image effects => seamless tiling => default
settings
adjust => blur => gaussian blur => 20
layers => merge => merge all (flatten)
layers => promote background layer
3
layers => duplicate
effects => texture effect => Fine Leather /
color 1
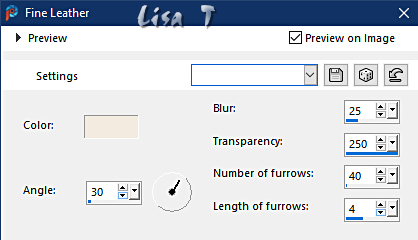
blend mode of the layer : Overlay / opacity : 77%
4
layers => duplicate
effects => plugins => Mura’s Meister => Perspective
Tiling
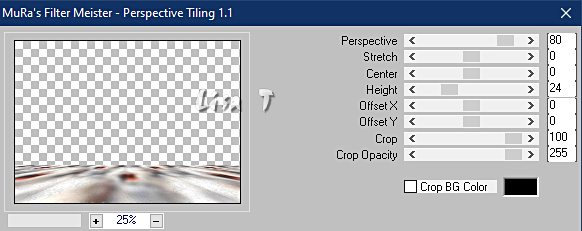
enable the Magic Wand tool / feather 60% and select the
transparent part
hit 5 times the DELETE key of your keyboard
selections => select none
don’t forget to reset feather of the Magic Wand to
0
effects => reflection effects => rotating Mirror
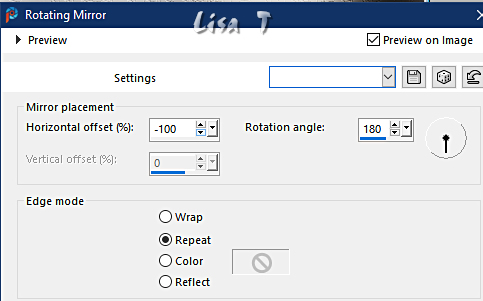
5
highlight Raster 1
layers => new raster layer
flood fill with color 2
layers => new mask layer => from image => choose
mask 3(63)
layers => merge => merge group
6
effects => edge effects => enhance
effects => image effects => seamless tiling
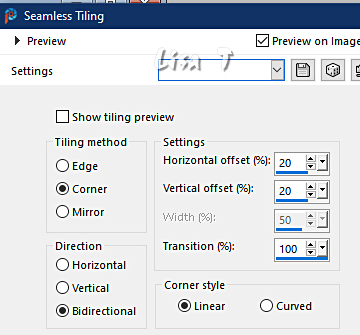
7
highlight « copy 2 of Raster 1 » (the
background)
layers => duplicate
layers => merge => merge down
8
layers => new raster layer
flood fill with color 2
layers => new mask layer => from image => choose
mask coeur
image => mirror => mirror horizontal
layers => merge => merge group
9
layers => arrange => move down
effects => edge effects => enhance
10
highlight top layer
at this point, you have two choices
1st choice => open the Frame T49 St Valentin
(the one you prefer, with or without the image, so you
can place your own image)
copy / paste on your main work
image => resize => untick « resize all layers » => 50%
enable the Pick tool with the following settings, to move
the layer acurately => position X : 331 / position
Y : 8
hit the « M » key of your keyboard to disable
the tool
layers => duplicate
image => free rotate / left / 40
enable the Pick tool with the following settings, to move
the layer acurately => position X : 90 / position Y
: 76
layers => duplicate
image => mirror => mirror horizontal
enable the Pick tool with the following settings, to move
the layer acurately => position X : 464 / position
Y : 82
layers => merge => merge down TWICE
effects => 3D effects => drop shadow => -10 /
7 / 65 / 12 / black
2nd choice => open 3 Frames
objects => align => top
effects => 3D effects => drop shadow => -10 /
7 / 65 / 12 / black
une fois que vous avez terminé l’un des deux
choix, poursuivez ci-dessous
layers => duplicate
highlight layer just below (the original)
effects = > plugins => It@lian Editors Effects /
Effeto Fantasma / 41 * 41
11
highlight top layer
copy / paste the couple tube as new layer
enable the Pick tool with the following settings, to move
the layer acurately => position X : 54 / position Y
: 79
effects => 3D effects => drop shadow => -10 /
7 / 65 / 12 / black
effects => plugins => Alien Skin Eye Candy 5 Impact
/ Perspective Shadow
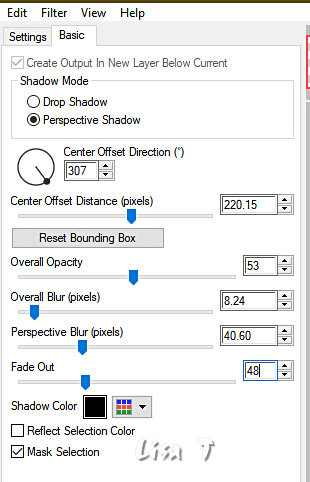
translator’s
note => I
used different settings, see screenshot below
12
copy / paste the dogs tube as new layer
image => resize => untick « resize all layers » => 50%
place properly (see final result)
effects => 3D effects => drop shadow => -5 / 3
/ 80 / 25 / black
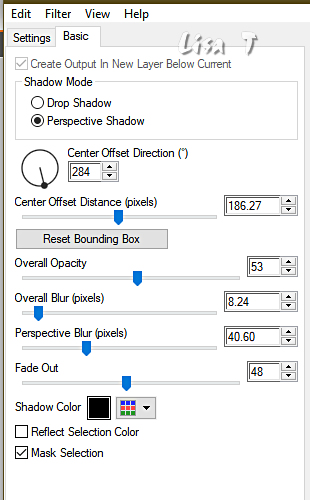
effects => plugins => Alien Skin Eye Candy 5 Impact
/ Perspective Shadow
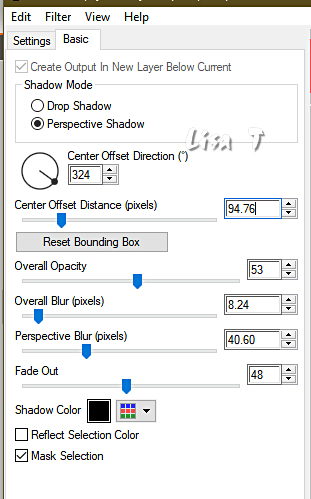
translator’s note => I
used different settings, see screenshot below
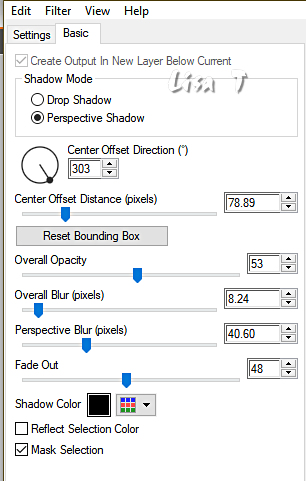
13
copy / paste the text tube as new layer
image => resize => untick « resize all layers » => 65%
enable the Pick tool with the following settings, to move
the layer acurately => position X : 691 / position
Y : 115
effects => User Defined Filter => Emboss 3
effects => 3D effects => drop shadow => -5 / 3
/ 80 / 25 / black
14
image => add borders => tick « symmetric » => ...
1 px color 3
10 px color 2
2 px color 3
selections => select all
15
image => add borders => tick « symmetric » => 55
px white
selections => invert
16
effects => plugins => Alien Skin Eye Candy 5 => Textures
/ Stone Wall
settings tab => Stained Glass Red
Basic tab => colors 2 and 3
lighting tab => white
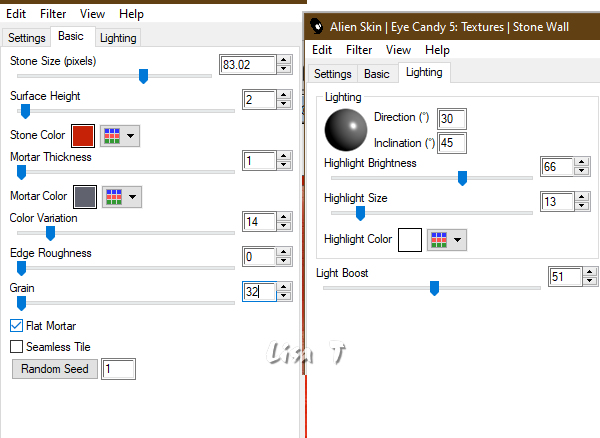
17
selections => invert
effects => 3D effects => drop shadow => 0 / 0
/ 100 / 35 / black
18
selections => invert
effects => plugins => AAA Frames => Texture Frame
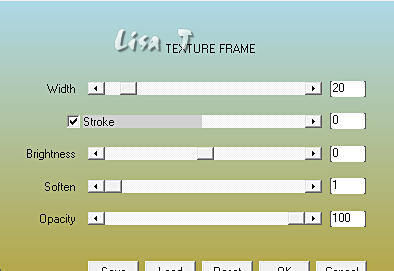
19
effects => plugins => DC Special => Book

selections => select none
20
effects => plugins => AAA Frames => Foto Frame
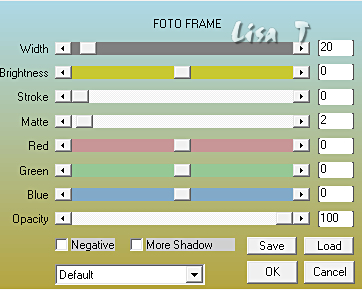
copy / paste the hearts frame you like (match the color
with your personal colors) as new layer
21
apply Shawnee’s Watermark
apply your watermark or signature
write your licence number if you used a licenced tube
layers => merge => merge all (flatten)
adjust => sharpness => unsharp mask / Soft
resize if you wish and save as ... type .jepg

Another version with
my tubes


Don't hesitate to write to me if you have any trouble
with this tutorial
If you create a tag (using other tubes than those provided)
with this tutorial
and wish it to be shown, send it to Shawnee !
It will be a real pleasure for her to add it to the gallery
at the end of the tutorial


back to the boards of Shawnee’s tutorials
20 tutorials on each board
board 3 => 
at the bottom of each board you will find the arrows
allowing you to navigate from one board to another


|