

You will find the original tutorial here :
This tutorial is a personal creation.
Any resemblance with another one would be only pure
coincidence.
It is stricly forbidden to modify tubes, to change
their name or take off the matermarks,
To present them on your sites or blog,
To share them in groups,
to make a bank of images, or to use them on lucrative purposes.

Thank you to respect Shawnee’s work and the tubers
work.
Don’t hesitate to warn me if you have any trouble
with this translation,
and I’ll try to fix the problem as quickly as I can

I used PSP 2020 to create my tag and make the translation
you can follow this tutorial with another version
of PSP, but the result might be slightly different

Supplies
1 mask - tubes – palette - Shawnee’s watermark – selections

TIP 1 -> if you don’t want to install a font -->
open it in a software as « Nexus Font » (or
other font viewer software of you choice)
as long as both windows are opened (software and font),
your font will be available in your PSP
TIP 2 -> from PSPX4, in the later versions of PSP the
functions « Mirror » and « Flip » have
been replaced by -->
« Mirror »has become --> image => mirror => mirror
horizontal
« Flip » has become --> image => mirror => mirror
vertical

Plugins needed
Eye Candy 5 Impact
Thank you Renée Salon for sharing your plugins page


Use the pencil to mark your place
along the way
hold down left click to grab and move it
 |

Prepare your work !
duplicate all the tubes and work with the copies
to preserve originals
save your work often in case of problems with your psp
use the Dropper tool to pick up your colors into your tubes
and misted images
Shawnee chose these :
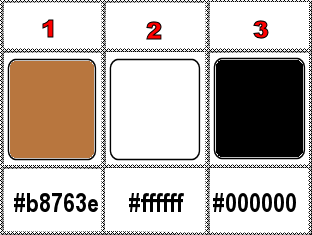
don’t hesitate to change blend modes and opacities
of the layers to match your personal colors and tubes
place the selections into the dedicated folder of My Corel
PSP General folder
open the mask and minimize to tray
1
open a new image => transparent => 900 * 650
px
selections => select all
copy / paste « Fond-T42 » into selection
selections => select none
2
selections => load-save selection => from disk => selection
#sél2-T42
selections => promote selection to layer
copy / paste the landscape tube as new layer
move into selection properly to add color to the selection
selections => invert
hit the DELETE key of your keyboard
selections => select none
3
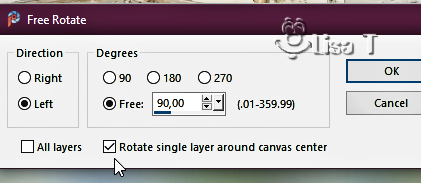
image => free rotate
effects => plugins => Tramages / Panel Stripes => 20
/ 132 / 70
enable the Pick tool with the following settings, to move
the layer acurately => position X : 125 / position
Y : -84
4
layers => duplicate
image => mirror => mirror horizontal
layers => merge => merge down
5
effects => image effects => seamless tiling => default
settings except Transition => 80
adjust => sharpness => sharpen
effects => 3D effects => drop shadow => 0 / 0
/ 80 / 45 / black
layers => duplicate
effects => reflection effects => kaleidoscope
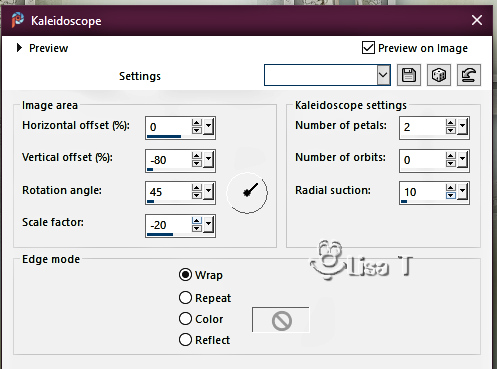
effects => image effects => seamless tiling
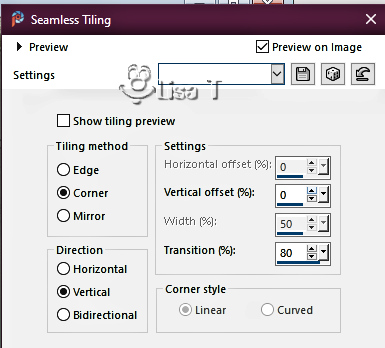
6
layers => new raster layer
flood fill white
layers => new mask layer => from image
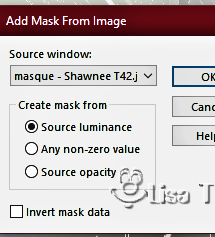
layers => merge => merge group
7
effects => image effects => seamless tiling => default
settings
layers => duplicate
effects => distortion effects => Ripple
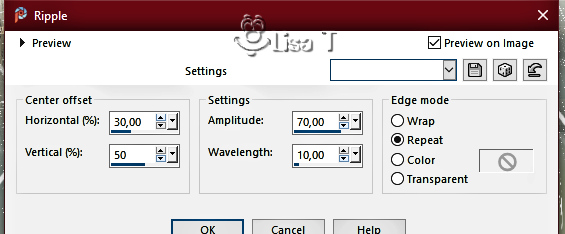
layers => merge => merge down
effects => 3D effects => drop shadow => 1 / 1
/ 80 / 1 / black
8
selections => load-save selection => from disk => selection
#sél1-T42
layers => new raster layer
copy / paste the landscape tube into selection
selections => select none
layers => merge => merge down
layers => arrange => move down twice
9
highlight top layer
image => add borders => tick « symmetric » => 1
px color 1
edit => COPY
edit => paste as new image
minimize to tray for a later use
10
back to your main work
image => add borders => tick « symmetric » => ...
5 px white
1 px color 1
10 px white
2 px color 1
10 px white
1 px color 1
11
selections => select all
image => add borders => tick « symmetric » => 50
px white
selections => invert
effects => plugins => Unlimited 2 => Horizonaus
mixed bag / Stripesareln / 100 / 100
selections => select none
12
enable the Magic Wand tool

and select both white bands on top and bottom of your
tag
paste into selection the image set aside in step 9
13
selections => select all
selections => modify => contract => 50 px
effects => 3D effects => drop shadow => 0 / 0
/ 100 / 40 / black
selections => modify => contract => 25 px
effects => 3D effects => drop shadow => 0 / 0
/ 100 / 40 / black
selections => select none
14
effects => plugins => AAA Frames => Foto Frame
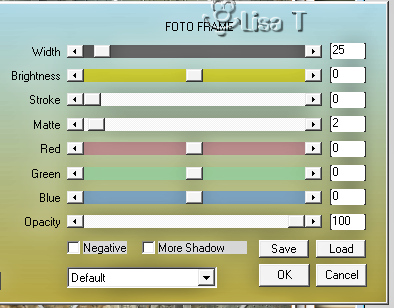
layers => merge => merge all (flatten)
15
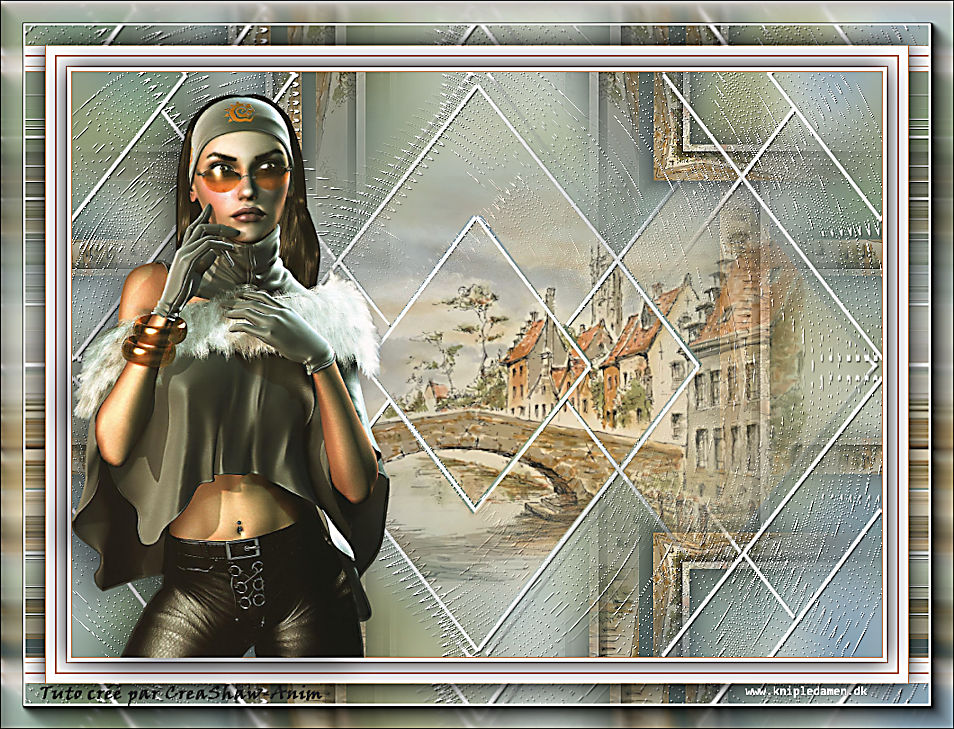
copy / paste the character tube as new layer
image => resize => untick « resize all layers » => 80%
image => mirror => mirror horizontal
enable the Pick tool with the following settings, to move
the layer acurately => position X : 81 / position Y
: 139
effects => 3D effects => drop shadow => -10 /
-15 / 45 / 45 / black or a dark color picked into you main
tube
16
copy / paste Shawnee’s watermark as new layer and
place properly
apply your watermark or signature
write your licence number if you used a licenced tube
image => add borders => tick « symmetric » => 1
px black
adjust => sharpness => unsharp mask / soft
image => resize => tick « resize all layers » => 800
px width (or other size if you prefer)

Another version with
my misted image and a tube created by Ladybird

created by  Birte Birte

Don't hesitate to write to me if you have any trouble
with this tutorial
If you create a tag (using other tubes than those provided)
with this tutorial
and wish it to be shown, send it to Shawnee !
It will be a real pleasure for her to add it to the gallery
at the end of the tutorial


back to the boards of Shawnee’s tutorials
20 tutorials on each board
board 3 => 
at the bottom of each board you will find the arrows
allowing you to navigate from one board to another


|