

You will find the original tutorial here :

This tutorial is a personal creation.
Any resemblance with another one would be only pure
coincidence.
It is stricly forbidden to modify tubes, to change
their name or take off the matermarks,
To present them on your sites or blog,
To share them in groups,
to make a bank of images, or to use them on lucrative purposes.

Thank you to respect Shawnee’s work and the tubers
work.
Don’t hesitate to warn me if you have any trouble
with this translation,
and I’ll try to fix the problem as quickly as I can

I used PSP 2020 to create my tag and make the translation
you can follow this tutorial with another version
of PSP, but the result might be slightly different

Supplies
tubes – palette - Shawnee’s watermark – selections
Shawnee's watermark

TIP 1 -> if you don’t want to install a font -->
open it in a software as « Nexus Font » (or
other font viewer software of you choice)
as long as both windows are opened (software and font),
your font will be available in your PSP
TIP 2 -> from PSPX4, in the later versions of PSP the
functions « Mirror » and « Flip » have
been replaced by -->
« Mirror »has become --> image => mirror => mirror
horizontal
« Flip » has become --> image => mirror => mirror
vertical

Plugins needed
It@lian Editors Effect > Effeto Fantasma
Unlimited 2 > Factory Gallery G > Xaggerate
Unlimited 2 > Factory Gallery F > Moiré blocks
AAA Frame > Foto FrameThank you Renée Salon for
sharing your plugins page


Use the pencil to mark your place
along the way
hold down left click to grab and move it
 |

Prepare your work !
duplicate all the tubes and work with the copies
to preserve originals
save your work often in case of problems with your psp
use the Dropper tool to pick up your colors into your tubes
and misted images
Shawnee chose these :
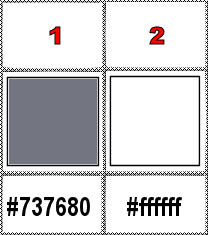
don’t hesitate to change blend modes and opacities
of the layers to match your personal colors and tubes
place the selections into the dedicated folder of My Corel
PSP General folder
1
open a new image => transparent => 900 * 650
px
selections => select all
copy / paste « T38 - Personnage printemps » into
selection
selections => select none
adjust => blur => gaussian blur => 25
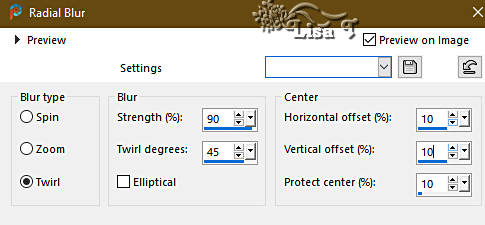
adjust => blur => radial blur
layers => merge => merge all (flatten)
2
effects => plugins => Unlimited 2 => Filter Factory
Gallery C / Xaggerate / default settings
3
layers => duplicate
effects => geometric effects => Circle / Transparent
4
effects = > plugins => It@lian Editors Effects /
Effeto Fantasma

5
layers => new raster layer
selections => load-save selection => from disk => selection
#1
highlight bottom layer
selections => promote selection to layer
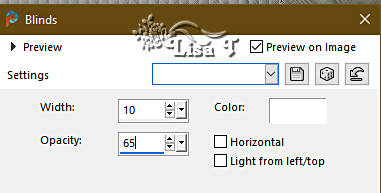
effects => texture effects => blinds / white
6
layers => duplicate
image => mirror => mirror horizontal
image => mirror => mirror vertical
selections => select none
7
layers => merge => merge down
8
highlight top layer
copy / paste « T38 - Figures de coin G » as
new layer
effects => 3D effects => drop shadow => 10 / 10
/ 80 / 25 / black
effects => 3D effects => drop shadow => -10 /
-10 / 80 / 25 / black
blend mode of the layer : Soft Light
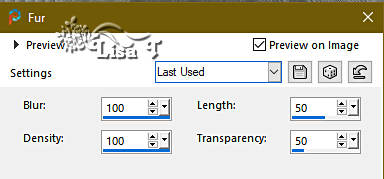
effects => texture effects => Fur
9
copy / paste « T38 - Figures coins D » as new
layer
effects => plugins => Unlimited 2 => Filter Factory
Gallery F / Moiré blocks
TN => some people have found
this filter in the G gallery
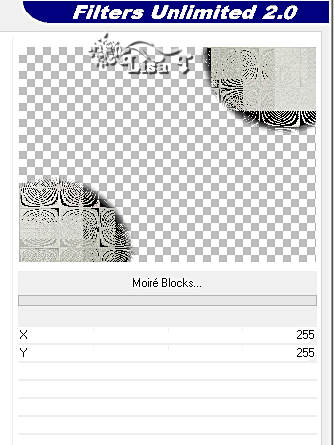
10
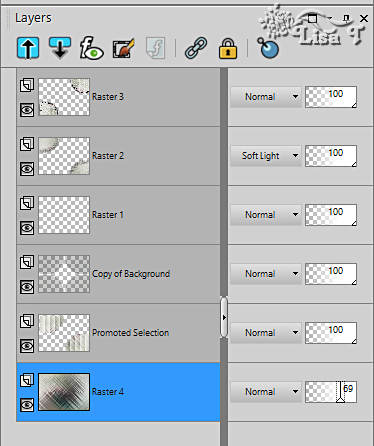
highlight bottom layer
opapcity of the layer => 69%
your layers palette looks like this
11
highlight the third layer from the bottom in the layer
stack
selections => load-save selection => from disk => selection
#2
12
layers => new raster layer
copy / paste « T38 - mist Fleurs 1 » into
selection
layers => new raster layer
effects => 3D effects => cutout
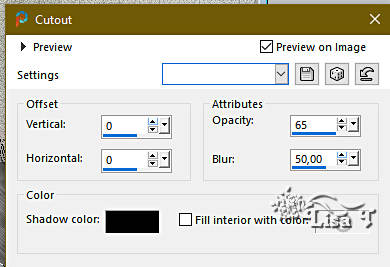
selections => select none
13
highlight top layer
copy / paste « T38 - personnage printemps » as
new layer
effects => 3D effects => drop shadow => 15 / 13
/ 65 / 45 / black
enable the Pick tool with the following settings, to move
the layer acurately => position X : 407 / position
Y : 116
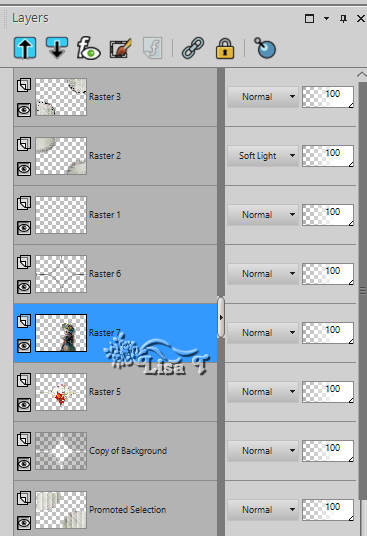
layers => arrange => move down so as the character
tube comes above the flowers placed in the middle of the
tag
arrange Raster 3 under the character
14
highlight top layer
copy / paste « T38 - Fleurs coins » as new
layer
effects => 3D effects => drop shadow => 5 / 5
/ 65 / 20 / black
image => resize => untick « resize all layers » => 85%
enable the Pick tool with the following settings, to move
the layer acurately => position X : 8 / position Y
: 4
15
copy / paste « T38 - Texte » as new layer
effects => 3D effects => drop shadow => 2 / 2
/ 65 / 25 / black
16
copy / paste « T38 - Fleurs rouges » as new
layer
effects => 3D effects => drop shadow => 2 / 2
/ 65 / 25 / black
enable the Pick tool with the following settings, to move
the layer acurately => position X : 642 / position
Y : 408
17
image => add borders => tick « symmetric » => ...
1 px color 1
5 px color 2
1 px color 1
edit => copy
18
selections => select all
image => add borders => tick « symmetric » => 42
px color 2
19
selections => invert
edit => paste into selection
adjust => blur => gaussian blur => 25
selections => invert
effects => 3D effects => drop shadow => 5 / 5
/ 65 / 20 / black
effects => 3D effects => drop shadow => -5 / -5
/ 65 / 20 / black
selections => select none
20
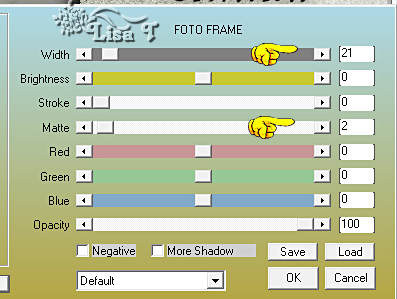
effects => plugins => AAA Frames => Foto Frame
21
apply your watermark or signature
write your licence number if you used a licenced tube
apply Shawnee’s watermark
22
image => add borders => tick « symmetric » => 1
px color 1
image => resize => tick « resize all layers » => 800
px width (or other size if you prefer)
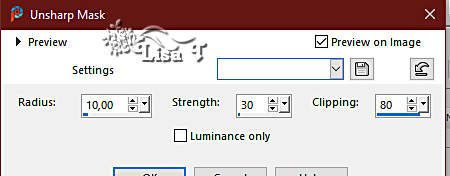
adjust => sharpness => unsharp mask
save your work as... type .jpeg

Another version with
my tubes and misted image


Don't hesitate to write to me if you have any trouble
with this tutorial
If you create a tag (using other tubes than those provided)
with this tutorial
and wish it to be shown, send it to Shawnee !
It will be a real pleasure for her to add it to the gallery
at the end of the tutorial

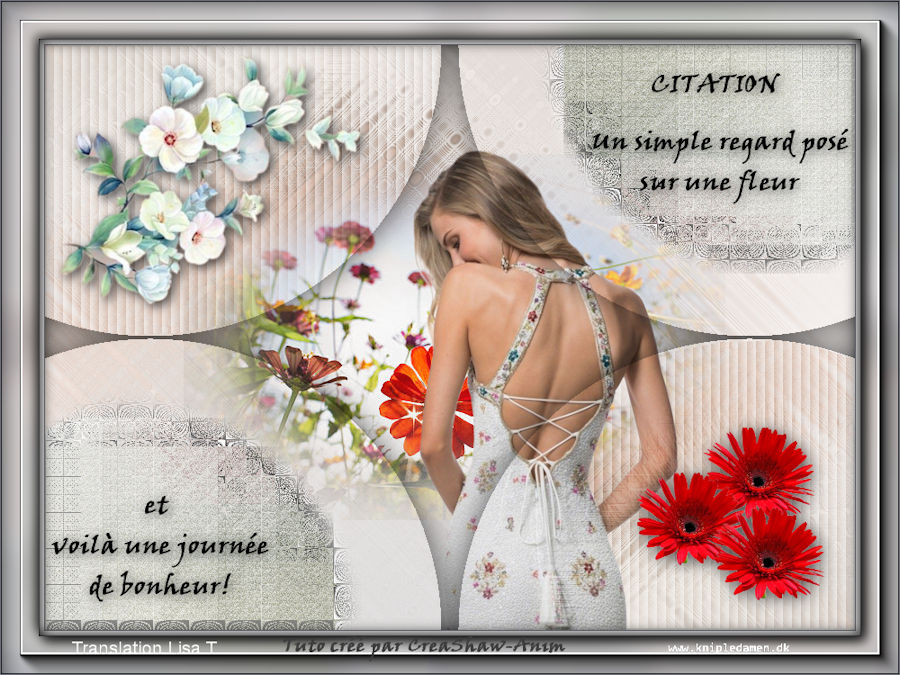
GALLERY
created by Knipledamen

back to the boards of Shawnee’s tutorials
20 tutorials on each board
board 2 => 
at the bottom of each board you will find the arrows
allowing you to navigate from one board to another


|