

You will find the original tutorial here :
This tutorial is a personal creation.
Any resemblance with another one would be only pure
coincidence.
It is stricly forbidden to modify tubes, to change
their name or take off the matermarks,
To present them on your sites or blog,
To share them in groups,
to make a bank of images, or to use them on lucrative purposes.

Thank you to respect Shawnee’s work and the tubers
work.
Don’t hesitate to warn me if you have any trouble
with this translation,
and I’ll try to fix the problem as quickly as I can

I used PSP 2020 to create my tag and make the translation
you can follow this tutorial with another version
of PSP, but the result might be slightly different

Supplies
1 mask - tubes – palette - Shawnee’s watermark – background
image - selections
TIP 1 -> if you don’t want to install a font -->
open it in a software as « Nexus Font » (or
other font viewer software of you choice)
as long as both windows are opened (software and font),
your font will be available in your PSP
TIP 2 -> from PSPX4, in the later versions of PSP the
functions « Mirror » and « Flip » have
been replaced by -->
« Mirror »has become --> image => mirror => mirror
horizontal
« Flip » has become --> image => mirror => mirror
vertical

Plugins needed
It@lian Editors Effect > Effeto Fantasma
Unlimited>ICNET>Boutons & Frames>Glass Frame
2

Thank you Renée Salon for sharing your plugins
page


Use the pencil to mark your place
along the way
hold down left click to grab and move it
 |

Prepare your work !
duplicate all the tubes and work with the copies
to preserve originals
open the mask and minimize to tray
save your work often in case of problems with your psp
use the Dropper tool to pick up your colors into your tubes
and misted images
Shawnee chose these :
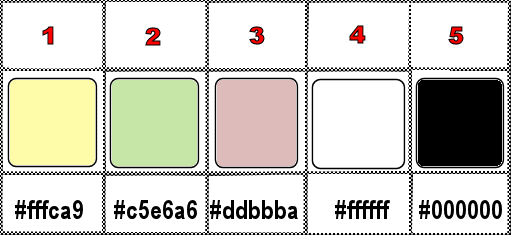
don’t hesitate to change blend modes and opacities
of the layers to match your personal colors and tubes
place the selections into the dedicated folder of My Corel
PSP General folder
1
open a new image => transparent => 900 * 650
px
selections => select all
copy / paste « T37 - Fond » into selection
selections => select none
2
effects => texture effects => Weave / color 3 & 2
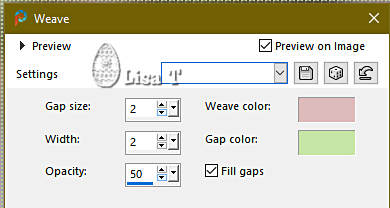
effects => edge effects => enhance more
3
layers => new raster layer
flood fill with color 1
layers => new mask layer => from image
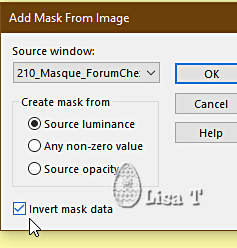
effects => edge effects => enhance more
layers => merge => merge group
4
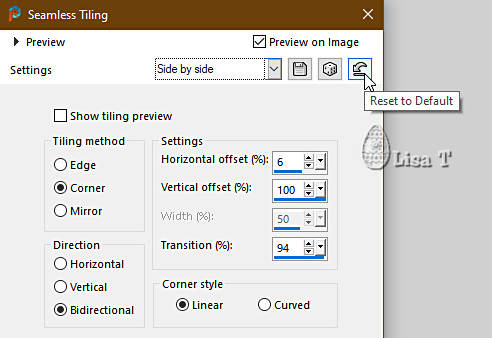
effects => image effects => seamless tiling => Side
by Side => default settings
5
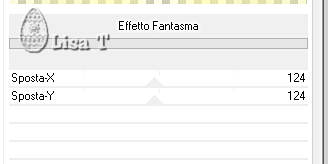
effects = > plugins => It@lian Editors Effects /
Effeto Fantasma
layers => merge => merge visible
6
selections => load-save selection => from disk => selection
#1
selections => promote selection to layer
selections => select none
objects => align => Center in Canvas
7
layers => new raster layer
selections => load-save selection => from disk => selection
#1
copy / paste « T37 - mist oeufs » into
selection
selections => select none
enable the Pick tool with the following settings, to move
the layer acurately => position X : 117 / position
Y : 41
hit the « M » key of your keyboard to disable
the tool
8
highlight layer below
adjust => blur => gaussian blur => 20
highlight top layer
layers => merge => merge down
9
highlight bottom layer
edit => copy
image => canvas size
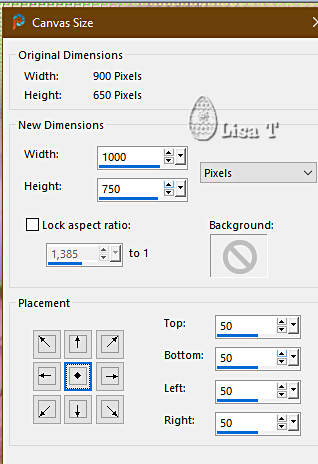
select the transparent part with the Magic Wand tool
layers => new raster layer
edit => paste into selection
selections => select none
10
highlight bottom layer
effects => plugins => Unlimited 2 => Buttons & Frames
/ Glass Frame 2 => 64 / 128
selections => select none
11
highlight top layer
blend mode of the layer : Luminance (Legacy)
12
selections => load-save selection => from disk => selection
#2
layers => new raster layer
copy / paste « T37 - Chocolats » into
selection
effects => 3D effects => Inner Bevel / White
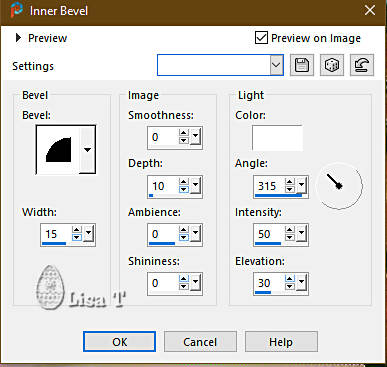
selections => select none
13
copy / paste « T37 - déco 1 - parachute » as
new layer
enable the Pick tool with the following settings, to move
the layer acurately => position X : 687 / position
Y : 97
effects => 3D effects => drop shadow => 2 / 0
/ 65 / 10 / black
14
copy / paste « T37 - déco 2 - lapinou » as new layer
image => resize => untick « resize all layers » => 85%
enable the Pick tool with the following settings, to move
the layer acurately => position X : 129 / position
Y : 169
effects => 3D effects => drop shadow => 10 / 10
/ 65 / 35 / black
15
copy / paste « T37 - déco 3 - lapin oeuf » as
new layer
image => resize => untick « resize all layers » => 55%
enable the Pick tool with the following settings, to move
the layer acurately => position X : 13 / position Y
: 518
effects => 3D effects => drop shadow => 2 / 2
/ 65 / 10 / black
16
copy / paste « T37 - déco 4 - lapin rose » as
new layer
image => resize => untick « resize all layers » => 65%
enable the Pick tool with the following settings, to move
the layer acurately => position X : 641 / position
Y : 360
effects => 3D effects => drop shadow => 2 / 2
/ 65 / 10 / black
17
copy / paste « T37 - déco 5 - panier » as new
layer
image => resize => untick « resize all layers » => 32%
enable the Pick tool with the following settings, to move
the layer acurately => position X : 325 / position
Y : 549
effects => 3D effects => drop shadow => 2 / 2
/ 65 / 10 / black
18
erase the part of the basket handle that is on the rabbit's
thumb
19
copy / paste « T37 - déco 6 - Sol oeufs » as
new layer
layers => merge => merge down 5 times (this layer
must be above the frame layer)
enable the Pick tool with the following settings, to move
the layer acurately => position X : 369 / position
Y : 571
20
layers => duplicate
image => mirror => mirror horizontal
enable the Pick tool with the following settings, to move
the layer acurately => position X : 693 / position
Y : 571
layers => merge => merge down
effects => 3D effects => drop shadow => 2 / 2
/ 65 / 10 / black
layers => move down => Twice
highlight top layer
21
copy / paste « T37 - déco 7 - Poussins et caneton » as
new layer
layers => merge => merge down (this layer must
be above the frame layer)
enable the Pick tool with the following settings, to move
the layer acurately => position X : 390 / position
Y : 382
effects => 3D effects => drop shadow => 2 / 2
/ 65 / 10 / black
layers => merge => merge visible
22
choose the font you want to use and a color (BG color in
the materials palette)
23
enable the « Preset Shape » tool / Ellipse
layers => new raster layer
draw the shape (color and place are not important)
layers => new raster layer
enable the « Text Tool »
DON’T add a new raster layer
place the tip of the cursor on the edge of the shape, until
a small tilted "T" appears to write your text
as soon as the smal « T » appears,
left click
write « Easter 2023 » (or another
text of your choice)
the text will follow the edge of the shape
once finished, validate by clicking on the check mark (top
menu => action => apply changes)
place and => convert to raster layer
you can delete the shape layer and the empty layers
text layer must be highlighted
24
layers => duplicate
layers => merge => merge down
effects => 3D effects => drop shadow => 1 / 1
/ 100 / 1 / black
place where you like
Shawnee duplicated this layer, palced the copy top left
and colorized this copy
layers => merge => merge all (flatten)
25
selections => select all
image => add borders => tick « symmetric » => 15
px white
selections => invert
26
prepare a sunburst gradient in materials palette (2 colors
you choose in the materials palette)
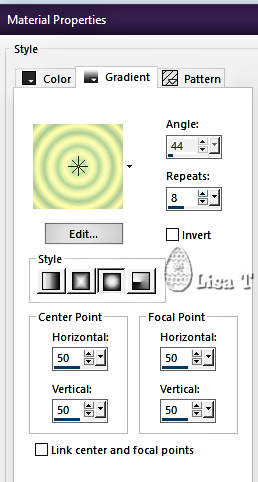
flood fill selection with the gradient
effects => 3D effects => drop shadow => -4 / 4
/ 48 / 9 / black
effects => 3D effects => drop shadow => 4 / -4
/ 48 / 9 / black
selections => select none
27
apply your watermark or signature
write your licence number if you used a licenced tube
apply Shwanee’s watermark
layers => merge => merge all (flatten)
image => resize => tick « resize all layers » => 800
px width (or other size if you prefer)
adjust => sharpness => unsharp mask
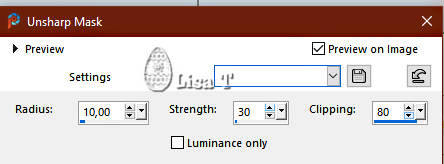
save your work as... type .jpeg

Another version with
my tubes and misted image


Don't hesitate to write to me if you have any trouble
with this tutorial
If you create a tag (using other tubes than those provided)
with this tutorial
and wish it to be shown, send it to Shawnee !
It will be a real pleasure for her to add it to the gallery
at the end of the tutorial


back to the boards of Shawnee’s tutorials
20 tutorials on each board
board X => 
at the bottom of each board you will find the arrows
allowing you to navigate from one board to another


|